Lập kế hoạch quản trị và quản lý vòng đời cho Microsoft Teams là rất quan trọng đối với các tổ chức sử dụng giải pháp giao tiếp và cộng tác trong Teams.
Trước khi triển khai Microsoft Teams, bạn nên xem xét những điều, chẳng hạn như ai có thể tạo nhóm, quy ước đặt tên nhóm là gì, có cho phép khách truy (guest) cập hay không, v.v.
Teams được xây dựng trên Microsoft 365 Groups (trước đây là Office 365 Groups), bao gồm một bộ công cụ phong phú để triển khai các khả năng quản trị mà tổ chức bạn cần.
Trong module này, bạn sẽ tìm hiểu các tính năng mà bạn có thể sử dụng để Quản trị Teams, chẳng hạn như tạo nhóm, phân loại, chính sách hết hạn và chính sách đặt tên.
Exercise 1: Triển Khai Governance and Lifecycle Management Cho Microsoft Teams
Task 1 – Tạo và Áp Đặt Expiration Policy
Bài lab hướng dẫn tạo expiration policy, sẽ xóa group Teams Rollout sau 90 ngày.
- Tại trình duyệt truy cập trang https://admin.microsoft.com bằng user têcủabạn@customdomain.
- Màn hình Microsoft 365 admin center, menu trái chọn Show All, và chọn Azure Active Directory.
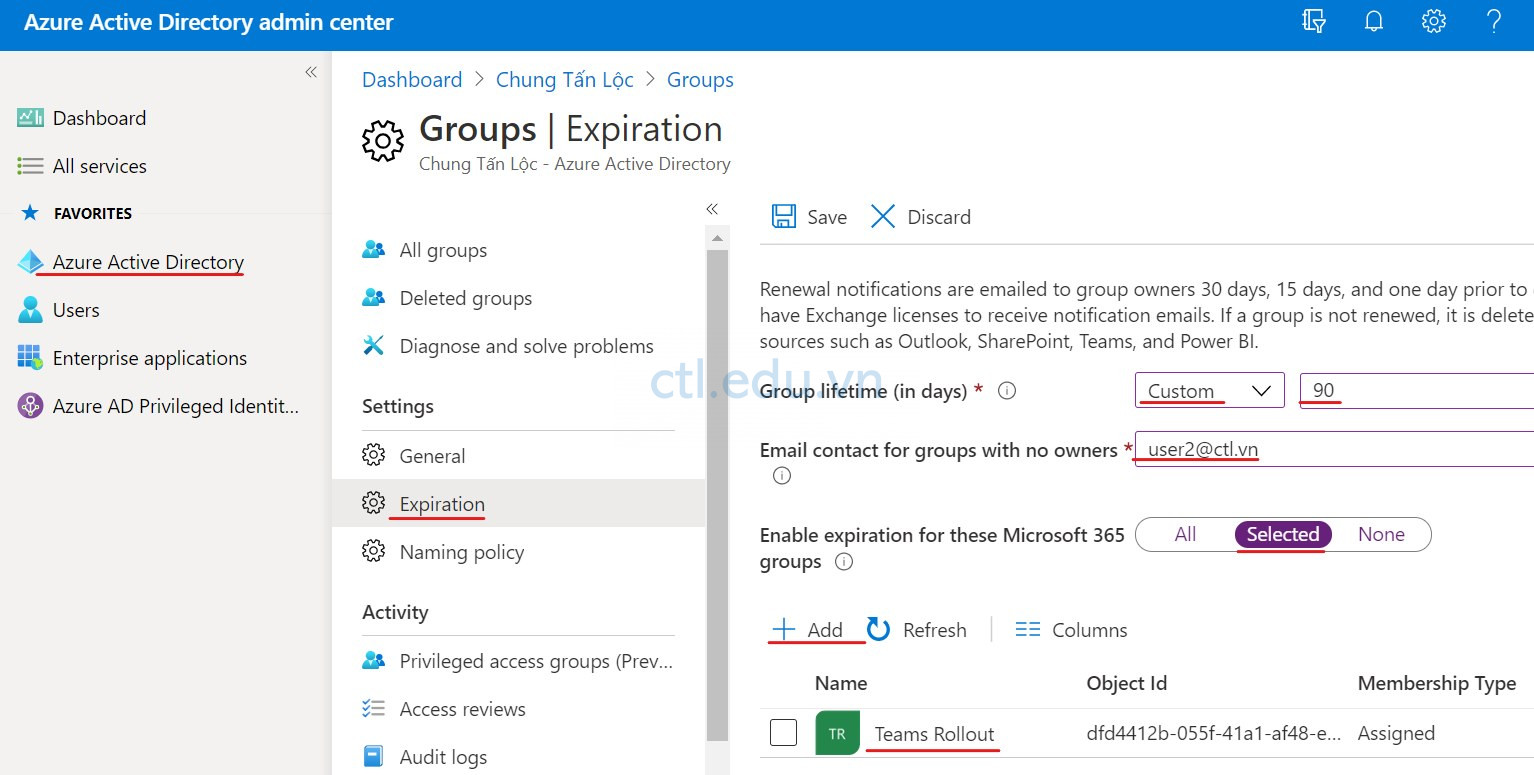
- Màn hình Azure Active Directory Admin Center, menu trái chọn Azure Active Directory, chọn Groups, và chọn Expiration.
- Màn hình Groups – Expiration, trong phần Group lifetime (in days) trong drop-down chọn Custom, ô bên phải Custom nhập vào 90.
- Trong phần Email contact for groups with no owners: nhập vào user2@customdomain
- Trong phần Enable expiration for the Office 365 groups, chọn Selected và ấn + Add, chọn group Teams Rollout ấn Select, ấn Save.
Task 2 – Tạo Group Creation Policy
Task này bạn sẽ tạo Group GroupCreators và chỉ định chỉ có thành viên của Group này mới có thể tạo Microsoft 365 groups
- Tại máy Windows 10 vào Start phải chuột vào Windows PowerShell chọn run as Administrator.
- Tại PowerShell thực hiện lệnh sau để cài Module AzureADPreview: (Ấn Y khi có yêu cầu)
Install-Module AzureADPreview
3. Thực hiện lệnh sau để Connect đến Azure AD bằng user têncủabạn@customdomain
Connect-AzureAD
4. Dùng lệnh sau để tạo security group “GroupCreators”:
New-AzureADGroup -DisplayName “GroupCreators” -SecurityEnabled:$true -MailEnabled:$false -MailNickName “GroupCreators”
5. Thực hiện lệnh sau để add user4 vào group:
Get-AzureADGroup -SearchString “GroupCreators” | Add-AzureADGroupMember -RefObjectId (Get-AzureADUser -SearchString “user4”).ObjectId
6. Tạo file c:GroupCreators.ps1 có nội dung sau: (file này có trong thư mục Allfile)
$GroupName = “GroupCreators”
$AllowGroupCreation = “False”
Connect-AzureAD
$settingsObjectID = (Get-AzureADDirectorySetting | Where-object -Property Displayname -Value “Group.Unified” -EQ).id
if(!$settingsObjectID)
{
$template = Get-AzureADDirectorySettingTemplate | Where-object {$_.displayname -eq “group.unified”}
$settingsCopy = $template.CreateDirectorySetting()
New-AzureADDirectorySetting -DirectorySetting $settingsCopy
$settingsObjectID = (Get-AzureADDirectorySetting | Where-object -Property Displayname -Value “Group.Unified” -EQ).id
}
$settingsCopy = Get-AzureADDirectorySetting -Id $settingsObjectID$settingsCopy[“EnableGroupCreation”] = $AllowGroupCreation
if($GroupName)
{
$settingsCopy[“GroupCreationAllowedGroupId”] = (Get-AzureADGroup -SearchString $GroupName).objectid
}
else {
$settingsCopy[“GroupCreationAllowedGroupId”] = $GroupName
}
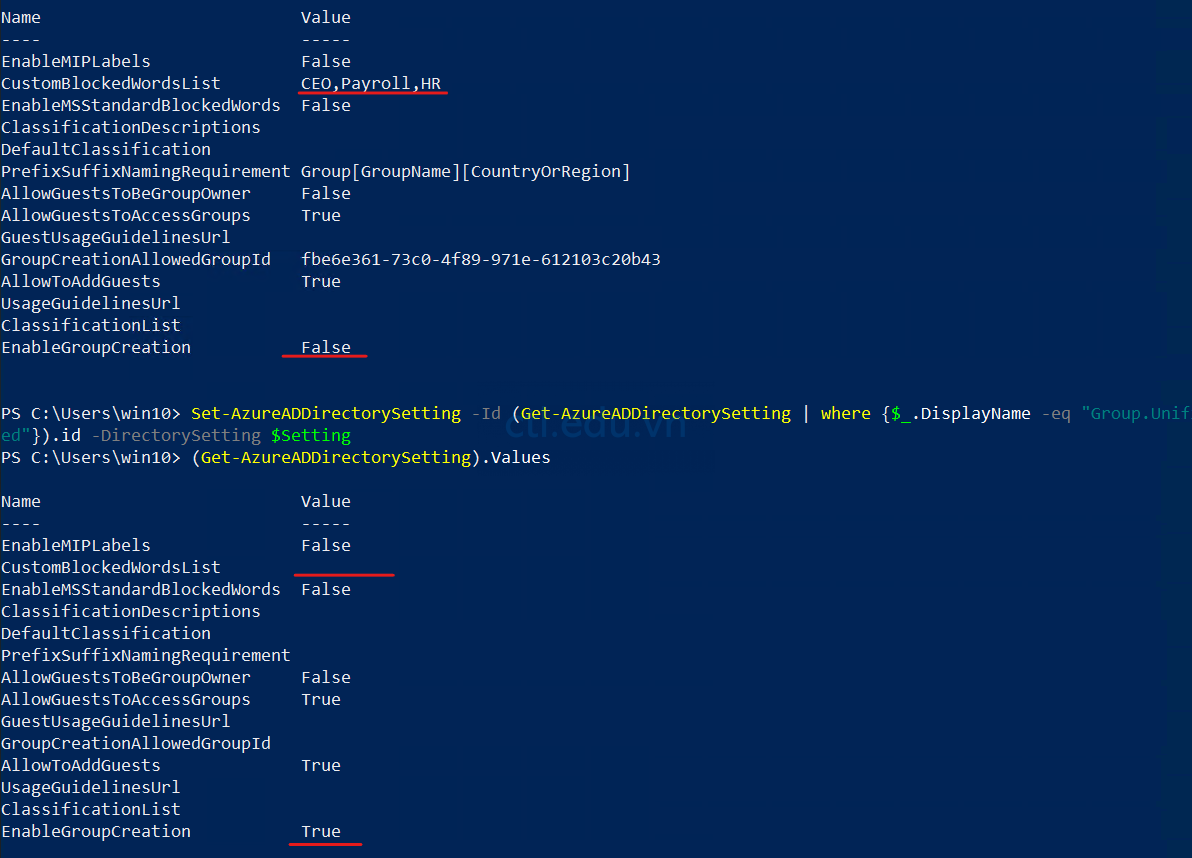
Set-AzureADDirectorySetting -Id $settingsObjectID -DirectorySetting $settingsCopy
(Get-AzureADDirectorySetting -Id $settingsObjectID).Values
7. Tại Powershell thực hiện lệnh:
cd
.GroupCreators.ps1
8. Tại máy windows 10 đã cài Office 365, chọn icon Microsoft Teams trên desktop để khởi động Teams Desktop client.
9. Khi có yêu cầu đăng nhập vào user1@customdomain.
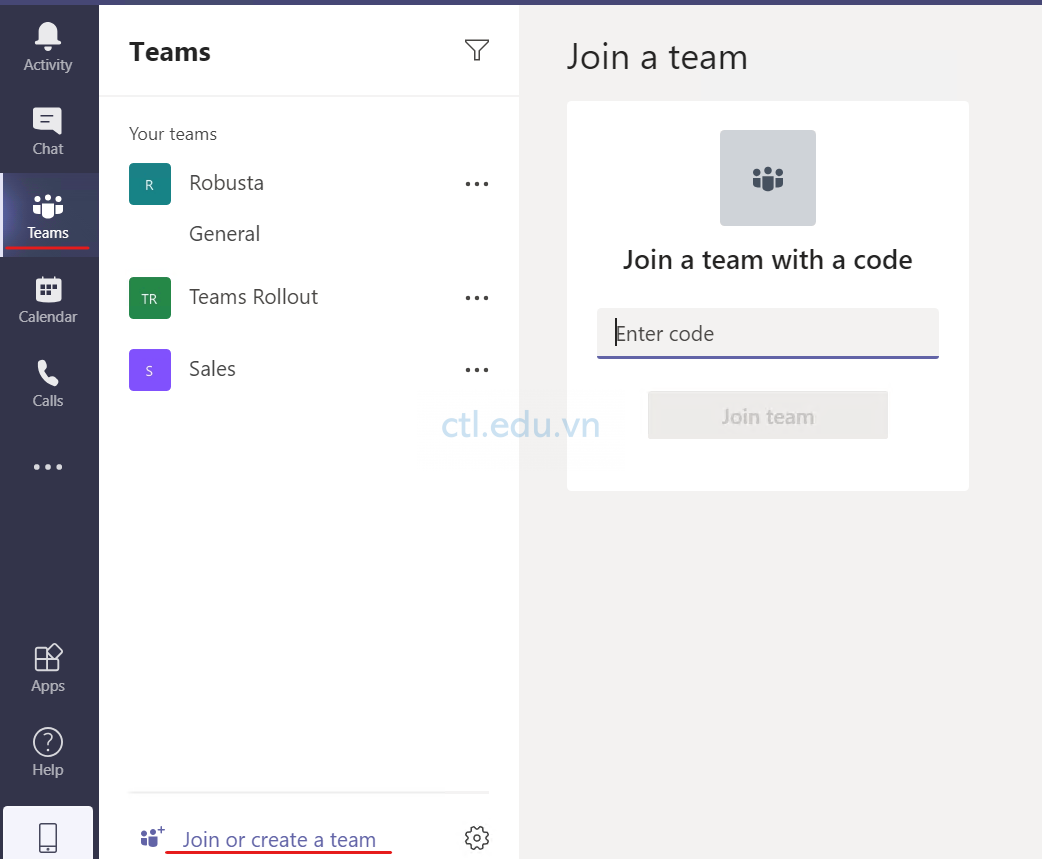
10. Màn hình Microsoft Teams Desktop, menu trái chọn Teams, và chọn Join or create a team, user1 không thể Create Team
11. Tại Teams Desktop client ở gốc trên bên phải chọn icon user chọn sign out, sign in lại bằng user4@customdomain
12. Màn hình Microsoft Teams Desktop, menu trái chọn Teams, và chọn Join or create a team, user4 có thể Create Team
Task 3 – Cấu Hình Chính Sách Đặt Tên
Task này bạn sẽ tạo policy qui định cách đặt tên khi tạo Microsoft 365 Group hay Team mới.
- Tại trình duyệt truy cập trang https://admin.microsoft.com bằng user têcủabạn@customdomain.
- Màn hình Microsoft 365 admin center, menu trái chọn Show All, và chọn Azure Active Directory.
- Màn hình Azure Active Directory Admin Center, menu trái chọn Azure Active Directory, chọn Groups, và chọn Naming policy
- Tại tab Blocked words, ấn Download, mở file BlockedWords.csv vừa download bằng Notepad
- Nhập CEO,Payroll,HR thay cho 2 dấu nháy như trong hình, ấn Save. (Group không được dùng các từ này)
- Trở lại tab Blocked words, ở bước thức 3, upload file BlockedWords.csv, ấn Save.

7. Tại cửa sổ Naming policy, chọn tab Group naming policy, Check vào Add prefix, drop-down menu chọn string, và nhập vào Group ở ô kế bên.
8. Check vào Add suffix, drop-down menu chọn Attribute, và chọn CountryOrRegion ở ô kế bên.
9. Ấn Save.

Task 4 – Xóa Các Cấu Hình Azure AD
Bạn có thể hoàn nguyên các thay đổi cài đặt Azure AD về mặc định bằng các bước sau:
- Tại máy Windows 10 vào Start phải chuột vào Windows PowerShell chọn run as Administrator.
- Thực hiện lệnh sau để Connect đến Azure AD bằng user têncủabạn@customdomain
Connect-AzureAD
3. Dùng lệnh sau để load unifed group template
$Template = Get-AzureADDirectorySettingTemplate | Where {$_.DisplayName -eq “Group.Unified”}
4. Dùng lệnh sau để tạo Azure AD tenant settings rỗng:
$Setting = $Template.CreateDirectorySetting()
5. Kiểm tra Cấu hình Azure AD tenant settings trong template:
$Setting.Values
6. Kiểm tra cấu hình hiện tại trong Azure AD tenant settings, so sánh với các giá trị trong biến $Setting chứa trong default template:
(Get-AzureADDirectorySetting).Values
7. Áp dụng default settings, để hoàn nguyên tất cả các thay đổi:
Set-AzureADDirectorySetting -Id (Get-AzureADDirectorySetting | where {$_.DisplayName -eq “Group.Unified”}).id -DirectorySetting $Setting
8. Kiểm tra lại Azure AD tenant settings, đã trở về chế độ mặc định.
(Get-AzureADDirectorySetting).Values
Exercise 2: Triển Khai security Cho Microsoft Teams
Task 1 – Cấu Hình ATP Cho Microsoft Teams
Phần này bạn sẽ tạo ATP policy để block các tài liệu có chứa phần mềm độc hại chia sẽ qua Microsoft Teams.
- Tại trình duyệt truy cập trang https://security.microsoft.com bằng user têcủabạn@customdomain.
- Màn hình Microsoft 365 Security, menu trái chọn Policies & rules.
- Cửa sổ Policies & Rules, Chọn Threat policies vào chọn safe attachments.

4. Màn hình Safe attachments, chọn Global settings, xuất hiện cửa sổ bên phải, trong phần Turn on Defender for Office 365 for SharePoint, OneDrive, and Microsoft Teams chọn On.
5. Ấn Save.

Exercise 3: Triển Khai Compliance Cho Microsoft Teams
Task 1 – Tạo New Retention Policy Cho Team
Phần này bạn sẽ tạo retention policy để giữ lại nội dung của Team “Sales” Team 7 năm kễ từ lần modify cuối cùng.
- Tại trình duyệt truy cập trang https://compliance.microsoft.com/ bằng user têcủabạn@customdomain.
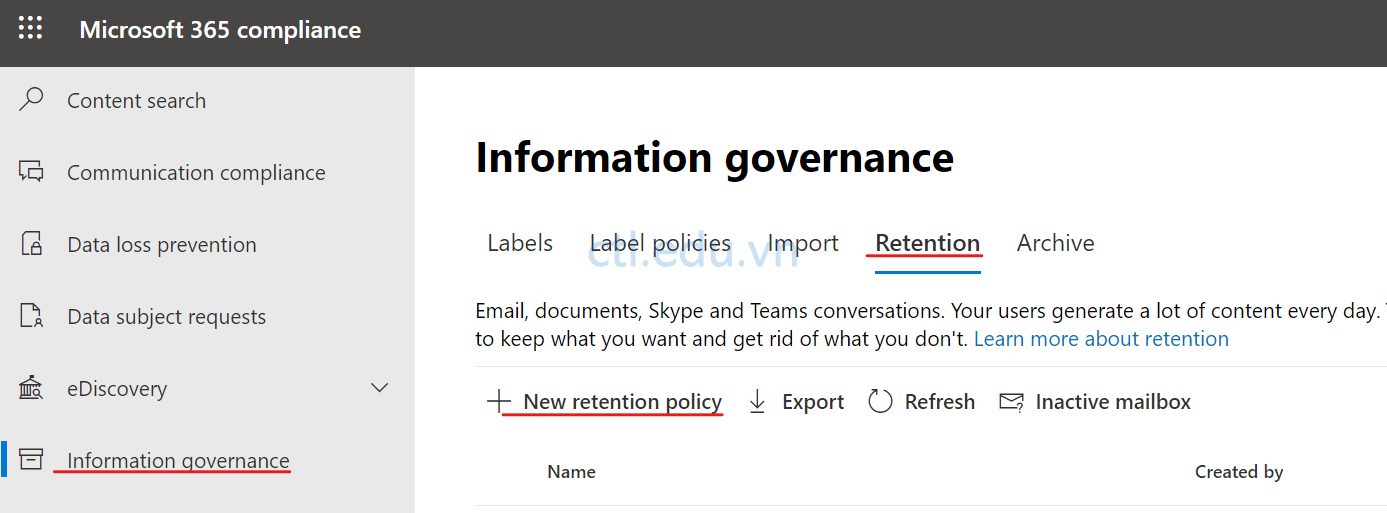
- Màn hình Microsoft 365 compliance, menu trái, kéo thanh xuống dưới chọn information governance, cửa sổ bên phải chọn tab Retention Policies.
- Màn hình Retention Policies, ấn New retention policy,
4. Cửa sổ Name your policy, trong phần Name nhập vào Sales retention policy, trong phần Description nhập vào Retention policy for Sales department that will retain data for 7 years, ấn Next.
5. Màn hình Choose the type of retention policy to create, chọn Option Static, ấn Next
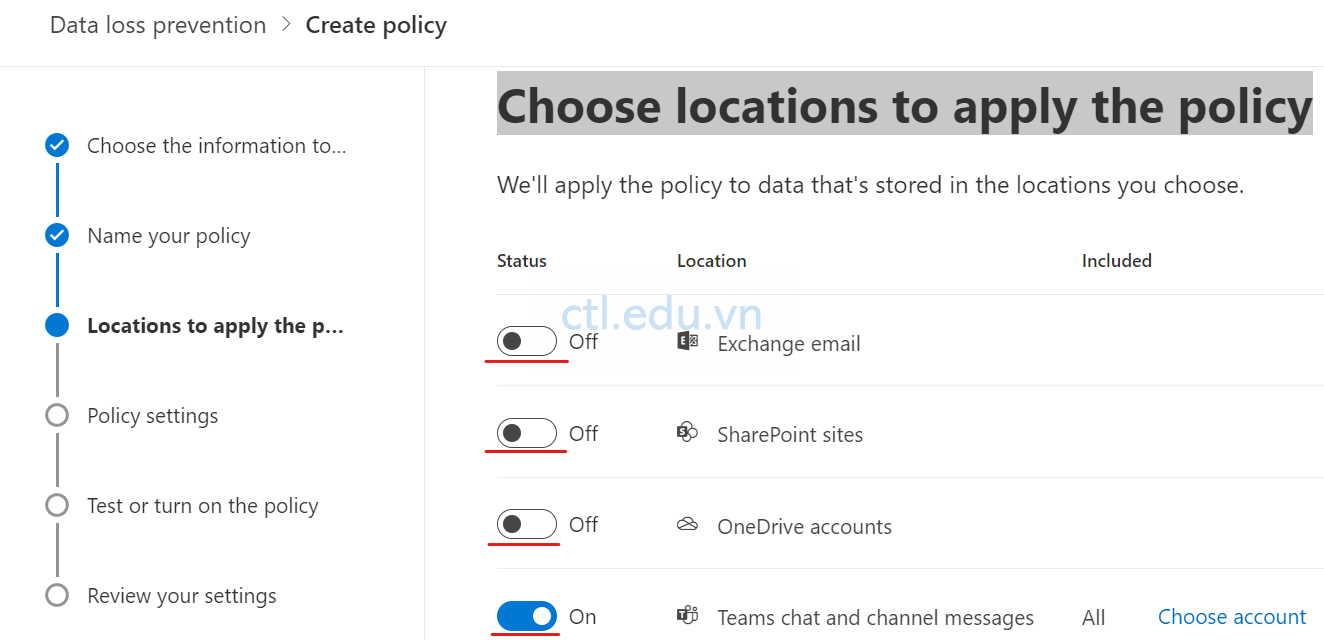
6. Cửa sổ Choose locations to apply the policy, kéo thanh trượt đến Teams channel messages, chọn On và click Choose teams.
7. Cửa sổ Edit locations, ấn Choose teams, chọn Team Sales, ấn Choose ấn Done.
8. Cửa sổ Decide if you want to retain content, delete it, or both nhập các thông tin sau:
- Chọn option Retain Items for a specific period
- Retain Items for a specific period… 7 years
- Trong phần Start the Retention period based on chọn when it was last modified
- Trong phần At the end of the specific period chọn option Do Nothing
- Ấn Next
9. Ấn Next ấn Submit.

Task 2 – Tạo DLP policy cho GDPR (PII) Content Từ Template
Task này bạn sẽ tạo DLP policy từ template, để phát hiện những thông tin nhạy cảm có bị chia sẽ với người bên ngoài tổ chức của bạn hay không?
- Tại trình duyệt truy cập trang https://compliance.microsoft.com/ bằng user têcủabạn@customdomain.
- Màn hình Microsoft 365 compliance, menu trái, kéo thanh trượt xuống dưới chọn Data loss prevention, chọn tab Policies chọn tab + Create policy.
- Cửa sổ Start with a template or create a custom policy, trong phần search nhập vào GDPR, chọn General Data Protection Regulation (GDPR), ấn Next.

4. Cửa sổ Name your policy nhập các thông tin sau:
- Name: GDPR DLP Policy
- Description: Data loss prevention policy for GDPR regulations in Teams.
- Ấn Next.
5. Cửa sổ Choose locations to apply the policy, chọn Off tất cả, chỉ Teams chat and channel messages: On ấn Next.
6. Cửa sổ Define policy settings, chọn option Review and customize default settings from the template. ấn Next.
7. Cửa sổ Info to protect, check vào checkbox Detect when this content is shared from Microsoft 365, chọn option with people outside my organization, ấn next
8. Cửa sổ Protection actions, check vào tất cả các checkbox, trong phần At least nhập vào 1, ấn next.

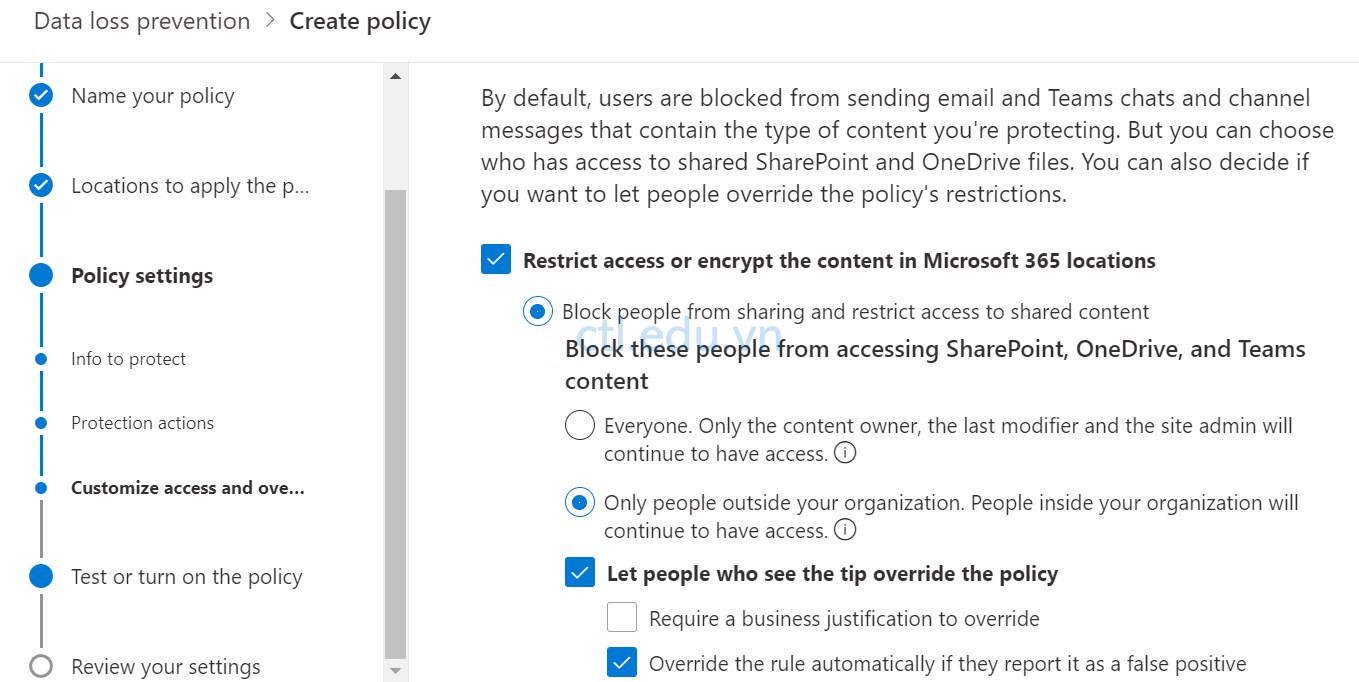
9. Cửa sổ Customize access and override settings, để mặc định ấn next
10. Cửa sổ Test or turn on the policy, chọno ption I’d like to test it out first, check vào check box Show policy tips while in test mode, ấn next
10. Ấn Submit. (phải mất ít nhất 1 giờ chính sách mới áp đặt)
Hoàn Tất Bài Lab
Lab Microsoft Teams Module 2