Tổ chức của bạn đang lên lên kế hoạch triển khai Microsoft Teams. Trước khi bắt đầu triển khai, bộ phận CNTT phải thu thập các nhu cầu hoạt động kinh doanh của công ty để về bảo mật dữ liệu, bao gồm cả cách dữ liệu được chia sẻ trong Teams được quy định theo các yêu cầu tuân thủ của tổ chức.
Ngoài ra còn có những lo ngại về cơ sở hạ tầng mạng hiện tại có đáp ứng các yêu cầu của các dịch vụ của Microsoft Teams. Do đó, bạn cần phân tích cơ sở hạ tầng mạng hiện tại và thực hiện tính toán băng thông. Dựa trên ước tính của bạn, bạn có thể cung cấp các đề xuất cho nhóm quản trị mạng.
Sau khi bạn hoàn tất quá trình lập kế hoạch, bạn sẽ bảo vệ Teams khỏi các mối đe dọa và định cấu hình Teams để đáp ứng các yêu cầu tuân thủ của tổ chức bạn.
Exercise 1: Tính Toán Khả Năng Kết Nối Mạng
Task 1. Tính Dung Lượng Băng Thông Mạng
- Tại trình duyệt truy cập trang https://admin.teams.microsoft.com bằng user têncủabạn@customdomain
- Màn hình Microsoft Teams admin center, Menu trái chọn Planning, và chọn Network Planner.
- Màn hình Network planner, tại tab Network plans, ấn Add.
- Xuất hiện màn hình Network plan name, trong phần Network plan name nhập vào Tan Loc Plan, trong phần Description nhập vào Tan Loc Teams Network plan, ấn Apply.
- Trở lại màn hình Network planner, chọn tab Personas, ấn +Add.
- Cửa sổ Add persona, trong phần Persona name nhập vào New York office, trong phần Description Nhập vào New York office Teams users, trong phần Permissions chọn On tất cả, ấn Apply.
- Trở lại Cửa sổ Add persona, tiếp tục ấn +Add, trong phần Persona name nhập vào Los Angeles office, trong phần Description nhập Los Angeles office Teams users, trong phần Permissions, PSTN chọn OFF và chọn On tất cả, ấn Apply.
- Chọn lại tab Networks plans, chọn Tan Loc Plan, tại tab Network sites, ấn Add a network site.
- Cửa sổ Network site, nhập các thông tin sau:
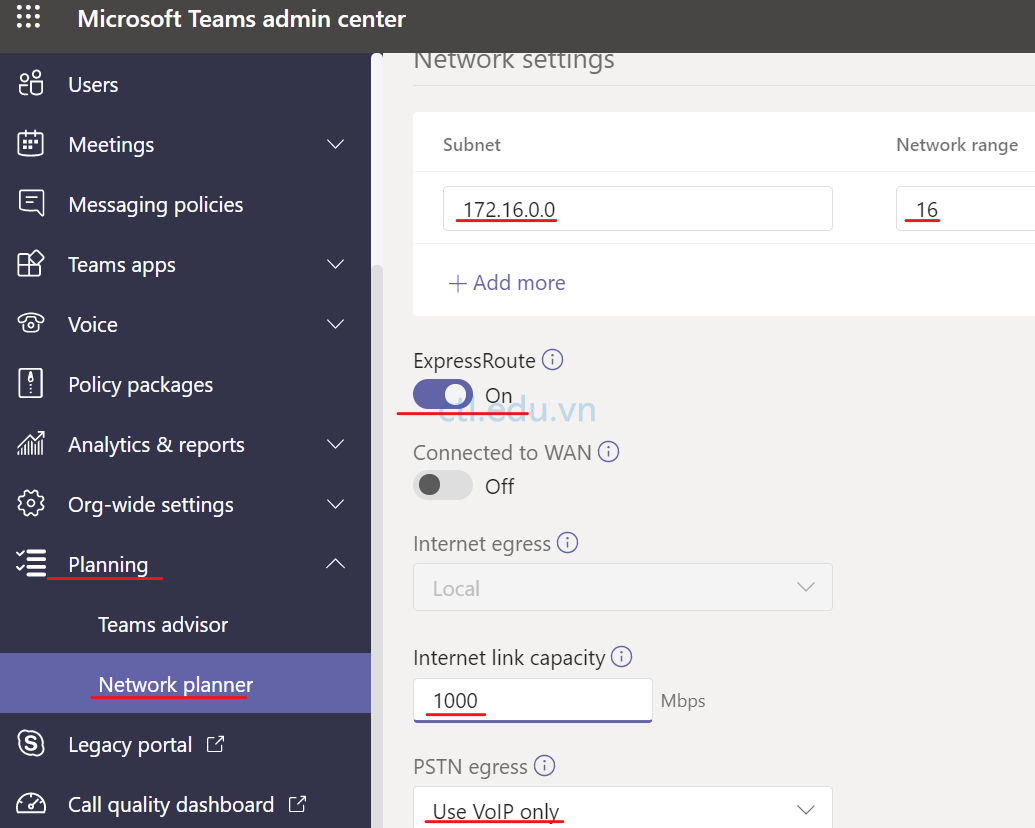
- Network site name: New York HQ site
- Description: New York HQ site network infrastructure
- Network users: 1000
- Network settings: trong phần subnet nhập 172.16.0.0, Network range: 16
- Express Route: chọn On.
- Internet link capacity: 1000
- PSTN egress: chọn Use VoIP only,
- ấn Save.
10. Trở lại cửa sổ Tan Loc Plan, tại tab Network sites, ấn Add a network site.
11. Cửa sổ Network site, nhập các thông tin sau:
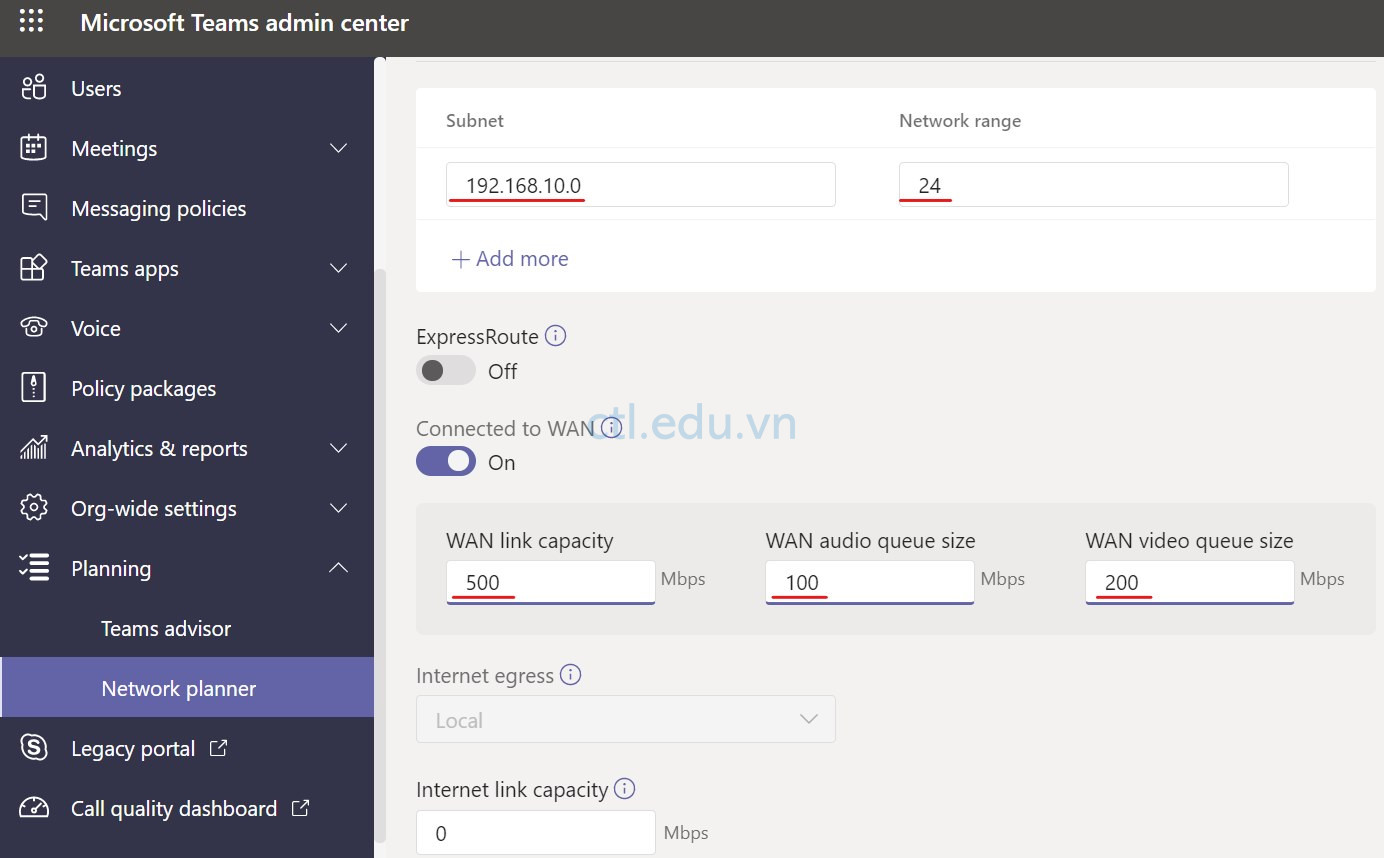
- Network site name: Los Angeles site
- Description: Los Angeles site network infrastructure
- Network users: 250
- Network settings: trong phần subnet nhập 192.168.10.0, Network range: 24
- Express Route: chọn OFF.
- Connected to WAN: chọn ON, WAN link capacity: 500, WAN audio queue size: 100, Video queue size: 200
- PSTN egress: chọn Use VoIP only,
- ấn Save.
12. Trở lại cửa sổ Tan Loc Plan, tại tab Network sites, ấn Add a network site.
13. Cửa sổ Network site, nhập các thông tin sau:
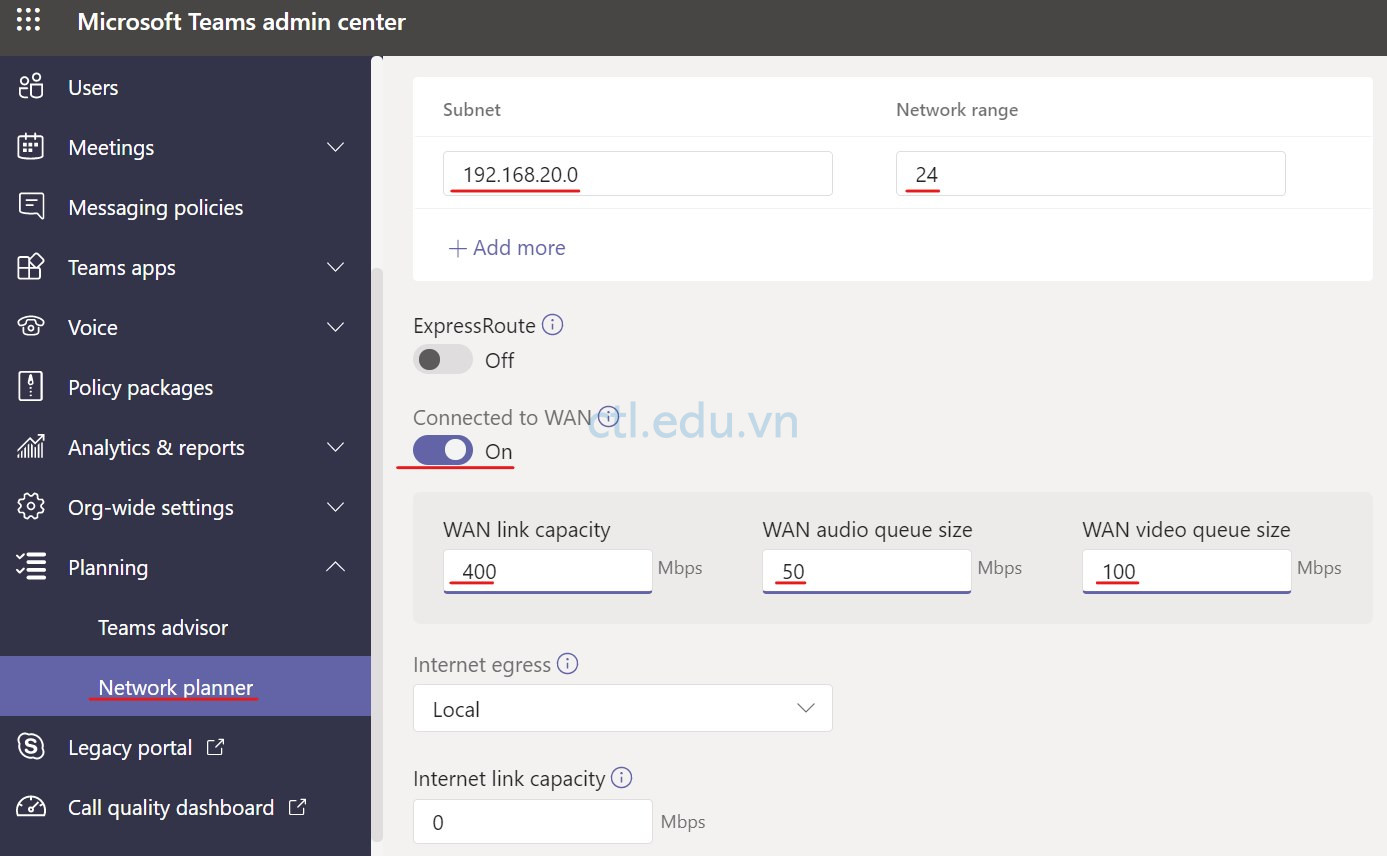
- Network site name: Houston site
- Description: Houston site network infrastructure
- Network users: 150
- Network settings: trong phần subnet nhập 192.168.20.0, Network range: 24
- Express Route: chọn OFF.
- Connected to WAN: chọn ON, WAN link capacity: 400, WAN audio queue size: 50, Video queue size: 100
- PSTN egress: chọn Use VoIP only,
- ấn Save.
14. Trở lại cửa sổ Tan Loc Plan, chọn tab Report, ấn Start a report.
15. Trong phần Report name: nhập vào Tan Loc report, description: Tan Loc network estimation report.
16. Trong phần Calculation, xem lại các giá trị của mỗi site, và ấn Generate report.
17. Trong phần Reports, xem kết quả phân tích về băng thông cần thiết cho audio, video, screen sharing, Office 365 traffic, và PSTN.
18. Trong report, ấn Switch to chart view ở gốc trên bên phải để xem báo cáo dạng đồ thị.

Task 2 – Dùng Network Testing Companion
Phần này bạn sẽ kiểm tra chất lượng mạng kết nối với Microsoft Teams
- Tại máy Windows 10 vào Start phải chuột vào Windows PowerShell chọn run as Administrator.
- Tại PowerShell thực hiện lệnh sau để cài Network Testing Companion: (Ấn Y khi có yêu cầu)
Install-Module -Name NetworkTestingCompanion
3. Dùng lệnh sau để tạo shortcut trên desktop:
Invoke-ToolCreateShortcuts
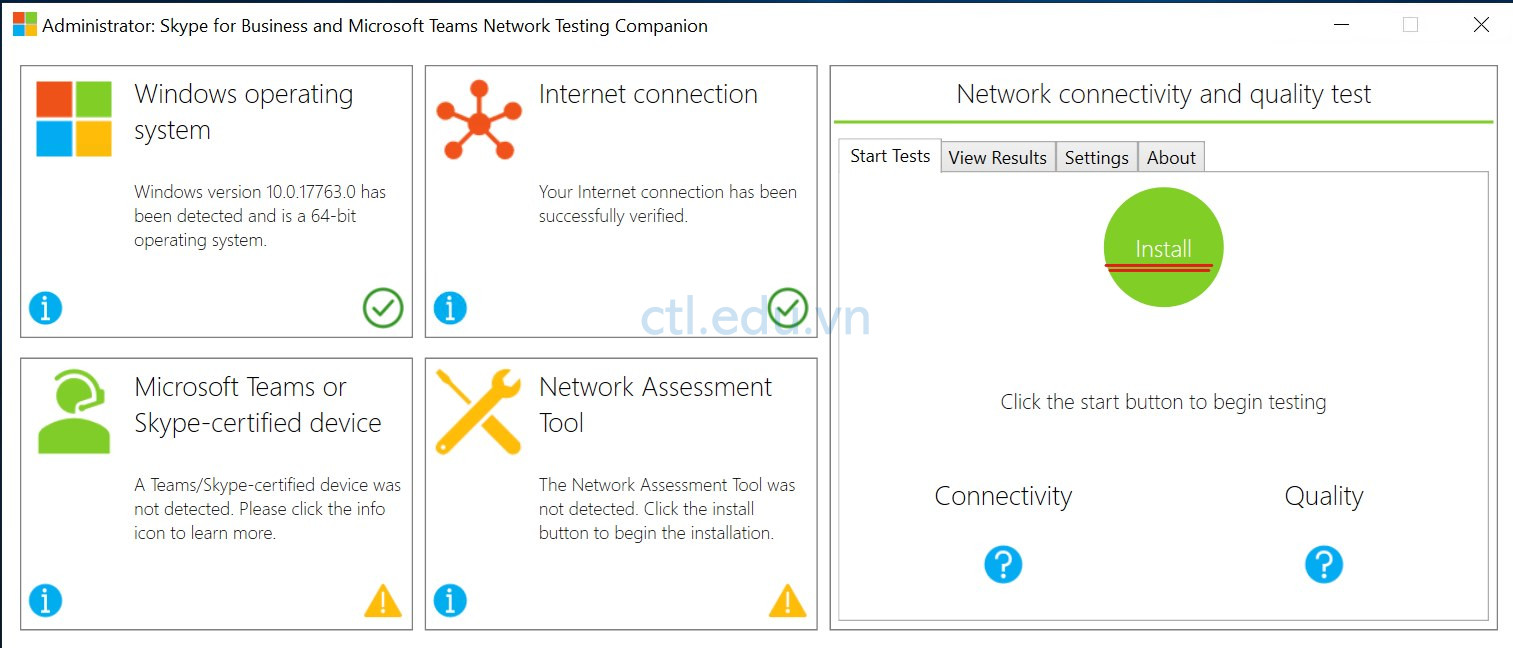
4. Double click vào shortcut vừa tạo trên desktop, chọn Install để cài Network Assessment Tool. chờ vài giây ấn Start, Chờ kiểm tra xong xong.
5. Cửa sổ Skype for Business and Microsoft Teams Network Testing Companion, xem các thông tin trong các ô Windows operating system, Internet connection, và Network Assessment tool, đảm bảo rằng không có lỗi.
6. Sau khi hoàn tất chọn tab View Results để xem kết quả.
Exercise 2: Triển Khai Teams Device Profiles
Task 1 – Tạo Configuration Profiles
Task này bạn sẽ tạo và thiết lập cấu hình configuration profile cho Teams device. Khi có devices mới được triển khai, bạn sẽ áp đặt configuration profiles cho devices đó.
- Tại trình duyệt truy cập trang https://admin.teams.microsoft.com bằng user user2@customdomain
- Màn hình Microsoft Teams admin center, Menu trái chọn Devices, và chọn Phones.
- Cửa sổ Phones, chọn tab Configuration profiles ấn +Add.
- Xuất hiện cửa sổ mới nhập các thông tin sau:
- Configuration profile Name: New York Teams Desk Phones
- Description: Configuration profile for Teams Desk Phones in New York HQ
5. Trong phần General nhập các thông tin sau:
- Device lock: On
- Timeout: 30 seconds
- PIN: 123456
- Language: English (United States)
- Timezone: (UTC+7:00) Bangkok, Hanoi, Jakarta
- Date format: MM/DD/YYYY
- Time format: 12 Hours (AM/PM)
6. Trong phần Device settings nhập các thông tin sau:
- Display screen saver: On, Timeout: 1 minute
- Display high contrast: On
- Office hours: 08:00-17:00
- Power Saving: On
7. Trong phần Network settingsnhập các thông tin sau:
- DHCP enabled: On
- Logging enabled: Off
- Device’s default admin password: Pass@word1
8. Ấn Save

Task 2 – Tạo Microsoft Teams Room
1. Tại máy Windows 10, vào Windows PowerShell, thực hiện lệnh sau để cài Microsoft Azure Active Directory Module for Windows PowerShell: (ấn Y khi có yêu cầu)
Install-Module MSOnline
2. Thực hiện tiếp lệnh sau để kết nối đến Azure Active Directory:
Connect-MsolService (nhập vào user name và password của têncủabạn@customdomain)
3. Thực hiện lệnh sau để giảm security:
Set-ExecutionPolicy unrestricted (ấn Y khi có yêu cầu)
4. Thực hiện các lệnh sau để kết nối đến remote Exchange Online dùng remote PowerShell. Sử dụng username và password của têncủabạn@customdomain
- Install-Module -Name ExchangeOnlineManagement
- Connect-ExchangeOnline -UserPrincipalName têncủabạn@customdomain -ShowProgress $true -ConnectionUri https://outlook.office365.com/powershell-liveid/ -AzureADAuthorizationEndPointUri https://login.microsoftonline.com/common
5. Sử dụng lệnh sau để tạo room mailbox có tên là NY-TeamsRoom1 (lưu ý nhớ thay customdomain thành domain của bạn):
New-Mailbox -Name “NY-TeamsRoom1” -Alias NY-TeamsRoom1 -Room -EnableRoomMailboxAccount $true -MicrosoftOnlineServicesID NY-TeamsRoom1@customdomain -RoomMailboxPassword (ConvertTo-SecureString -String ‘pass@word1’ -AsPlainText -Force)
6. Thực hiện lệnh sau để set các thông số cho Room mailbox:
Set-CalendarProcessing -Identity “NY-TeamsRoom1” -AutomateProcessing AutoAccept -AddOrganizerToSubject $false -DeleteComments $false -DeleteSubject $false -RemovePrivateProperty $false -AddAdditionalResponse $true -AdditionalResponse “This is a Teams Meeting room”
7. Dùng lệnh sau để kết nối đến Azure AD PowerShell:
Connect-AzureAD (nhập vào user name và password của têncủabạn@customdomain)
8. Dùng lệnh sau để Disable password expiration cho Teams Room account NY-TeamsRoom1:
Set-AzureADUser -ObjectId NY-TeamsRoom1@customdomain -PasswordPolicies DisablePasswordExpiration (thay customdomain thành domain của bạn)
9. Đóng cửa sổ PowerShell.

10. Tại trình duyệt truy cập trang https://admin.microsoft.com bằng user têncủabạn@customdomain
11. Màn hình Microsoft 365 admin center, menu trái chọn Billing và chọn Purchase services.
12. Cửa sổ Purchase services, trong phần search nhập vào Meeting Room và enter.
13. Trong phần kết quả Collaboration and communication, chọn Microsoft Teams Rooms Standard và chọn Get free trial.
14. Cửa sổ Check out, ấn Try now, cửa sổ order receipt, ấn Continue.
15. Màn hình Microsoft 365 admin center, menu trái chọn Users, và chọn Active Users.
16. Chọn NY-TeamsRoom1@customdomain, cửa sổ bên phải chọn tab Licenses and Apps, check vào Microsoft Teams Rooms Standard, ấn Save change.

Hoàn Tất Bài Lab