Tạo Teams và quản lý các tính năng của Teams là một khía cạnh quan trọng trong việc quản lý trải nghiệm Teams cho người dùng của bạn. Sự tăng trưởng quá mức mà không có sự giám sát và quản lý sẽ dẫn đến tình trạng thiếu thông và gây nhầm lẫn.
Trong bài lab này, bạn sẽ tìm hiểu về cách tạo Teams bằng các công cụ quản lý khác nhau và cấu hình các tính năng của Microsoft Teams.
Exercise 1: Manage Team Resources
Task 1 – Tạo Team Từ Microsoft 365 Group
Phần này bạn sẽ tạo team từ group IT-Department bạn đã tạo từ Lab 3.
- Tại máy Windows 10, chọn Microsoft Teams trên Desktop, sign in bằng user2@customdomain.
- Menu trái chọn Teams, chọn Join or create a team, và chọn Create a team.
- Cửa sổ Create your team, ấn Create from…, chọn tiếp Microsoft 365 group, chọn group IT-Department, ấn Create. Chờ tạo xong.
- Chọn vào … bên phải team IT-Department vừa tạo, chọn Manage team.
- Quan sát User2 đang là Owners, Trong phần Members and guests đã có sẳn các thành viên.

Task 2 – Tạo Team Dùng PowerShell
- Tại máy Windows 10 vào Start phải chuột vào Windows PowerShell chọn run as Administrator.
- Tại PowerShell thực hiện lệnh sau để kiểm tra version của Microsoft Teams module:
If ((Get-Command New-TeamChannel -ParameterName ‘MembershipType’ -ErrorAction Ignore) -eq $Null) {“Close PowerShell and install the Teams public preview module.”} else {“Continue with the current module.”}
- Nếu bạn nhận được kết quả Close PowerShell and install the Teams public preview module, bạn phải đóng PowerShell và thực hiện các lệnh tiếp theo.
- Nếu bạn nhận được kết quả Continue with the current module, thì bạn bỏ qua các bước từ bước 3 đến bước 8, thực hiện tiếp bước 9.
3. Đóng cửa sổ PowerShell, vào Start phải chuột vào Windows PowerShell chọn run as Administrator. (vào lại Powershell mới thực thi các lệnh tiếp theo)
4. Tại PowerShell thực hiện lệnh gỡ version hiện tại:
Uninstall-Module MicrosoftTeams
5. Thực hiện lệnh sau để cài version khác:
Install-Module -Name PowerShellGet -RequiredVersion 2.2.4.1 -Force
6. Đóng cửa sổ PowerShell, vào Start phải chuột vào Windows PowerShell chọn run as Administrator. (vào lại Powershell mới thực thi các lệnh tiếp theo)
7. Thực hiện lệnh sau để cài Microsoft Teams PowerShell public preview module:
Install-Module -Name MicrosoftTeams -RequiredVersion 1.1.3-preview -AllowPrerelease -AllowClobber (Ấn Y khi có yêu cầu)
8. Thực hiện lệnh sau để kiểm tra lại version.
If ((Get-Command New-TeamChannel -ParameterName ‘MembershipType’ -ErrorAction Ignore) -eq $Null) {“Close PowerShell and install the Teams public preview module.”} else {“Continue with the current module.”}
bạn sẽ nhận được kết quả Continue with the current module

9. Dùng lệnh sau để kết nối đến Microsoft Teams bằng user2@customdomain.
Connect-MicrosoftTeams
10. Dùng lệnh sau để tạo team CA-Office:
New-Team -Displayname “CA-Office” -MailNickName “CA-Office” -Visibility Public
11.Dùng lệnh sau để add user3, user4 vào team CA-Office: (Thay customdomain bằng domain của bạn)
- Get-Team -Displayname “CA-Office” | Add-TeamUser -User user3@customdomain
- Get-Team -Displayname “CA-Office” | Add-TeamUser -User user4@customdomain
12. Dùng lệnh sau tạo channel Support trong team CA-Office:
Get-Team -Displayname “CA-Office” | New-TeamChannel -DisplayName “Support”
13. Dùng lệnh sau tạo channel Recruiting trong team CA-Office:
Get-Team -Displayname “CA-Office” | New-TeamChannel -DisplayName “Recruiting”
14. Dùng lệnh sau tạo channel Administration trong team CA-Office:
Get-Team -Displayname “CA-Office” | New-TeamChannel -DisplayName “Administration” -MembershipType Private
15. Đóng PowerShell, vào Teams Client để kiểm tra.

Task 3 – Xóa và Phục Hồi Teams
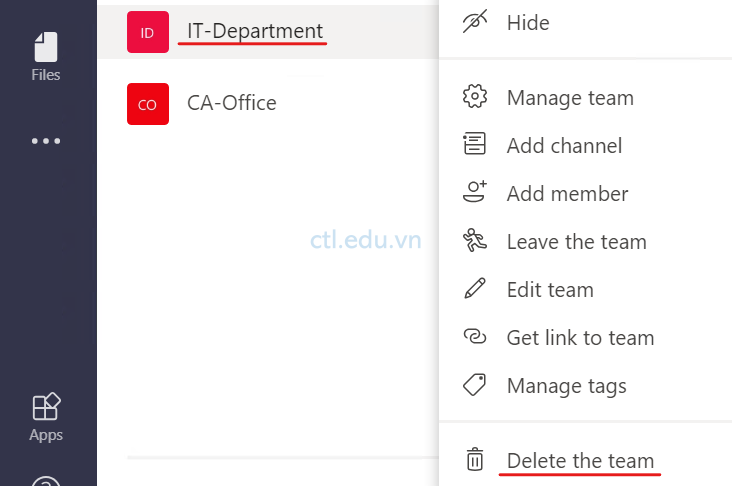
- Tại Teams Desktop client, chọn (…) bên phải team IT-Department chọn Delete the team.
- Cửa sổ Delete “IT-Department” team, check vào I understand that everything will be deleted, ấn Delete team.
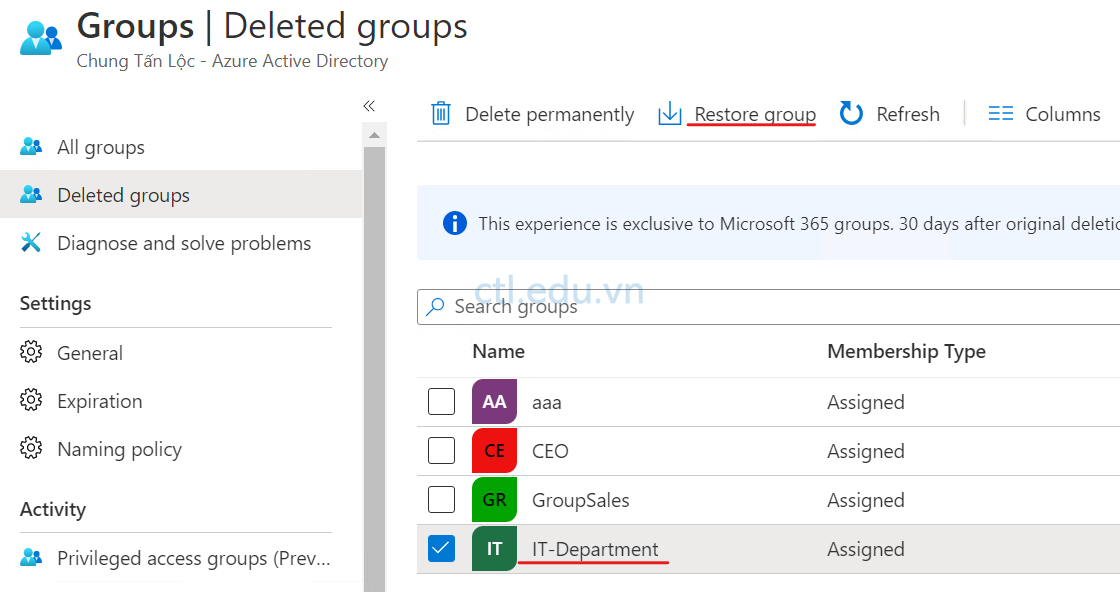
3. Mở trình duyệt truy cập vào trang https://portal.azure.com bằng user2@customdomain.
4. Màn hình Microsoft Azure, menu trái chọn Azure Active Directory, chọn Groups, chọn Deleted Groups.
5. Chọn group IT-Department chọn Restore group cửa sổ Confirm the Do you want to restore deleted groups ấn Yes.
6. Trở lại Teams Desktop client, ấn refresh, quan sát đã phục hồi lại team IT-Department, kiểm tra còn đầy đủ các thành viên trong team.
Task 4 – Tạo Team Với Dynamic Membership
- Mở trình duyệt truy cập vào trang https://portal.azure.com bằng têncủabạn@customdomain.
- Màn hình Microsoft Azure, menu trái chọn Azure Active Directory, chọn Groups, chọn All Groups.
- Cửa sổ bên phải chọn group CA-Office, menu trái chọn Properties.
- Cửa sổ bên phải, trong phần Membership type, đổi Assigned thành Dynamic User, trong phần Dynamic user members, chọn Add dynamic query.

5. Cửa sổ Dynamic membership rules chọn các thông tin sau:
- Property: accountEnabled
- Operator: Equals
- Value: true
6. ấn +add expression và chọn các thông tin sau:
- Property: usageLocation
- Operator: Equals
- Value: VN
- Ấn Save
7. Tiếp tục ấn Save, và ấn Yes.
(tất cả các user có usageLocation là VN sẽ tự động là thành viên Group CA-Office)
8. Cửa sổ CA-Office group, menu trái chọn Members, quan sát thấy có các user có usageLocation là VN.

Exercise 2: Manage Sharing And Access
Task 1 – Configure Guest Access in Teams
Phần này bạn sẽ cấu hình cho phép Guest truy cập vào Teams
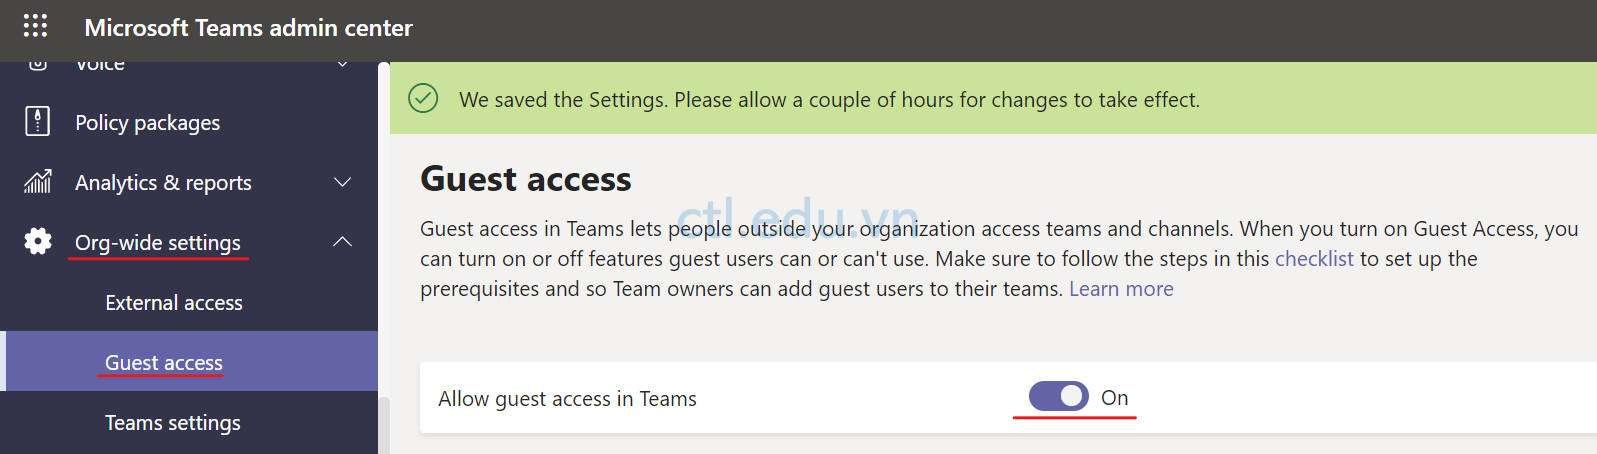
- Vào trình duyệt truy cập vào trang https://admin.teams.microsoft.com bằng têncủabạn@customdomain.
- Màn hình Microsoft Teams admin center, menu trái chọn Org-wide settings, và chọn Guest access.
- Cửa sổ Guest access, trong phần Allow guest access in Teams chọn On, và ấn Save.
Task 2 – Dùng Azure AD Cấu Hình Guest Access
Phần này bạn sẽ dùng Microsoft Azure Portal để cấu hình Guest Access.
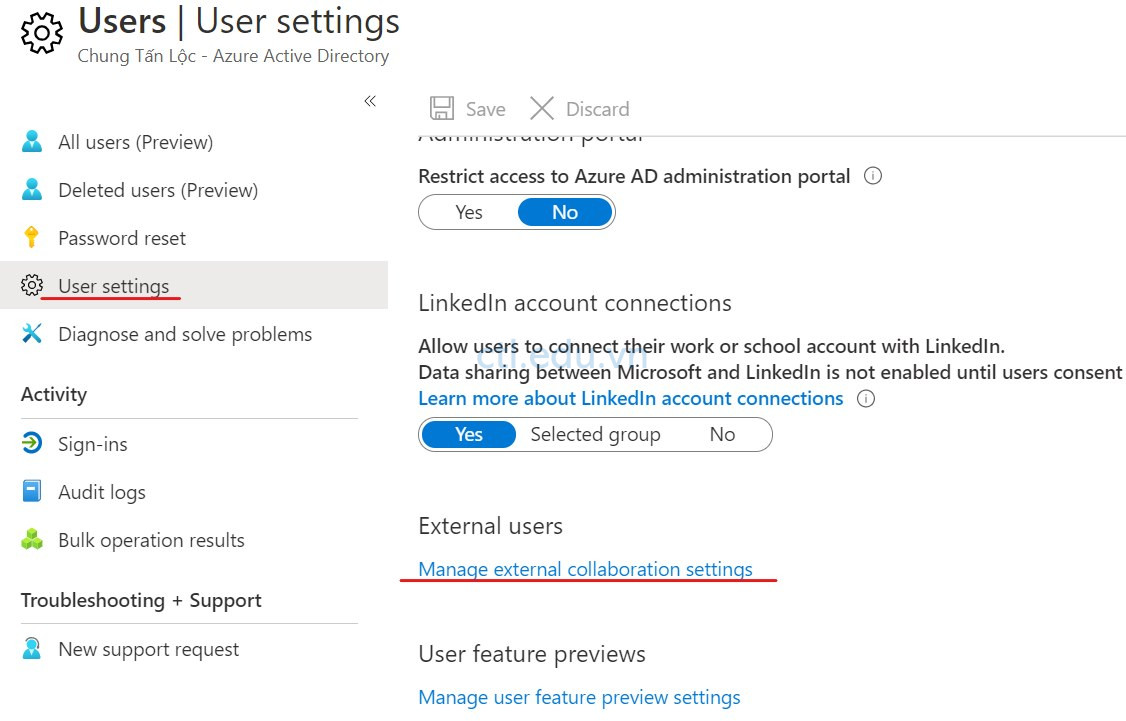
- Vào trình duyệt truy cập vào trang https://portal.azure.com bằng têncủabạn@customdomain.
- Màn hình Microsoft Azure, menu trái chọn Azure Active Directory, chọn Users và chọn User settings.
- Cửa sổ User settings chọn Manage external collaboration settings.
4. Cửa sổ External collaboration settings, kiểm tra Guests can invite đang chọn Yes. (Nếu là No chuyển sang Yes rồi ấn Save)
5. Đóng cửa sổ External collaboration settings, trở lại cửa sổ User, menu trái chọn All Users, và ấn + New guest user.
6. Cửa sổ New user, chọn option Invite user và nhập các thông tin sau:
- Name: tên cửa bạn
- Email address: email Outlook.com hay hotmail.com của bạn
- First name: Tên của bạn
- Last name: họ của bạn
- Personal Message: Hello Guest, Here is the link to access to our Chung Tan Loc organization. Best regards, Tan Loc admin.
- Trong phần Groups and roles, chọn 0 groups selected. tìm và chọn groups IT-Department ấn Select.
- Ấn Invite
7. Mở trình duyệt khác truy cập trang outlook.com bằng email Outlook.com hay hotmail.com của bạn.
8. Kiểm tra và mở email có tiêu đề You’re invited to the Chung Tan Loc organization, ấn Get Started, và ấn Accept.
9. Kiểm tra lại email, bạn sẽ nhận email thông báo bạn đã join vào group IT-Department.
Task 3 – Dùng Access Reviews Kiểm Tra Quyền Truy Cập
- Vào trình duyệt truy cập vào trang https://portal.azure.com bằng têncủabạn@customdomain.
- Màn hình Microsoft Azure, menu trái chọn Azure Active Directory, chọn Groups và chọn Access reviews.
- Cửa sổ Access reviews, ấn Onboard now, (nếu không thấy Onboard now hãy thực hiện tiếp bước 5)
- Tại cửa sổ Identity Governance, menu trái chọn Onboard và chọn Onboard Now

5. Trở lại màn hình Microsoft Azure, menu trái chọn Azure Active Directory, chọn Groups và chọn Access reviews, ấn +New access review
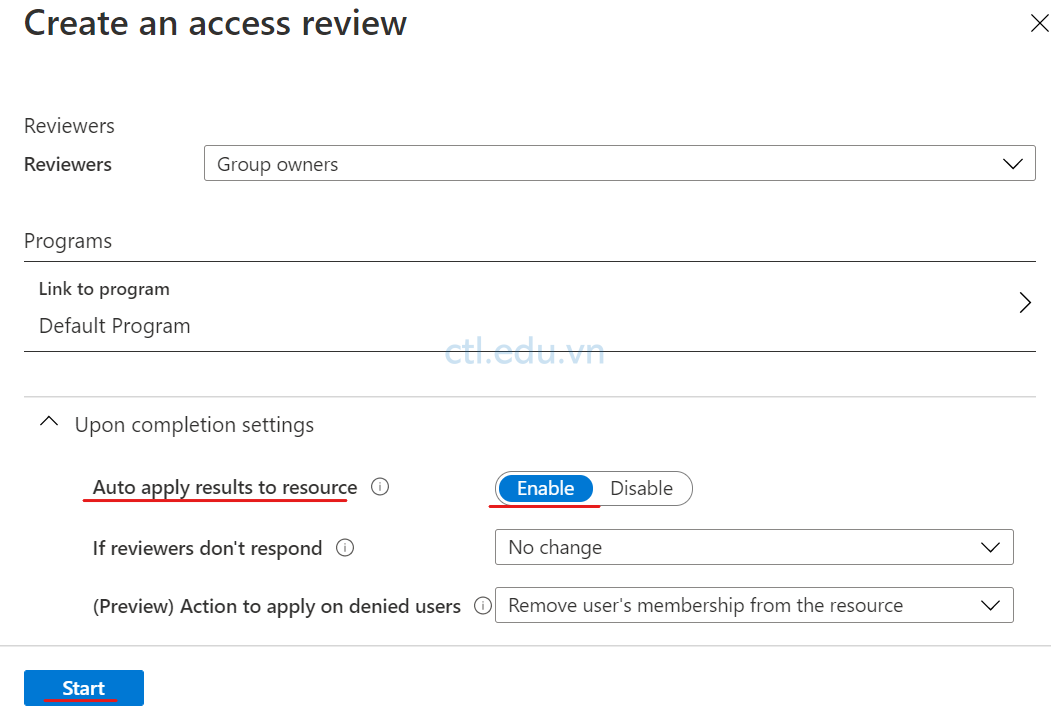
6. Màn hình Create an access review, nhập các thông tin sau:
- Review name: Guest access review
- Description: Reviewing guest access
- StartDate: ngày hiện tại
- Frequency: One time
- EndDate: ngày hiện tại + thêm 7 ngày
- Scope: Guest users only
- Group: IT-Department
- Reviewers: Group owners
- Mở rộng phần Upon completion settings trong phần Auto apply results to resource chọn enabled
- Ấn Start
7. Mở trình duyệt khác truy cập trang https://outlook.office365.com bằng user user2@customdomain.
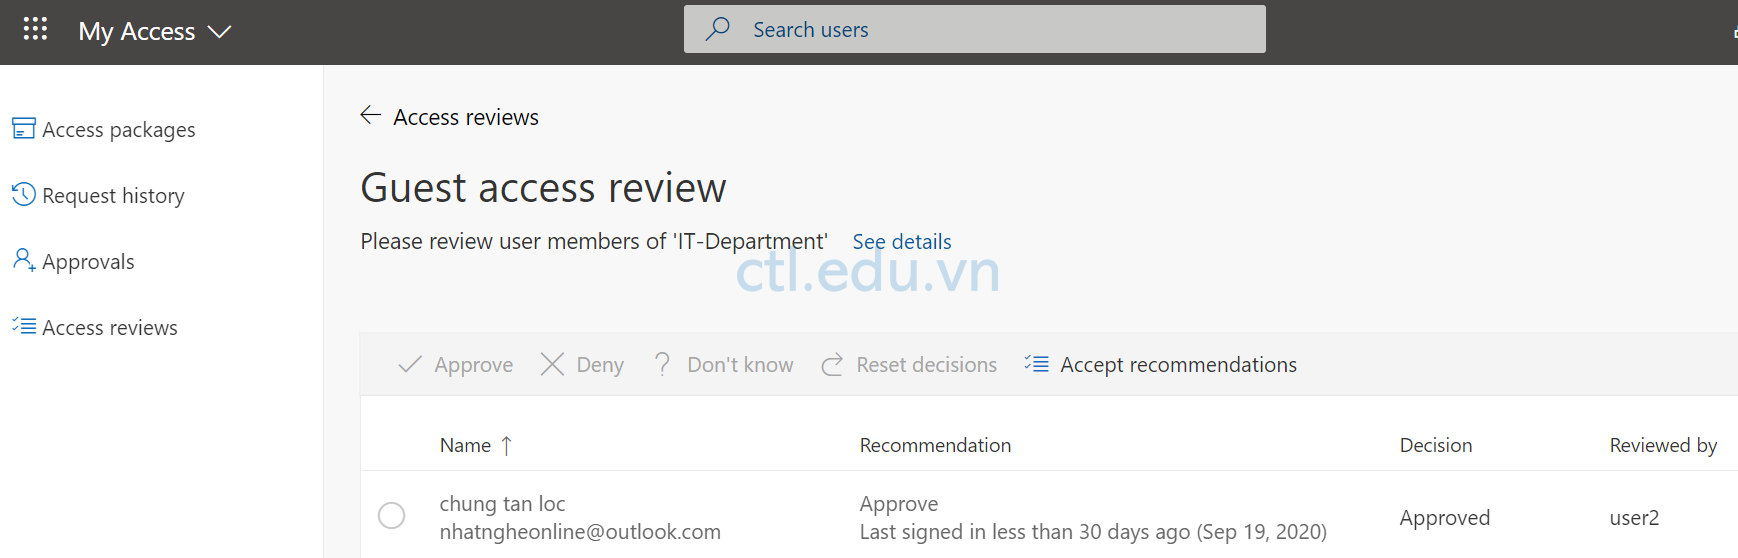
8. Mở email có tiêu đề Action required: Review users’ access to the IT-Department.. ấn Start review.
9. Cửa sổ Access Review, quan sát có user Guest là tên của bạn, click vào Details ở bên phải, bạn có thể chọn Approve hay Deny sau đó ấn Submit.
Hoàn tất bài lab
Mr CTL