Module 10 Hướng dẫn bạn Triển Khai Web Server, Triển Khai Web Application Proxy.
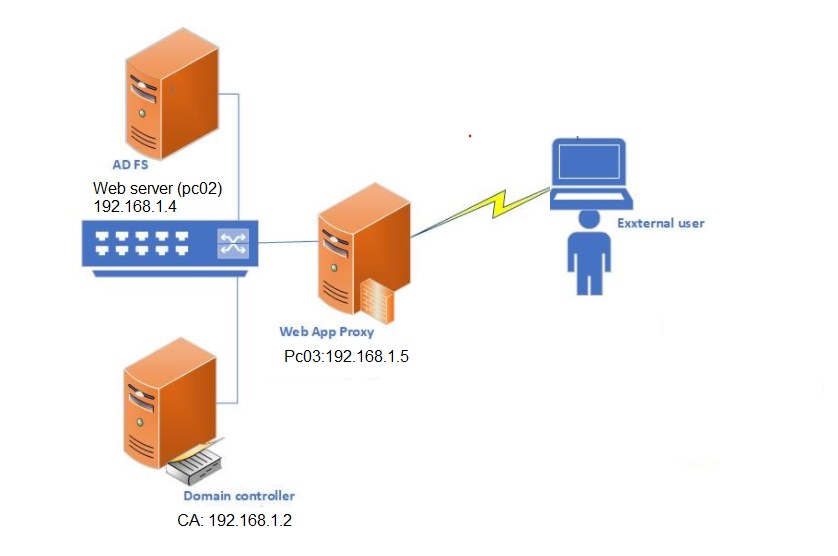
Exercise 1: Triển Khai Web Server
Task 1: Cài Web Server Role
- Tại máy PC02, vào Powershell (run as Administrator) thực hiện lệnh sau để cài Web Server Role
Install-WindowsFeature -name Web-Server -IncludeManagementTools
2. Chờ vài phút để hoàn tất.
3. Vào trình duyệt truy cập http://pc02 hay http://192.168.1.4 hiển thị trang Web Default.
4. Trở lại máy Dc1, vào Powershell (run as Administrator) thực hiện lệnh sau để tạo host A là www trỏ về IP 192.168.1.4.
Add-DnsServerResourceRecordA -ComputerName DC1 -Name “www” -ZoneName “ctl.local” -AllowUpdateAny -IPv4Address “192.168.1.4”
5. Dùng lệnh sau để kiểm ra lại www đã tạo
Get-DnsServerResourceRecord -ComputerName DC1 -ZoneName “ctl.local”
5. Tại DC1 vào trình duyệt truy cập http://www.ctl.local, hiển thị trang Web Default.

Task 2: Cài và Cấu hình Active Directory Certificate Services
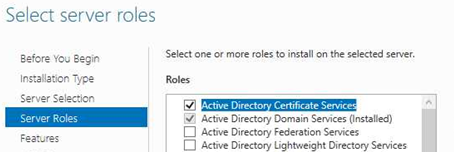
1. Tại máy Dc1 vào Server Manager, tại màn hình Dashboard chọn Add roles and Features
2. Màn hình Before you Begin ấn next, màn hình Select Installation Type ấn next, Màn hình Select Destination Server ấn Next
3. Màn hình Select server Roles chọn checkbox Active Directory Certificate Services ấn Add Features. ấn Next.
4. Màn hình Select Features ấn Next.
5. Màn hình Active Directory Certificate Services ấn Next
6. Màn hình Select Role Services chọn checkbox Certification Authority và Certification Authority Web Enrollment, ấn add features, ấn Next

7. Màn hình Web Server Role (IIS) ấn Next
8. Màn hình Select role services ấn Next
9. Màn hình Confirm installation selections ấn Install
10. Chờ quá trình cài xong, tại màn hình Installation Progress chọn Configure Active Directory Certificate Services on the destination server

11. Màn hình Credentials ấn next.
12. Màn hình Role Services chọn 2 checkbox Certification Authority và Certification Authority Web Enrollment ấn Next.

13. Màn hình Setup Type, chọn Option Enterprise CA ấn Next

14. Màn hình CA Type, chọn Option Root CA ấn Next

15. Tất cả các màn hình còn lại để mặc định ấn Next, đến màn hình Confirmation ấn Configure, chờ cấu hình xong tại màn hình Results ấn Close.

Task 3: Yêu Cầu Certificate Cho Web Server
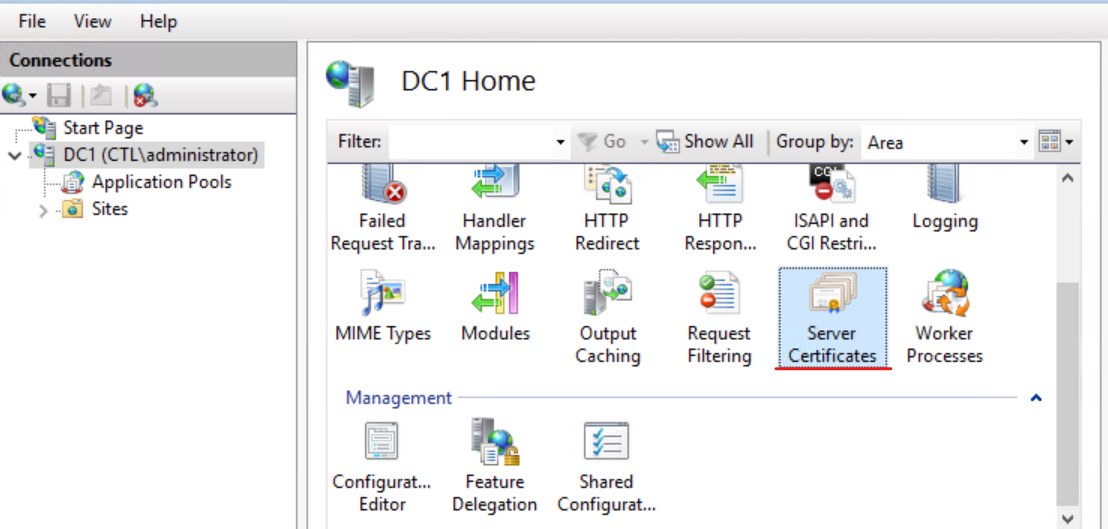
1. Tại máy DC1 vào Server Manager, tại màn hình Dashboard vào menu Tools chọn Internet Information Services (IIS) Manager
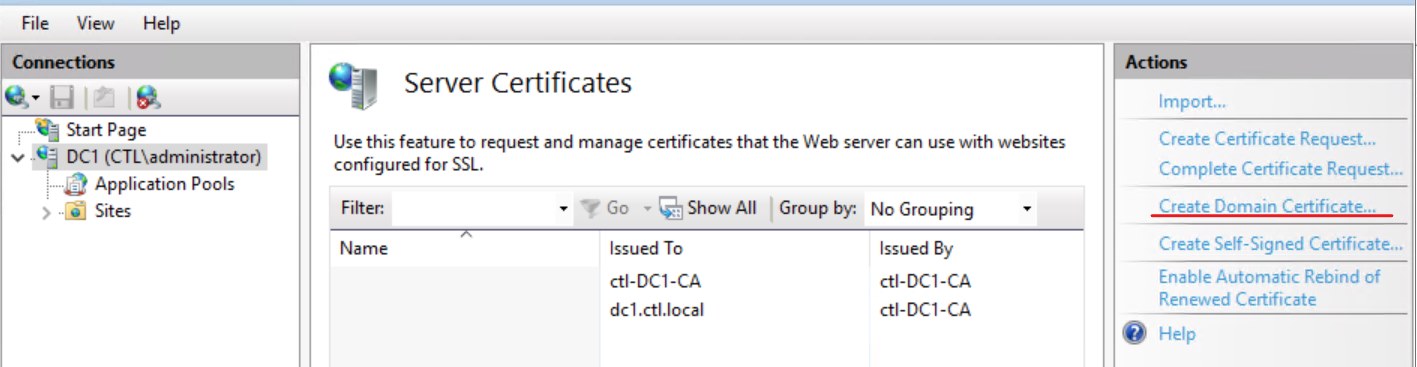
2. Màn hình Internet Information Services (IIS) Manager, bên trái chọn DC1, màn hình ở giữa chọn Server Certificates
3. Màn hình Server Certificates, bên phải trong phần Actions chọn Create Domain Certificate…
4. Tại màn hình Distinguished Name Properties, trong phần Common name nhập vào *.ctl.local, nhập đầy đủ các thông tin còn lại ấn next

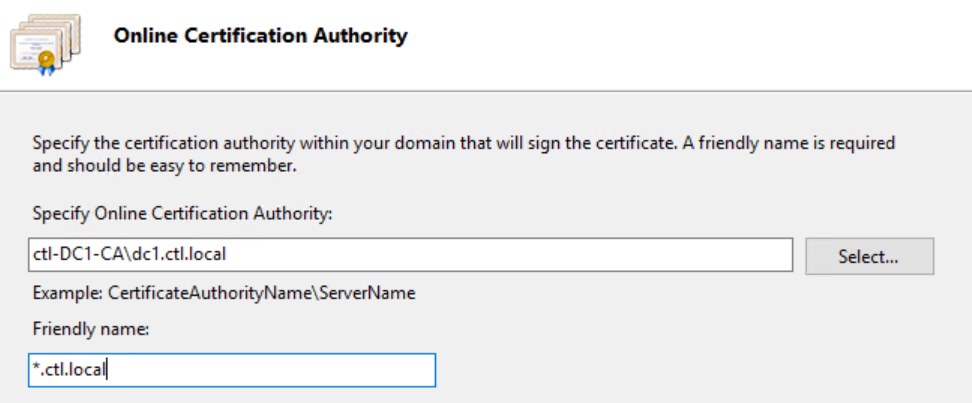
5. Màn hình Online Certification Authority ấn Select, chọn CA server ấn Ok, trong phần Friendly name nhập vào *.ctl.local ấn Finish.
Task 4: Export Certificate cho Web Server
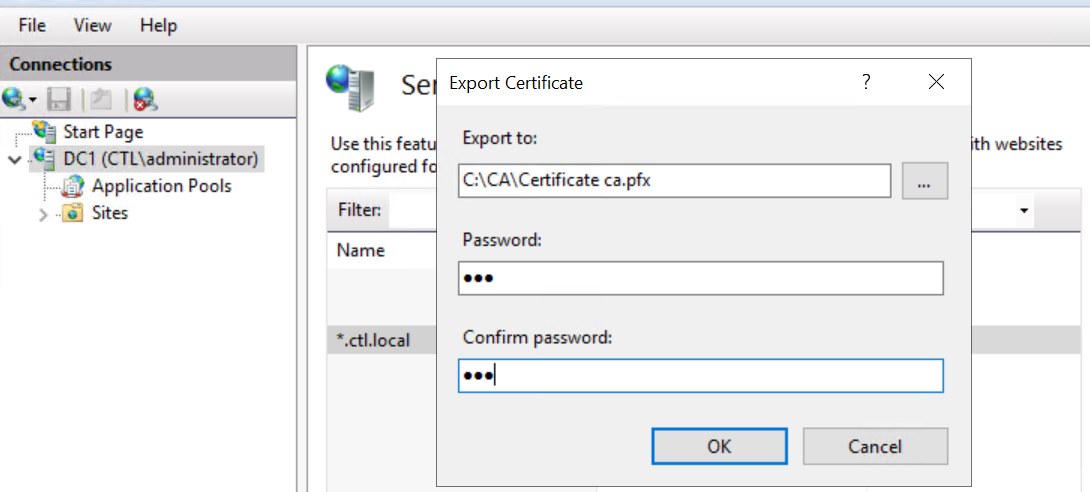
1. Tại màn hình Server Certificates, phải chuột vào certificate *.ctl.local chọn Export

2. Trong phần Export to, ấn nút … tạo folder CA trên C: và lưu file certificate CA.pfx vào thư mục C:\CA ấn Open, nhập password và ấn Ok
Task 5: Import Certificate cho Web Server
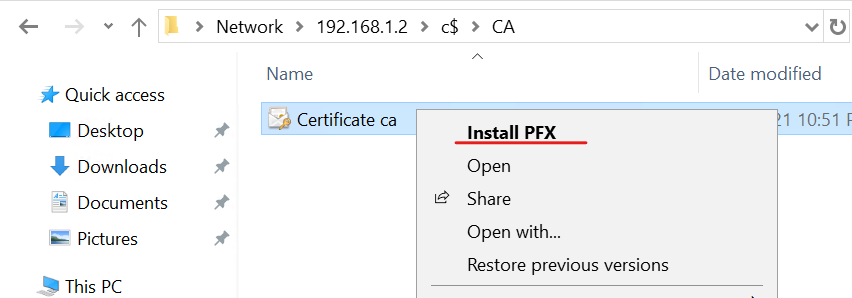
1. Tại máy PC02 vào run truy cập vào máy DC1 (\\192.168.1.2\c$)
2. Vào folder CA phải chuột vào file certificate Ca.pfx chọn Install PFX
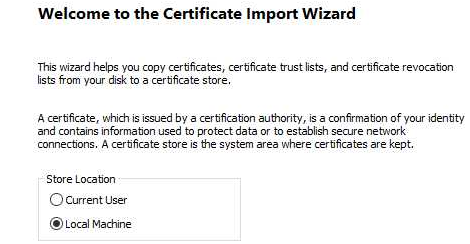
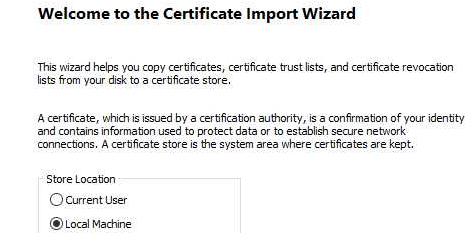
3. Màn hình Welcome to the Certificate Import Wizard chọn option Local Machine ấn Next.

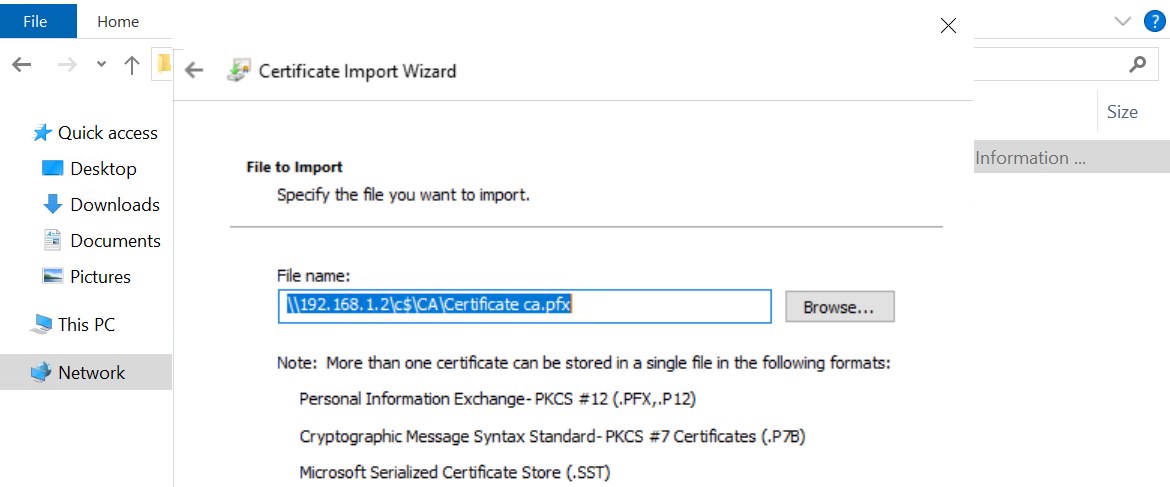
4. Màn hình File to Import ấn Next
5. Màn hình private key Protection, nhập password của file, để mặc định các checkbox ấn next.
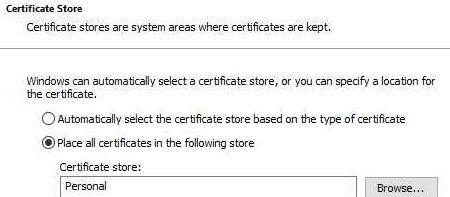
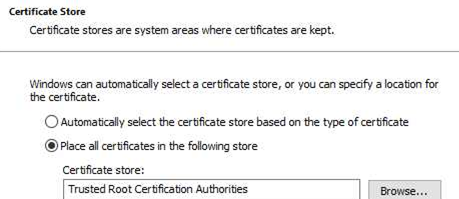
6. Màn hình Certificate Store, chọn option Place all certificates in the following store ấn Browse chọn Personal ấn Next và Finish

Task 6. Cấu Hình HTTPs
1. Tại máy PC02, vào Internet Information Services (IIS) Manager, phải chuột vào Default Web Site chọn Edit Bindings.
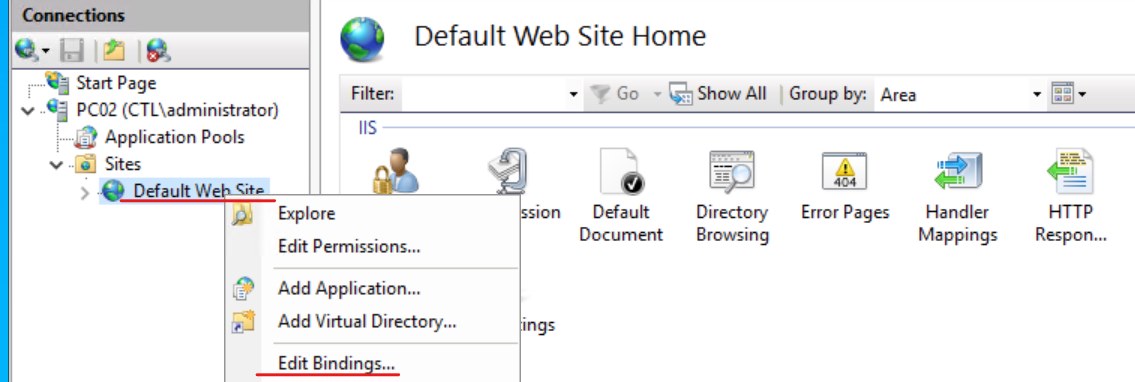
2. Cửa sổ Site Bindings, ấn Add
3. Trong phần type, chọn https, Trong phần host name nhập vào www.ctl.local, Trong phần SSL Certificate chọn *.ctl.local, ấn OK và ấn Close.
4. Vào trình duyệt nhập vào https://www.ctl.local, truy cập bằng SSL thành công.

Exercise 2: Triển Khai Web Application Proxy
Task 1. Tạo DNS Zone Mới
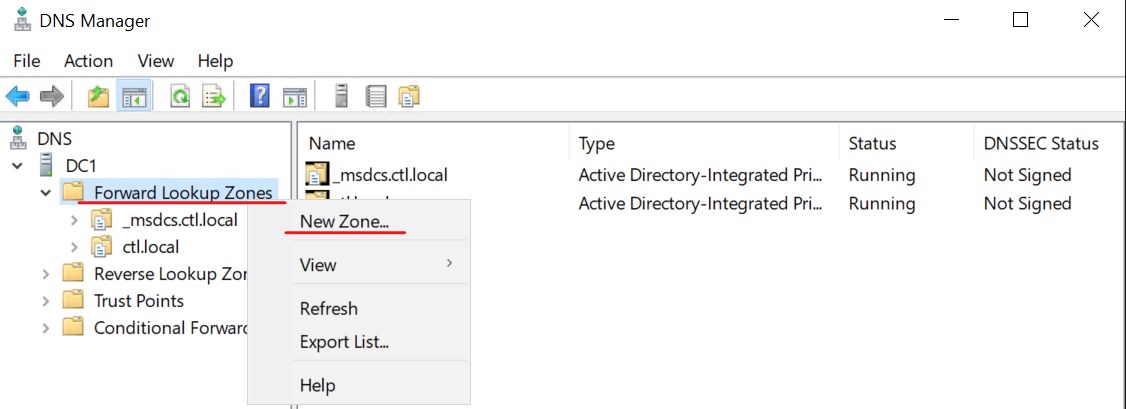
- Tại máy Dc1, vào run gõ lệnh DNSMGMT.MSC để vào DNS Manager
- Tại DNS server phải chuột vào Forward Lookup Zones chọn New Zone
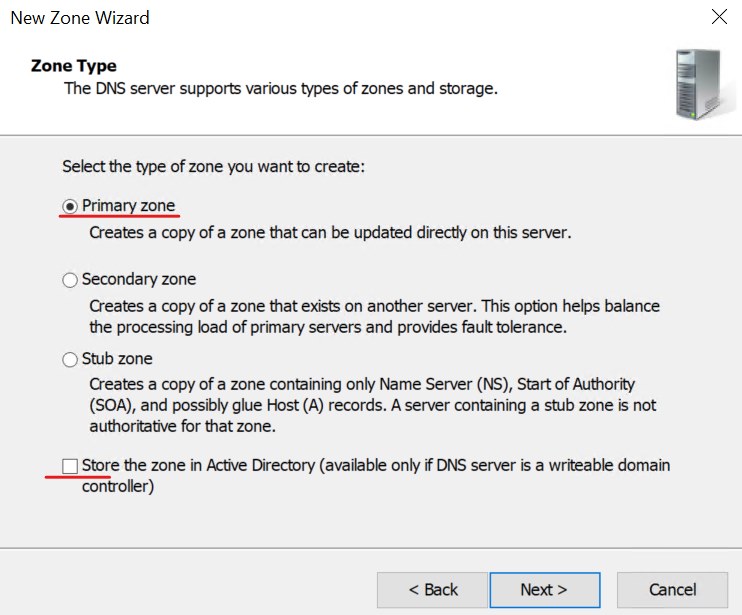
3. Màn hình Welcome to the New Zone Wizard ấn next
4. Màn hình Zone Type, chọn option Primary zone và bỏ chọn checkbox Store the zone in Active Directory ấn Next
5. Trong phần Zone name nhập vào tanloc.xyz ấn Next.

6. Màn hình Zone file ấn Next.
7. Màn hình Dynamic Update chọn option Do not allow dynamic updates ấn Next, và Finish

8. Phải chuột vào tanloc.xyz vừa tạo chọn new host (A or AAAA)
9. Tại màn hình New Host, trong phần Name nhập vào fs, trong phần IP address nhập vào IP của máy PC02 (192.168.1.4) ấn Add Host, ấn Ok và Done.
10. Tương tự, Phải chuột vào tanloc.xyz vừa tạo chọn new host (A or AAAA)
11. Tại màn hình New Host, trong phần Name nhập vào remoteapp , trong phần IP address nhập vào IP của máy PC03 (192.168.1.5) ấn Add Host, ấn Ok và Done.

Task 2: Yêu Cầu Certificate Cho ADFS
1. Tại máy DC1 vào Server Manager, tại màn hình Dashboard vào menu Tools chọn Internet Information Services (IIS) Manager
2. Màn hình Internet Information Services (IIS) Manager, bên trái chọn DC1, màn hình ở giữa chọn Server Certificates

3. Màn hình Server Certificates, bên phải trong phần Actions chọn Create Domain Certificate…

4. Tại màn hình Distinguished Name Properties, trong phần Common name nhập vào *.tanloc.xyz, nhập đầy đủ các thông tin còn lại ấn next

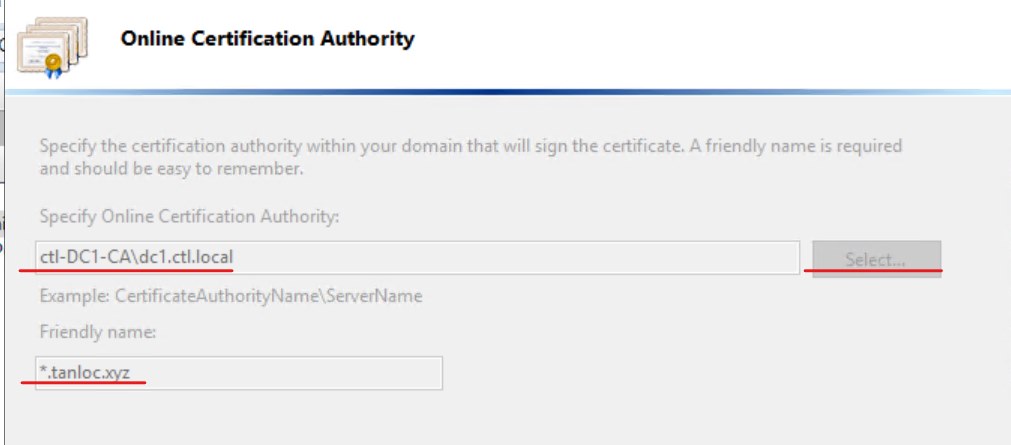
5. Màn hình Online Certification Authority ấn Select, chọn CA server ấn Ok, trong phần Friendly name nhập vào *.tanloc.xyz ấn Finish.
Task 3: Export Certificate cho ADFS Server
1. Tại máy DC, Tại màn hình Server Certificates, phải chuột vào certificate *.tanloc.xyz chọn Export

2. Trong phần Export to, ấn nút … tạo folder CA trên C: và lưu file certificate adfs.pfx vào thư mục C:\CA ấn Open, nhập password và ấn Ok

Task 4: Import Certificate cho ADFS Server
1. Tại máy PC02 vào run truy cập vào máy DC1 (\\192.168.1.2\c$)
2. Vào folder CA phải chuột vào file certificate ADFS.pfx chọn Install PFX
3. Màn hình Welcome to the Certificate Import Wizard chọn option Local Machine ấn Next.
4. Màn hình File to Import ấn Next

5. Màn hình private key Protection, nhập password của file, để mặc định các checkbox ấn next.
6. Màn hình Certificate Store, chọn option Place all certificates in the following store ấn Browse chọn Personal ấn Next và Finish
Task 5: Cài và cấu hình Active Directory Federation Services.
1. Tại máy PC02, vào Start, phải chuột vào Windows Powershell chọn run as Administrator, thực hiện lệnh sau để tạo Key Distribution Services
Add-KdsRootKey -EffectiveTime ((get-date).addhours(-10))

2. Tại máy Pc02 vào Server Manager, tại màn hình Dashboard chọn Add roles and Features
3. Màn hình Before you Begin ấn next, màn hình Select Installation Type ấn next, Màn hình Select Destination Server ấn Next
4. Màn hình Select server Roles chọn checkbox Active Directory Federation Services ấn Add Features. ấn Next.

5. Màn hình Select Features ấn Next.
6. Màn hình Active Directory Federation Services (ADFS) ấn Next
7. Màn hình Confirm Installation Selections ấn Install
8. Chờ quá trình cài xong chọn Configure the federation service on this server

9. Màn hình Welcome, chọn option Create the first federation server in a federation server farm ấn Next

10. Màn hình Connect to AD DS ấn Next
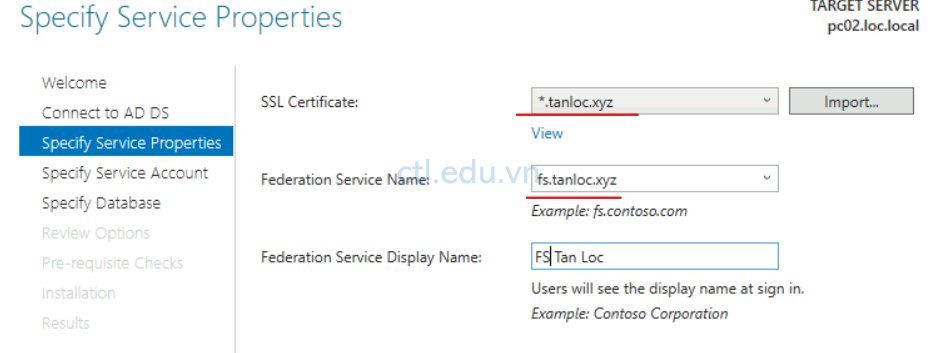
11. Màn hình Specify Service Properties chọn các thông tin sau ấn Next:
- SSL Certificate: chọn certificate *.tanloc.xyz
- Federation Service Name: nhập vào fs.tanloc.xyz
- Federation Service Display Name: Nhập vào FS Tan Loc
- Ấn Next
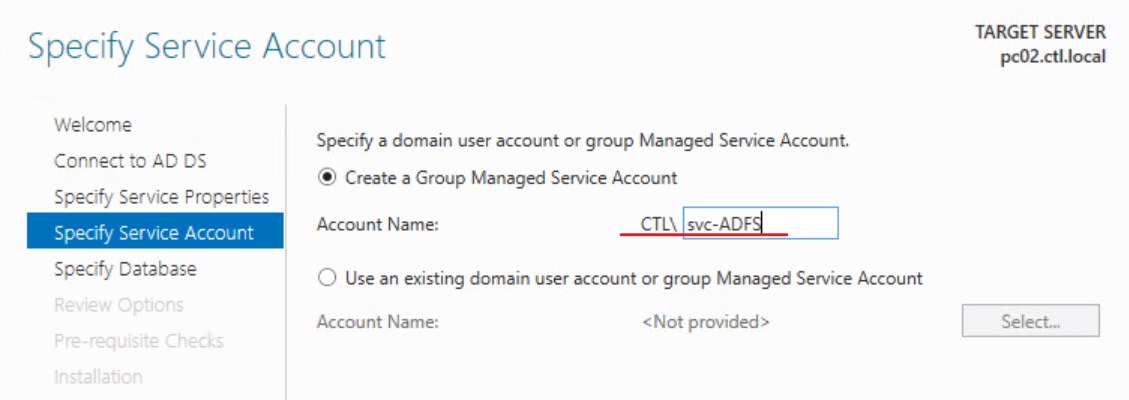
12. Màn hình Specify Service Account chọn option Create a Group Managed Service Account, trong phần Account Name nhập vào svc-ADFS, ấn Next.
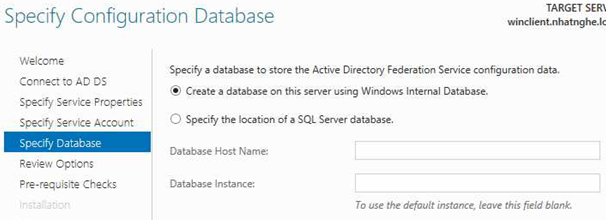
13. Màn hình Specify Configuration Database, chọn option Create a database on this server using Windows Internal Database, ấn Next.
14. Màn hình Review Options ấn Next
15. Màn hình Pre-requisite Checks ấn Configure
16. Màn hình Results ấn Close. Khởi động lại máy Pc02
Task 6: Import Certificate cho WebApp Proxy Server
Trước khi thực task 4, tại Pc03 gõ lệnh sysdm.cpl. đổi tên pcname thành remoteapp, ấn more nhập vào tanloc.xyz. reboot máy.
1. Tại máy Webapp proxy Server (PC03 không join domain) vào run truy cập vào máy DC1 (\\192.168.1.2\c$)
2. Vào folder CA phải chuột vào file certificate ADFS.pfx chọn Install PFX
3. Màn hình Welcome to the Certificate Import Wizard chọn option Local Machine ấn Next.

4. Màn hình File to Import ấn Next

5. Màn hình private key Protection, nhập password của file, để mặc định các checkbox ấn next.
6. Màn hình Certificate Store, chọn option Place all certificates in the following store ấn Browse chọn Personal ấn Next và Finish

7. Vào Run gõ lệnh MMC enter
8. Tại màn hình Console, vào menu File chọn Add/remove Snap-in…

9. Màn hình Add or Remove Snap-ins, bên phải chọn Certificates ấn Add, xuất hiện màn hình Certificates Snap-in chọn option Computer Account ấn next, xuất hiện màn hình Select Computer chọn option Local computer ấn Finish, ấn Ok.

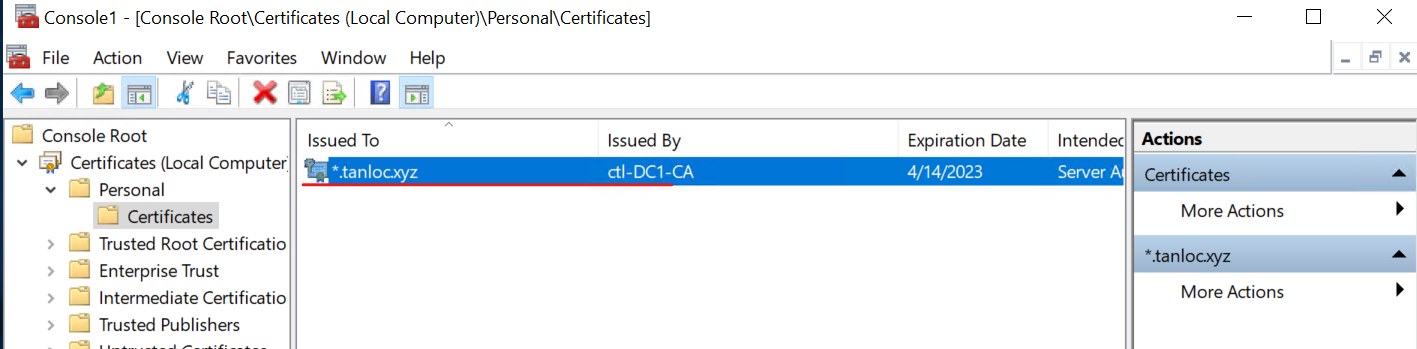
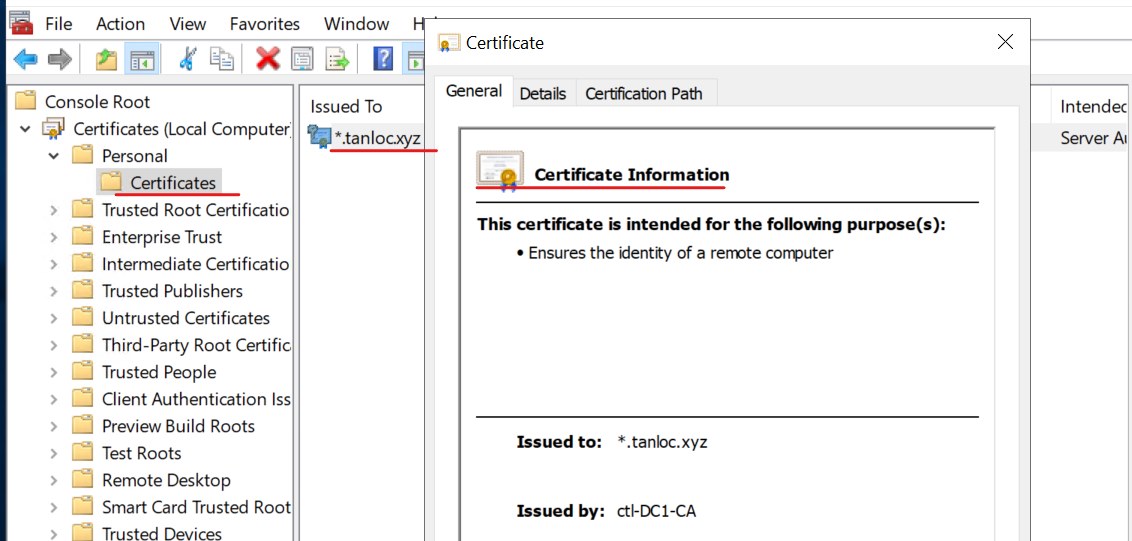
10. Chọn Certificates (local computer), chọn Personal, chọn Certificates, bên phải double click vào certificate *.tanloc.xyz kiểm tra certificate chưa trust.
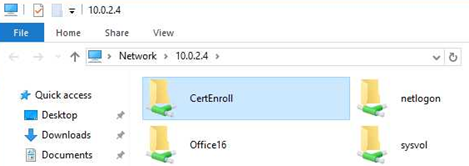
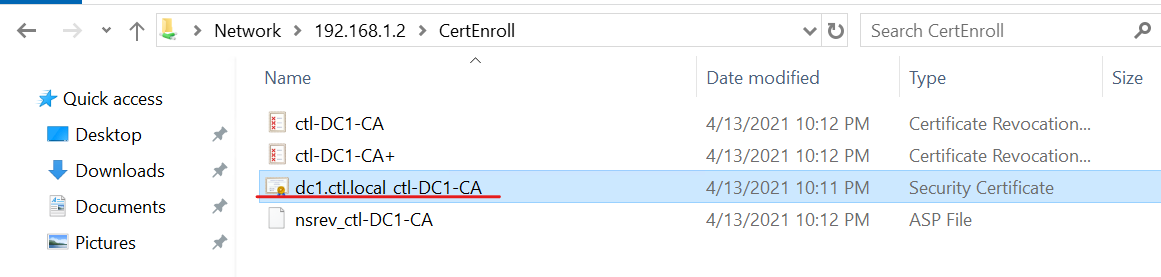
11. Vào Run truy cập vào máy domain controller DC1 (\\192.168.1.2), vào folder CertEnroll
12. Double click vào file root CA, ấn Open
13. Tại màn hình Certificate ấn Install Certificate…
14. Màn hình Welcome to the Certificate Import Wizard chọn option Local Machine ấn Next.
15. Màn hình Certificate Store, chọn option Place all certificates in the following store ấn Browse chọn Trusted Root Certification Authorities ấn Next và Finish, và OK
16. Trở lại màn hình Console, Chọn Certificates (local computer), chọn Personal, chọn Certificates, bên phải double click vào certificate *.tanloc.xyz. Kiểm tra lại certificate đã trust
Task 7: Cài và cấu hình Web Application Proxy server.
1. Tại máy web app proxy (Pc03) vào Server Manager, tại màn hình Dashboard chọn Add roles and Features
2. Màn hình Before you Begin ấn next, màn hình Select Installation Type ấn next, Màn hình Select Destination Server ấn Next
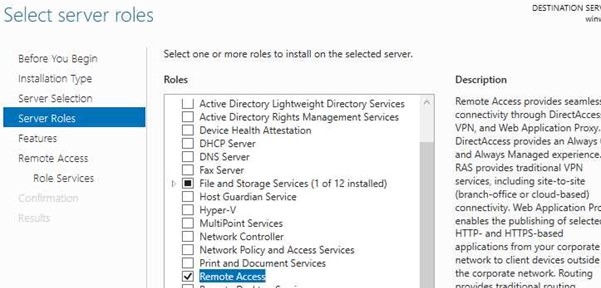
3. Màn hình Select server Roles chọn checkbox Remote Access, ấn add features ấn Next.
4. Màn hình Select Features ấn Next, Màn hình Remote Access ấn Next.
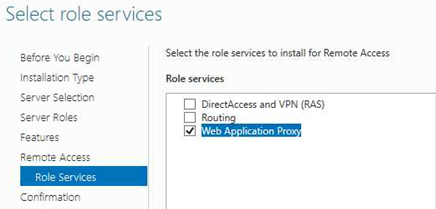
5. Màn hình Select role services chọn checkbox Web Application Proxy, ấn Add Features, ấn next và Install
6. Chờ cài xong, chọn Open the Web Application Proxy Wizard

7. Màn hình Welcome ấn Next, Màn hình Federation Server nhập các thông tin sau ấn Next:
- Federation service name: fs.tanloc.xyz
- User name: nhập vào username và password của Administrator

8. Màn hình AD FS Certificate chọn *.tanloc.xyz ấn Next

9. Màn hình Confirmation ấn Configure

10. Màn hình Results bảo đảm rằng nhận được thông báo Web Application Proxy was Configured successfully ấn Close

Task 8: Configure Web Application
- Màn hình Remote Access Management Console, bên phải ấn Publish.
- Cửa sổ Welcome screen, ấn Next.
- Cửa sổ Preauthentication chọn option Pass-through, ấn Next.

4. Cửa sổ Publishing Settings, nhập các thông tin sau ấn Next.
- Name: RemoteApp
- External URL: https://remoteapp.tanloc.xyz
- External certificate: *.tanloc.xyz
- Backend server URL: https://www.ctl.local
5. Cửa sổ Confirmation screen, ấn Publish.
6. Cửa sổ Results ấn Close.
7. Vào trình duyệt truy cập trang https://remoteapp.tanloc.xyz

Hoàn Tất Bài Lab