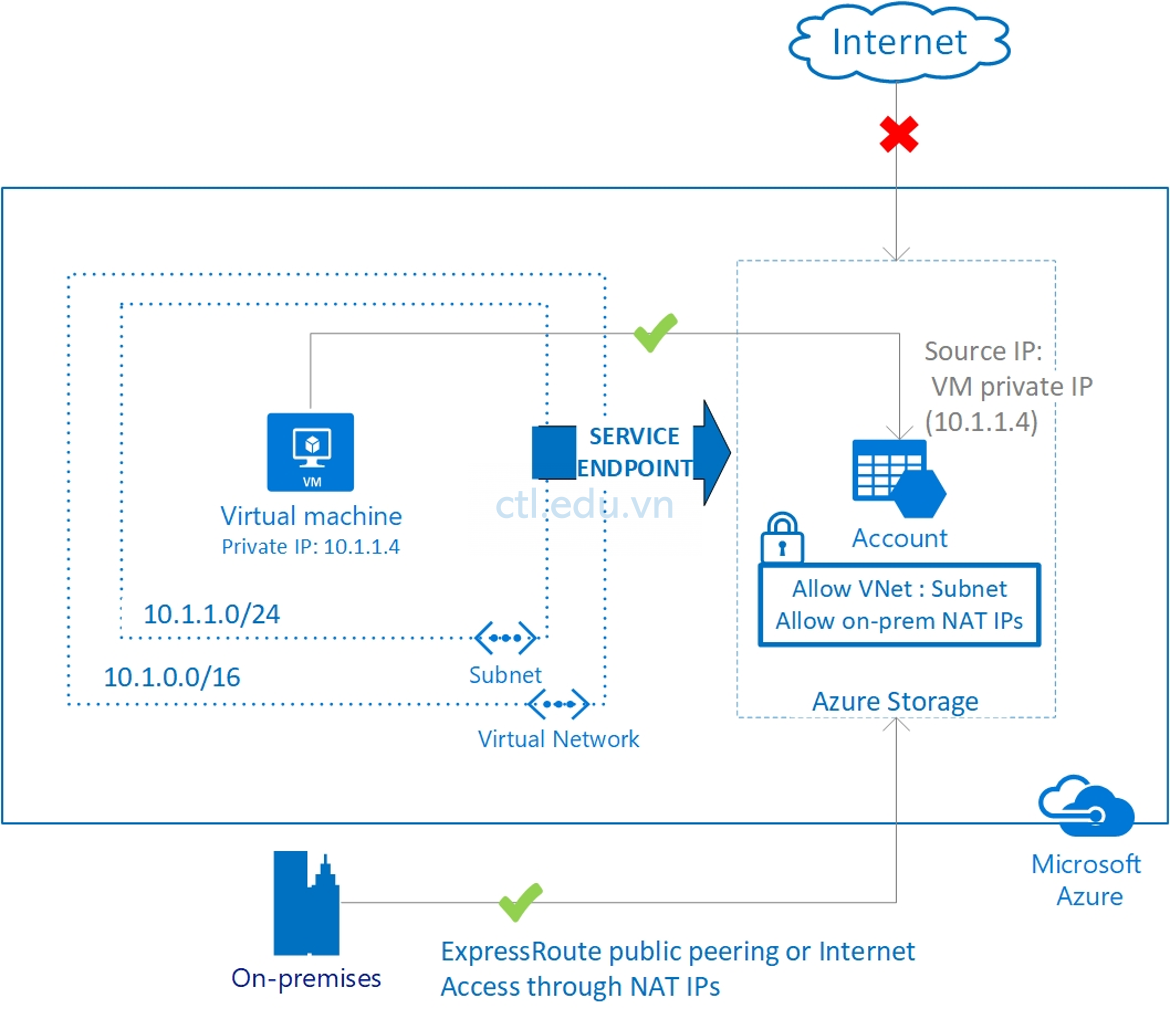
Virtual network service endpoints phép bạn giới hạn quyền truy cập từ các virtual network subnet vào Azure service resources. Bạn cũng có thể giới hạn quyền truy cập từ internet vào các Resource trong Azure.
Service endpoints cung cấp kết nối trực tiếp từ virtual network của bạn tới các Azure Services, cho phép bạn chỉ định dải IP private trong virtual network được phép truy cập đến các dịch vụ Azure.
Lưu lượng truy cập tới Azure resources thông qua service endpoint luôn nằm trên mạng xương sống của Microsoft Azure (Microsoft Azure backbone network)
Lab Microsoft Azure Module 16 sẽ hướng dẫn bạn cấu hình Virtual Network Service Endpoints qua các bước sau:
- Tạo virtual network với 1 subnet (public subnet)
- Tạo thêm subnet (Private subnet) và enable service endpoint
- Tạo Network security groups
- Tạo storage account và chỉ định chỉ một subnet được truy cập (Private subnet)
- Triển khai virtual machine (VM) trên mỗi subnet
- Kiểm tra truy cập resource từ private subnet
- Kiểm tra truy cập resource từ public subnet và internet
Triển Khai Virtual Network Service Endpoints
- Tại Azure portal, menu trái chọn Virtual Network
- Màn hình Virtual Network, chọn + Create
- Màn hình Create virtual network nhập các thông tin sau:
- Subscription: chọn Subscription của bạn
- Resource group: ấn Create new và nhập vào Module16RG ấn Ok
- Name: VNetM16
- Region: chọn Southeast Asia
- ấn Next: IP Addresses

4. Màn hình IP Addresses, xóa dải Ip hiện có, và nhập vào 172.16.0.0/16, ấn + Add Subnet
5. Cửa sổ Add Subnet nhập các thông tin sau:
- Subnet address range : 172.16.1.0/24
- Ấn Add
- Ấn Review + create và Create

- Tại Azure Portal, menu trái chọn Virtual Network
- Chọn VnetM16 vừa tạo.
- Màn hình VnetM16, menu trái chọn Subnet
- Màn hình Subnet ấn +Subnet
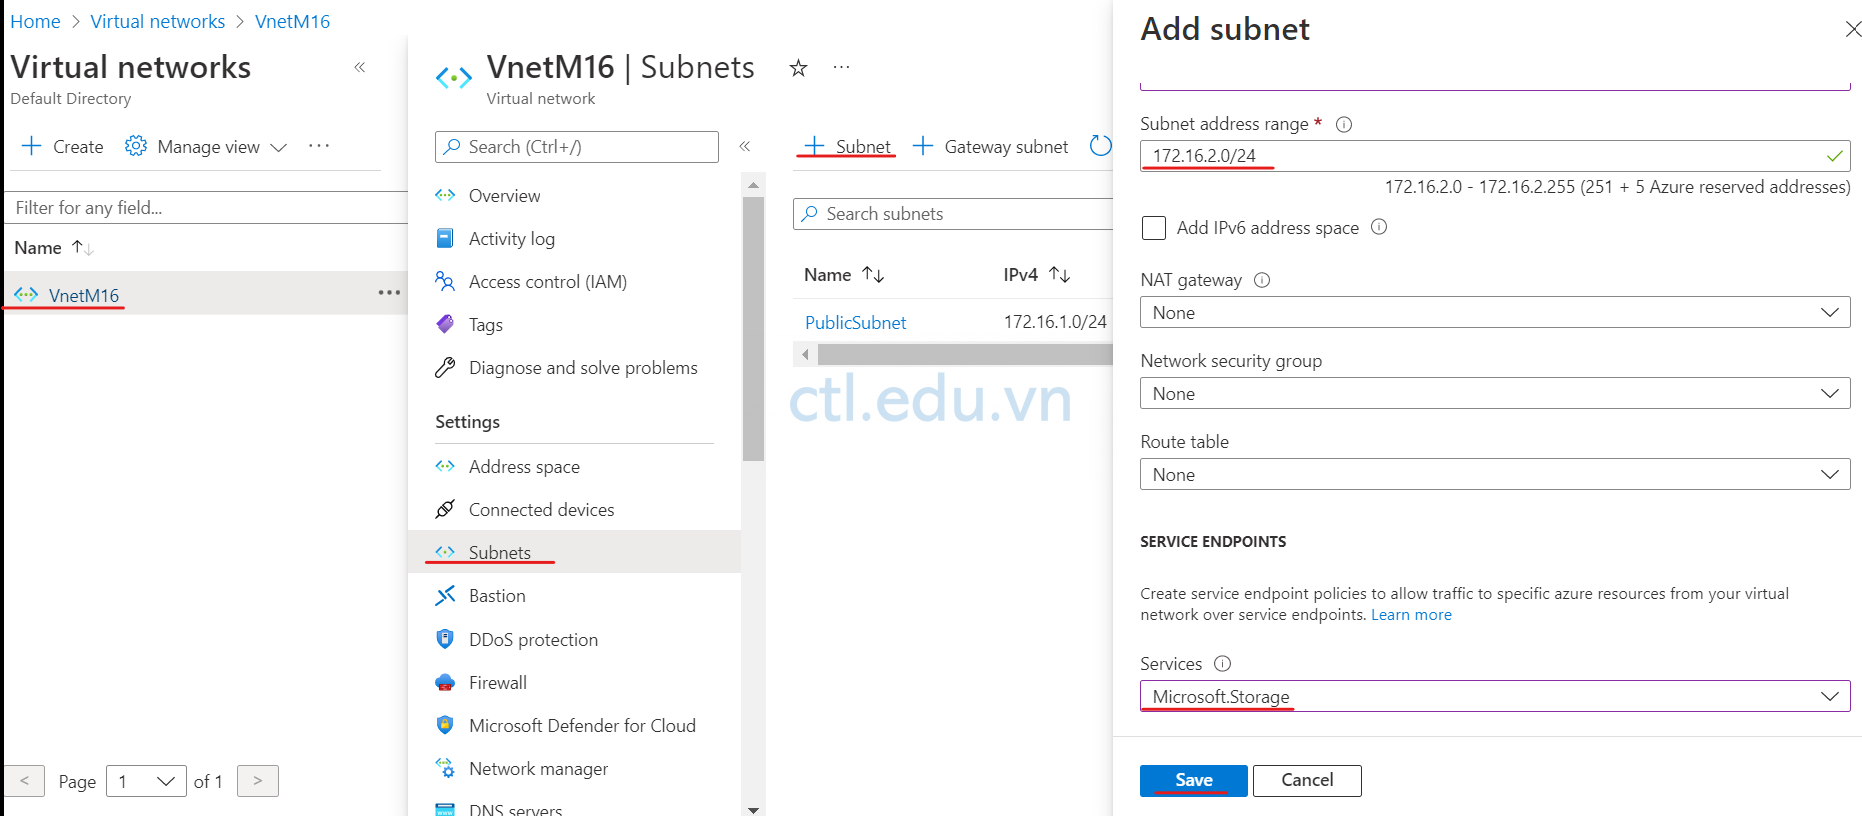
- Cửa sổ Add Subnet nhập các thông tin sau:
- Subnet address range : 172.16.2.0/24
- Service endpoints: chọn Microsoft.Storage
- Ấn Save
Theo mặc định, tất cả các virtual machine trong subnet có thể kết nối với bất kỳ resource nào. Bạn có thể giới hạn kết nối đến và đi từ tất cả các resource trong một subnet bằng cách tạo một network security group và liên kết nó với subnet.
- Tại Azure portal, tìm và chọn Network security groups.
- Màn hình Network security groups, ấn +Create
- Màn hình Create network security group nhập các thông tin sau:
- Subscription: chọn Subscription của bạn
- Resource group: chọn Module16RG
- Name: PrivateNSG
- Region: chọn Southeast Asia
- Ấn Review + create và ấn Create

4. Chờ tạo network security group xong ấn Go to resource
6. Màn hình PrivateNSG, menu trái chọn Outbound security rules và ấn + Add.
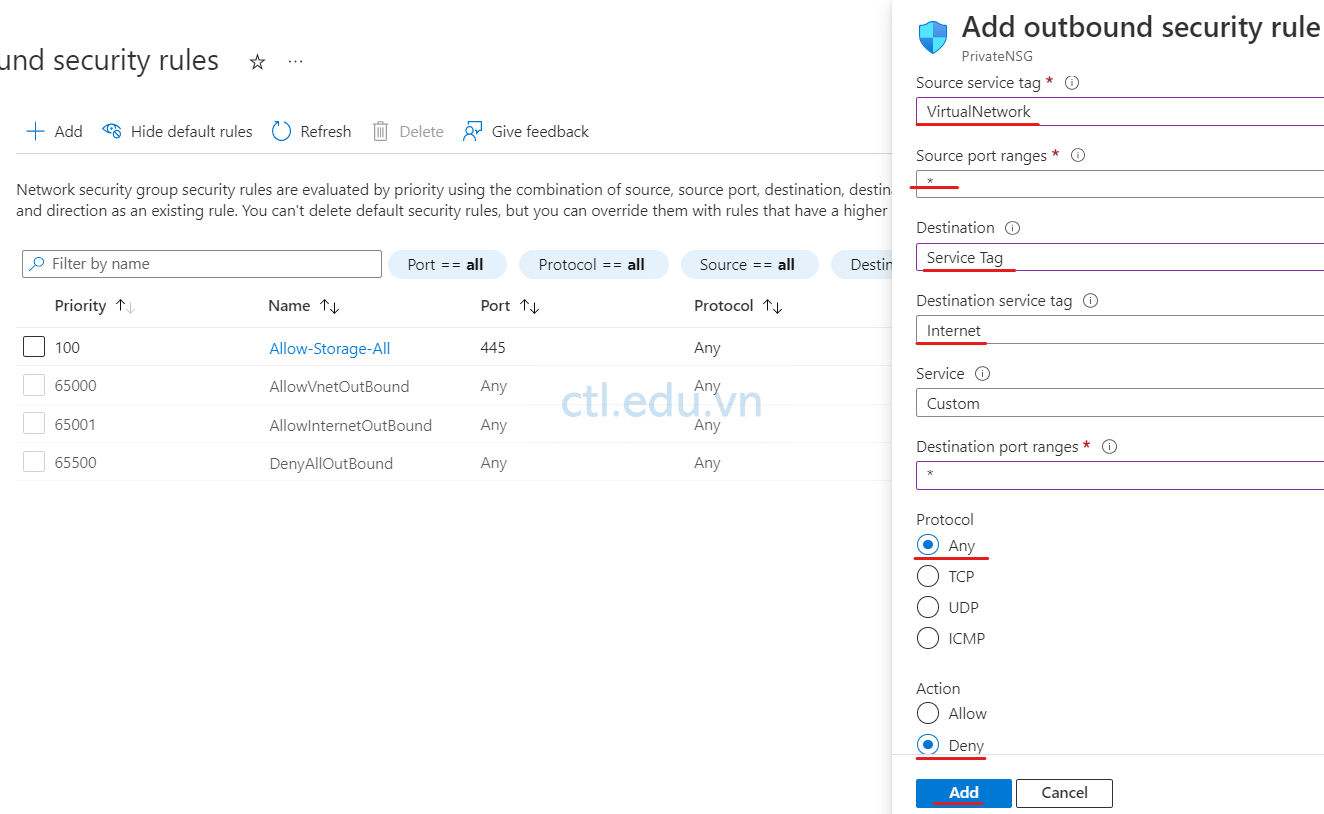
7. Cửa sổ Add outbound security rule nhập các thông tin sau:
- Source : chọn Service Tag
- Source service tag: Chọn VirtualNetwork
- Source port ranges : *
- Destination: Chọn Service Tag
- Destination service tag: chọn Storage
- Service: Custom
- Destination port ranges : 445
- Protocol: Any
- Action: Allow
- Priority: 100
- Name: Allow-Storage-All
- Ấn Add

Tiếp tục tạo Outbound security rules từ chối kết nối với internet
8. Màn hình PrivateNSG, menu trái chọn Outbound security rules và ấn + Add.
9. Cửa sổ Add outbound security rule nhập các thông tin sau:
- Source : chọn Service Tag
- Source service tag: Chọn VirtualNetwork
- Source port ranges : *
- Destination: Chọn Service Tag
- Destination service tag: chọn Internet
- Service: Custom
- Destination port ranges : *
- Protocol: Any
- Action: Deny
- Priority: 110
- Name: Deny-Internet-All
- Ấn Add
kế tiếp bạn tạo inbound security rule cho phép Remote Desktop Protocol (RDP) từ bất kỳ mạng nào
10. Màn hình PrivateNSG, menu trái chọn inbound security rule và ấn + Add.
11. Cửa sổ Add inbound security rule nhập các thông tin sau:
- Source : chọn Any
- Source port ranges : *
- Destination: Chọn Service Tag
- Destination service tag: chọn VirtualNetwork
- Service: Custom
- Destination port ranges : 3389
- Protocol: Any
- Action: Allow
- Priority: 120
- Name: Allow-RDP-All
- Ấn Add

Cuối cùng bạn sẽ kết nối network security group với SubNet.
12. Màn hình PrivateNSG, menu trái chọn Subnets và ấn + Associate
13. Cửa sổ Associate subnet, trong phần Virtual Network chọn VnetM16, Subnet chọn PrivateSubnet ấn OK

- Tại Azure Portal, menu trái chọn Storage accounts,
- Màn hình storage accounts ấn + Create
- Màn hình Create a storage account, nhập các thông tin sau:
- Subscription: chọn Subscription của bạn
- Resource group: chọn Module16RG
- Storage account name: nhập vào tên duy nhất toàn cầu ví dụ ctleduvnaccount
- Region: chọn Southeast Asia
- Performance: chọn Standard
- Redundancy: chọn Locally redundant storage (LRS)
- Ấn Review, và ấn Create.

4. Chờ tạo xong ấn Go to resource
5. Màn hình ctleduvnaccount, menu trái chọn File shares và ấn + File share
6. Cửa sổ New file share, nhập các thông tin sau:
- Name: my-file-share
- Tier: Transaction optimized
- Ấn Create

7. Chọn my-file-share vừa tạo, chọn + Upload, và up vài file vào my-file-share
Theo mặc định, storage accounts cho phép kết nối từ bất kỳ mạng nào, bao gồm cả internet. Bạn có thể hạn chế quyền truy cập từ internet và tất cả các subnet trong các virtual networks (ngoại trừ trong VnetM16.) Thực hiện các bước sau để hạn chế quyền truy:
8. Màn hình ctleduvnaccount, menu trái chọn Networking
9. Tại tab Firewalls and virtual networks trong phần Public network access chọn option Enabled from selected virtual networks and IP addresses, trong phần Virtual networks chọn + Add existing virtual network
10. Cửa sổ Add networks chọn các thông tin sau:
- Subscription: chọn Subscription của bạn
- Virtual networks: chọn VnetM16
- Subnet: chọn PrivateSubnet
- ấn Add
11. Trở lại tab Firewalls and virtual networks, trong phần Firewall check chọn Add your client IP address (cho phép máy tính của bạn được phép truy cập my-file-share), ấn Save

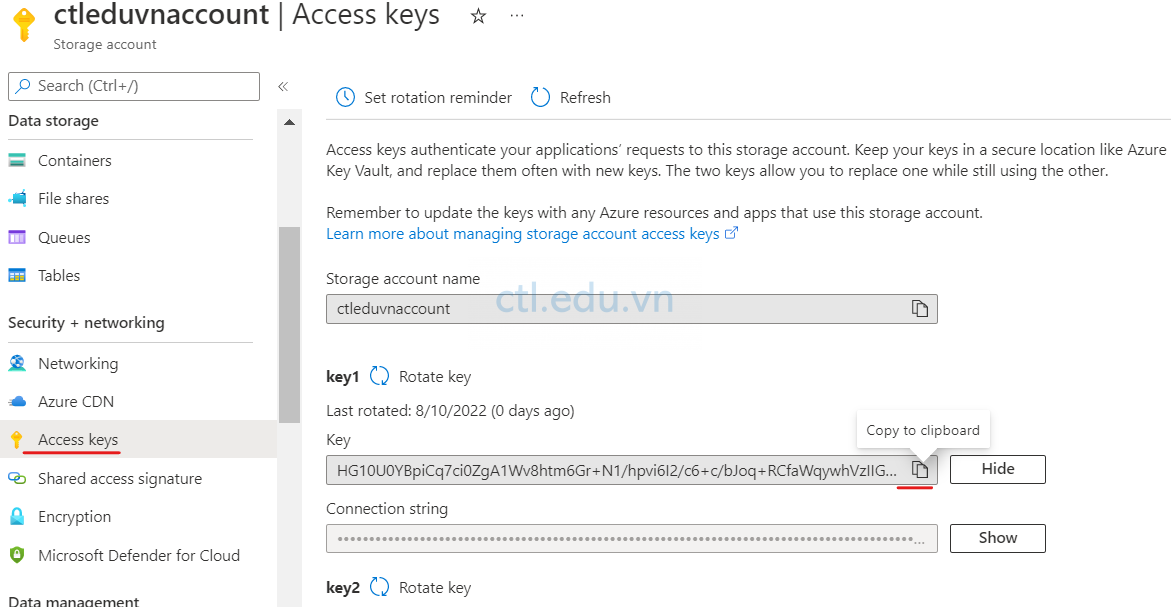
12. Cũng tại màn hình ctleduvnaccount, menu trái chọn Access keys trong phần key 1 ấn Show keys, và copy giá trị của key 1 vào Notepad để dùng cho phần tiếp theo
- Tại Azure portal, menu trái chọn Virtual machines và ấn + Create chọn Azure Virtual Machines
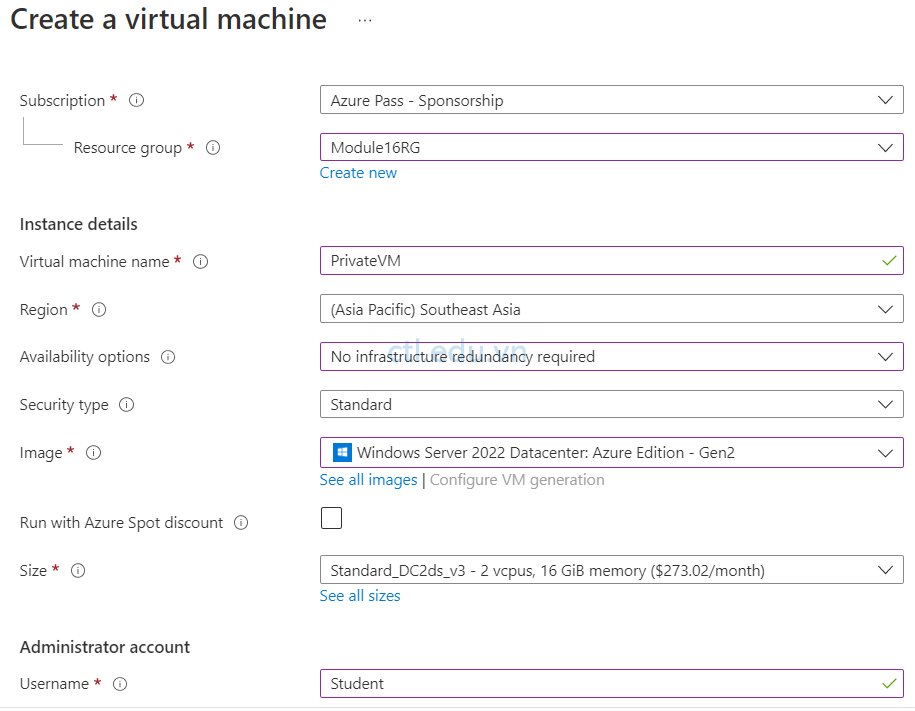
- Màn hình Create a virtual machine, tai tab Basic nhập các thông tin sau:
- Subscription: Chọn Azure subscription của bạn
- Resource group : chọn Module16RG.
- Virtual Machine name: PrivateVM
- Region : Southeast Asia
- Availabitlity options : Chọn No Infrastucture Redundancy Required
- Security Type: chọn Standard
- Image: Windows 2022 Gen2
- Size: DC2ds-V3
- Username: Student
- Password: P@ssW.rd1234
- Public inbound ports : Chọn Option Allow selected ports
- Select inbound ports: 3389
- ấn Next: Disk, và ấn Next: Networking
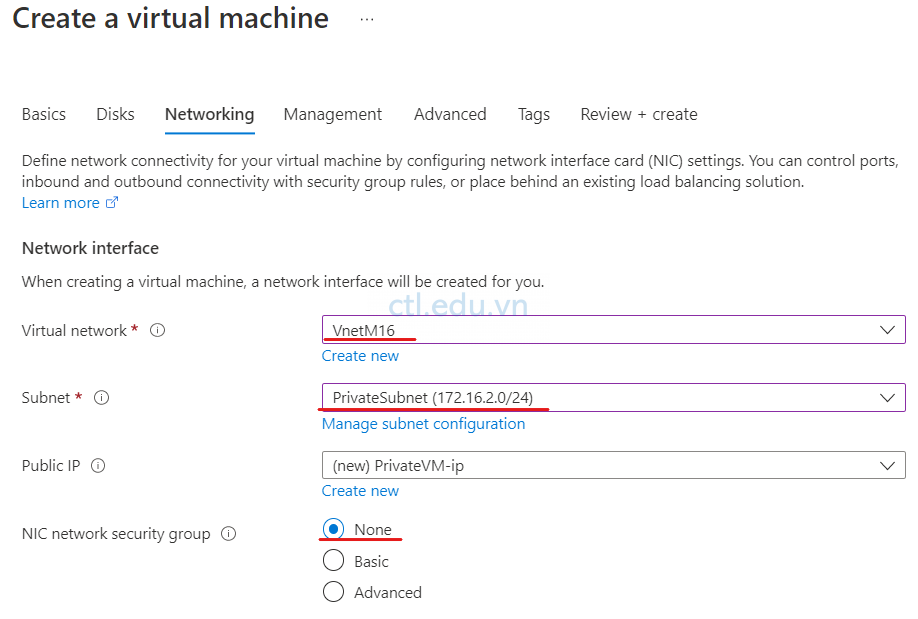
3. Tại Tab Networking chọn các thông tin sau:
- Virtual Network: chọn VnetM16
- Subnet: chọn PrivateSubnet
- Các option còn lại để mặc định
- Ấn Review + Create và ấn Create
4. Tiếp Tục Tại Azure portal, menu trái chọn Virtual machines và ấn + Create chọn Azure Virtual Machines
5. Màn hình Create a virtual machine, tai tab Basic nhập các thông tin sau:
- Subscription: Chọn Azure subscription của bạn
- Resource group : chọn Module16RG.
- Virtual Machine name: PublicVM
- Region : Southeast Asia
- Availabitlity options : Chọn No Infrastucture Redundancy Required
- Security Type: chọn Standard
- Image: Windows 2022 Gen2
- Size: DC2ds-V3
- Username: Student
- Password: P@ssW.rd1234
- Public inbound ports : Chọn Option Allow selected ports
- Select inbound ports: 3389
- ấn Next: Disk, và ấn Next: Networking
- Tại Tab Networking chọn các thông tin sau:
- Virtual Network: chọn VnetM16
- Subnet: chọn PublicSubnet
- NIC network security group: chọn option Basic
- Ấn Review + Create và ấn Create

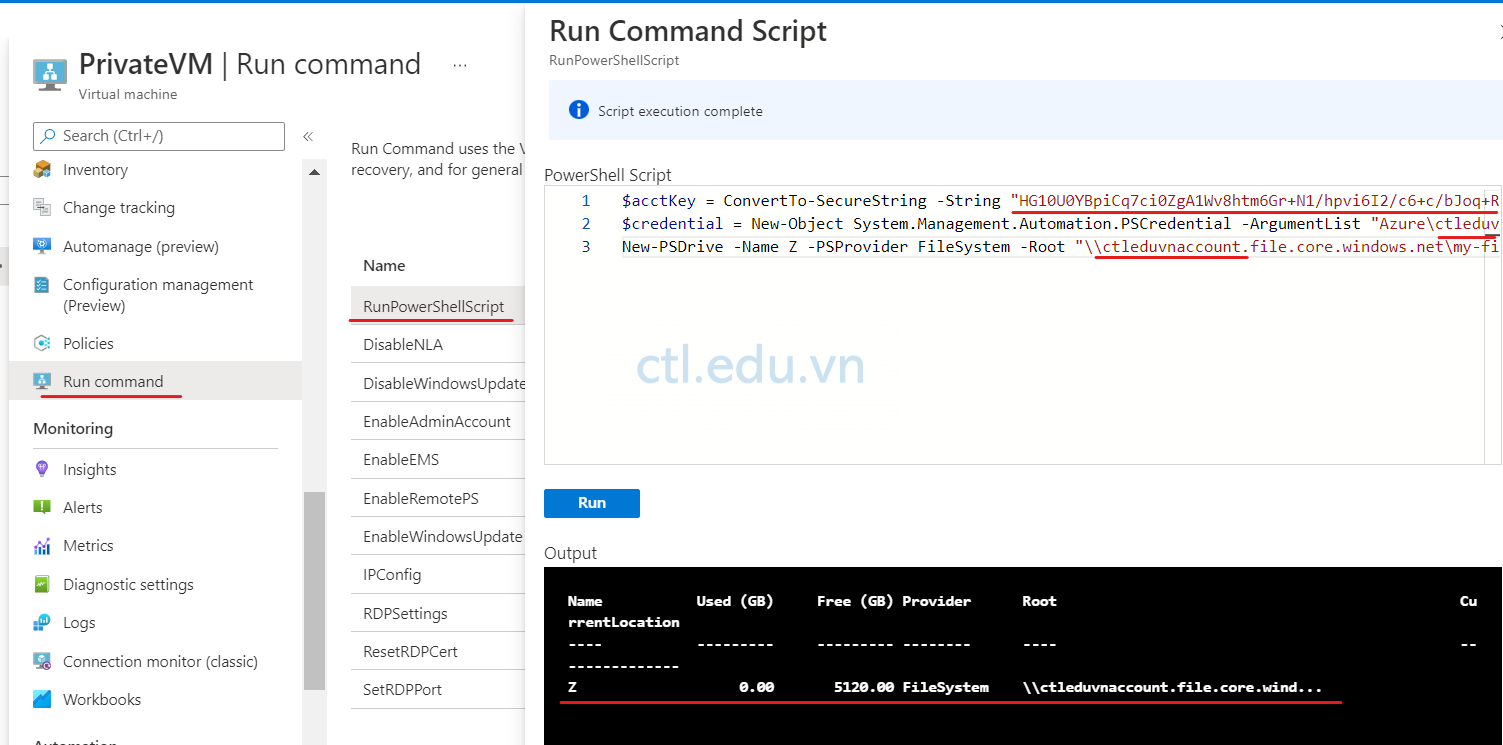
- Tại Azure portal, menu trái chọn Virtual machines, chọn PrivateVM
- Màn hình privateVM, menu trái chọn Run Command và chọn RunPowerShellScript và thực thi đoạn Script sau (Lưu ý thay <storage-account-key> bằng Key bạn đã copy ở bước 12 task 4, và thay <storage-account-name> bằng storage account bạn đã tạo ở bước 3 task 4)
- $acctKey = ConvertTo-SecureString -String “<storage-account-key>” -AsPlainText -Force
- $credential = New-Object System.Management.Automation.PSCredential -ArgumentList “Azure\<storage-account-name>”, $acctKey
- New-PSDrive -Name Z -PSProvider FileSystem -Root “\\<storage-account-name>.file.core.windows.net\my-file-share” -Credential $credential -Persist
Chờ vài phút, ánh xạ ổ đĩa Z: thành công, PrivateVM truy cập storage thành công.
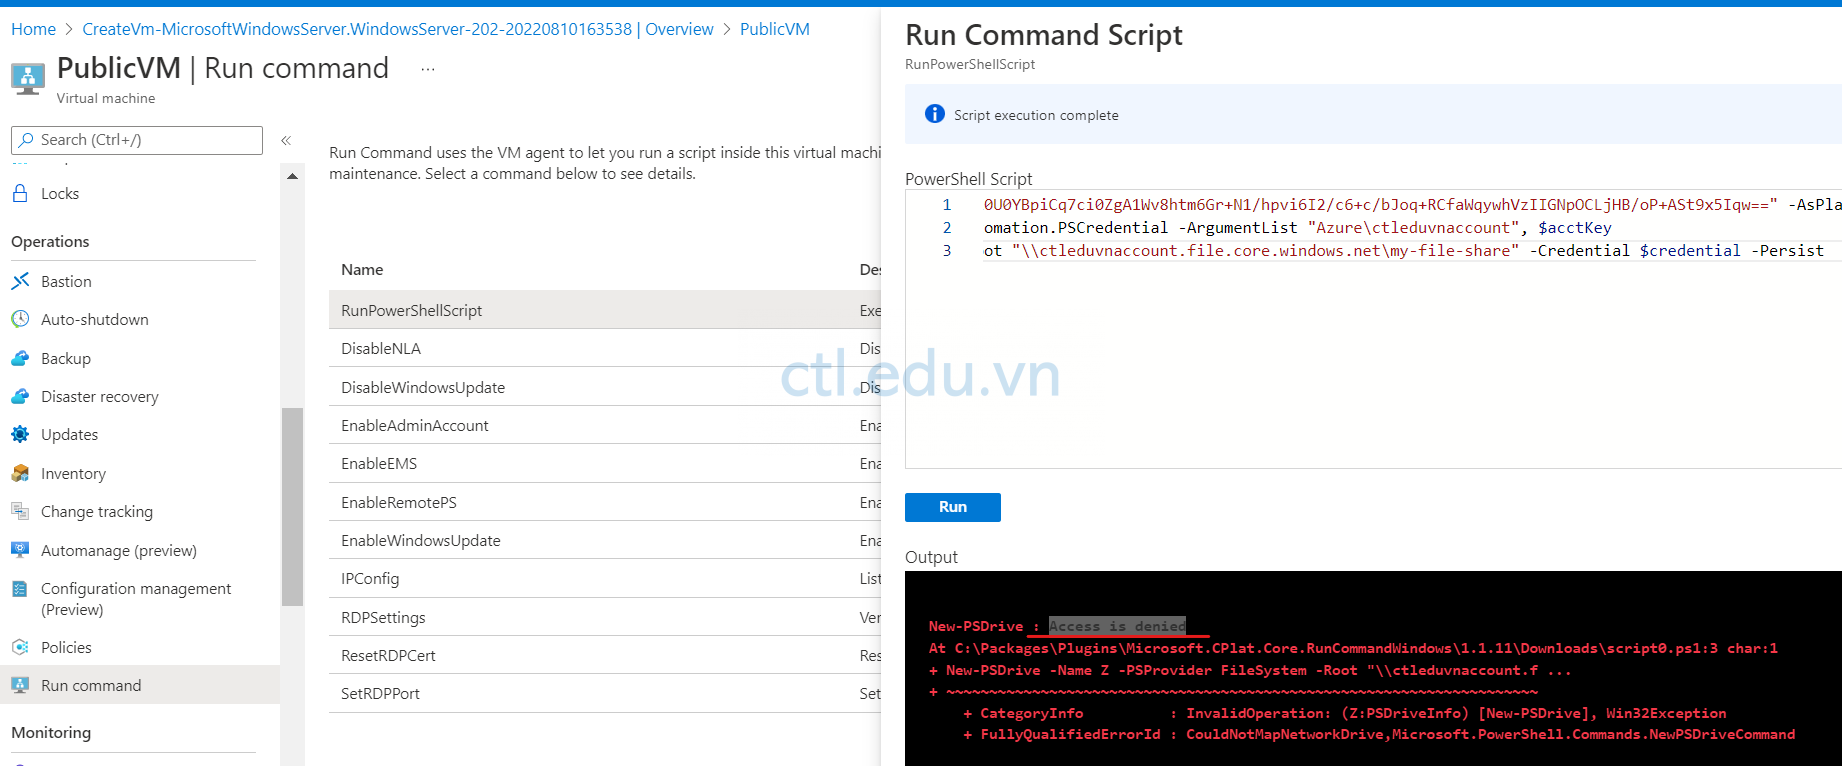
- Tại Azure portal, menu trái chọn Virtual machines, chọn PublicVM
- Màn hình PublicVM, menu trái chọn Run Command và chọn RunPowerShellScript và thực thi đoạn Script sau (Lưu ý thay <storage-account-key> bằng Key bạn đã copy ở bước 12 task 4, và thay <storage-account-name> bằng storage account bạn đã tạo ở bước 3 task 4)
- $acctKey = ConvertTo-SecureString -String “<storage-account-key>” -AsPlainText -Force
- $credential = New-Object System.Management.Automation.PSCredential -ArgumentList “Azure\<storage-account-name>”, $acctKey
- New-PSDrive -Name Z -PSProvider FileSystem -Root “\\<storage-account-name>.file.core.windows.net\my-file-share” -Credential $credential -Persist
Chờ vài phút, ánh xạ ổ đĩa Z: không thành công, PublicVM không thể truy cập storage.