Module 15 Lab Microsoft Azure hướng dẫn bạn Migrate Physical Servers to Azure on-premises lên Microsoft Azure
Để thực hiện bài lab bạn cần chuẩn bị hệ thống mạng on-premises gồm:
- Ser01: Cài Replication appliance (Ip:192.168.1.3/24)
- Ser02: Cài Mobility Service là máy cần Migrate lên Azure (IP:192.168.1.4/24)
Trước khi thực hiện bài lab, bạn logon vào Ser02 (server cần migrate), kiểm tra ser02 đã enable remote desktop chưa, lưu ý nhớ bỏ check box Network level Authentication, và thực hiện cài IIS là tạo web defauft trên máy Ser02.
Exercise 1. Migrate Physical Servers to Azure
Ở task này bạn tạo sẵn Resource Group – Vnet và Network security group cho các máy physical sẽ migrate lên Azure.
1. Tại Azure, vào menu trái chọn Resource groups, ấn +add
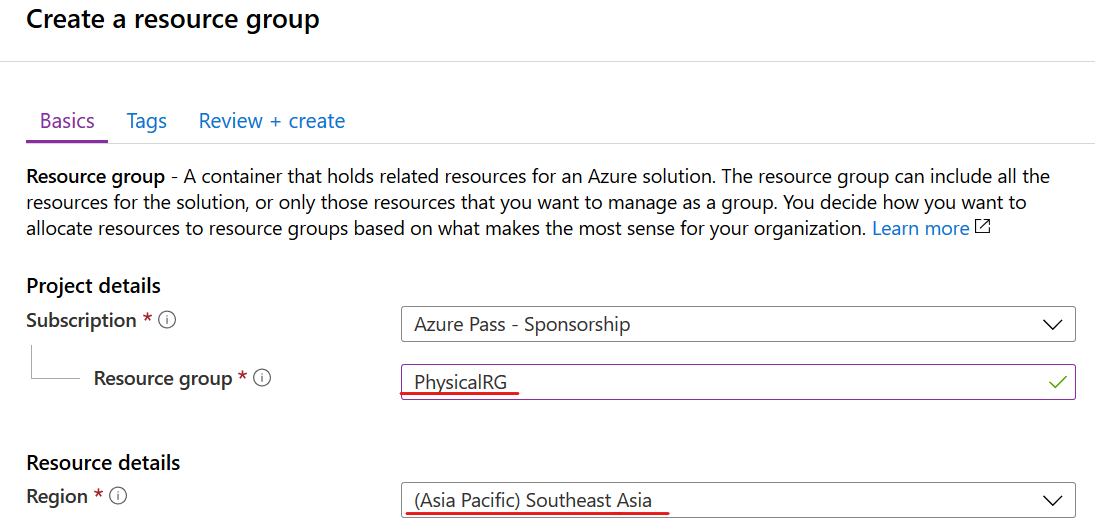
2. Màn hình Create a resource group, nhập các thông tin sau:
- Subscription: chọn subscription của bạn
- Resource group: PhysicalRG
- Region: Southeast Asia
- Ấn Create + Review và ấn Create
3. Tại màn hình Resource Groups, chọn PhysicalRG vừa tạo
4. Màn hình PhysicalRG, ấn +add, tìm và chọn Virtual network, ấn Create
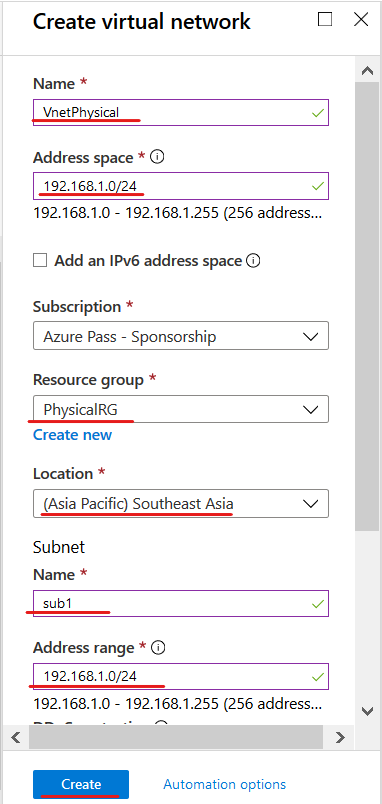
5. Màn hình Create Virtual Network, nhập các thông tin sau:
- Name: VnetPhysical
- Address space: 192.168.1.0/24
- Subscription: chọn Subscription của bạn
- Resource group: chọn PhysicalRG
- Location: Southeast Asia
- Subnet name: sub1
- Address space: 192.168.1.0/24
- ấn Create
6. Tại màn hình Resource Groups, tiếp tục chọn PhysicalRG
7. Màn hình PhysicalRG, ấn +add, tìm và chọn Network Security Group, ấn Create
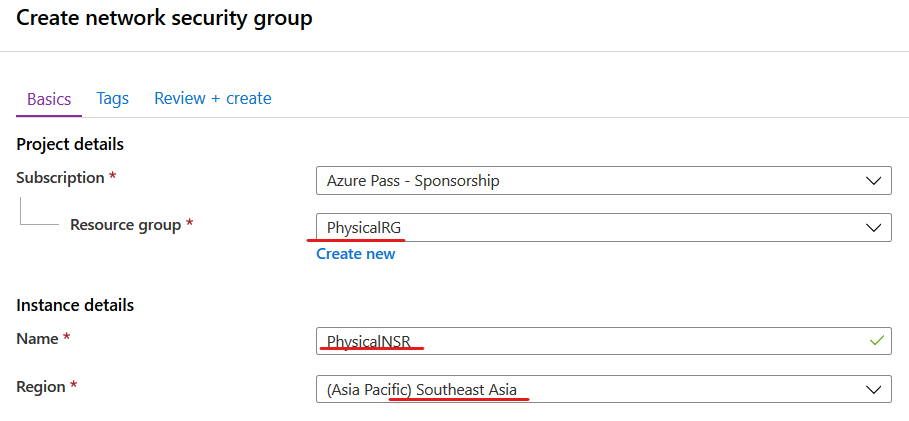
8. Màn hình Create network security group nhập các thông tin sau:
- Subscription: chọn Subscription của bạn
- Resource Group: PhysicalRG
- Name: PhysicalNSR
- Region: Southeast Asia
- Ấn Create + Review và Create
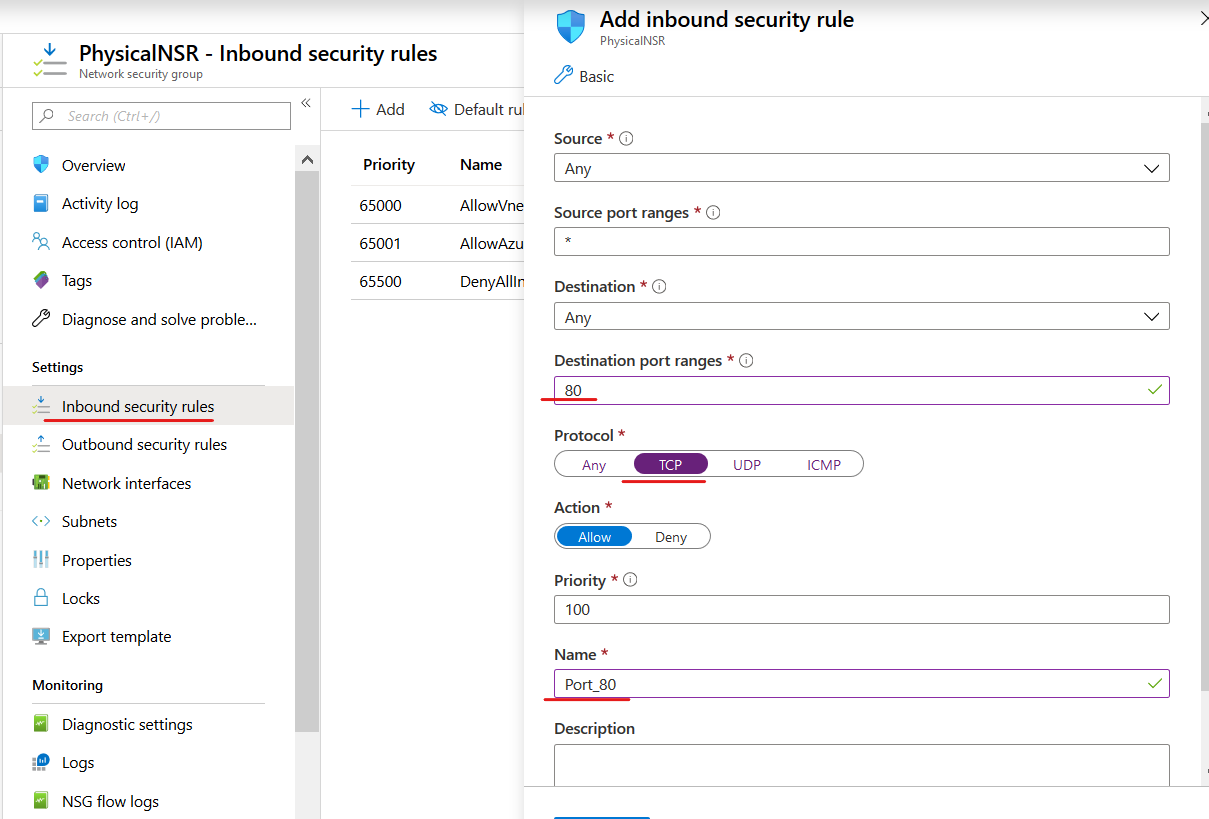
9. Tại màn hình Resource Groups, chọn PhysicalRG, chọn PhysicalNSG vừa tạo, menu trái chọn Inbound security rules và ấn +Add
10. Màn hình Add inbound security rule nhập các thông số sau:
- Destination port ranges: 80
- Protocol: TCP
- Name: Port_80
- Ấn Add
11. Màn hình Inbound security rules tiếp tục ấn +Add và nhập các thông số sau:
- Destination port ranges: 3389
- Protocol: TCP
- Name: Port_3389
- Ấn Add
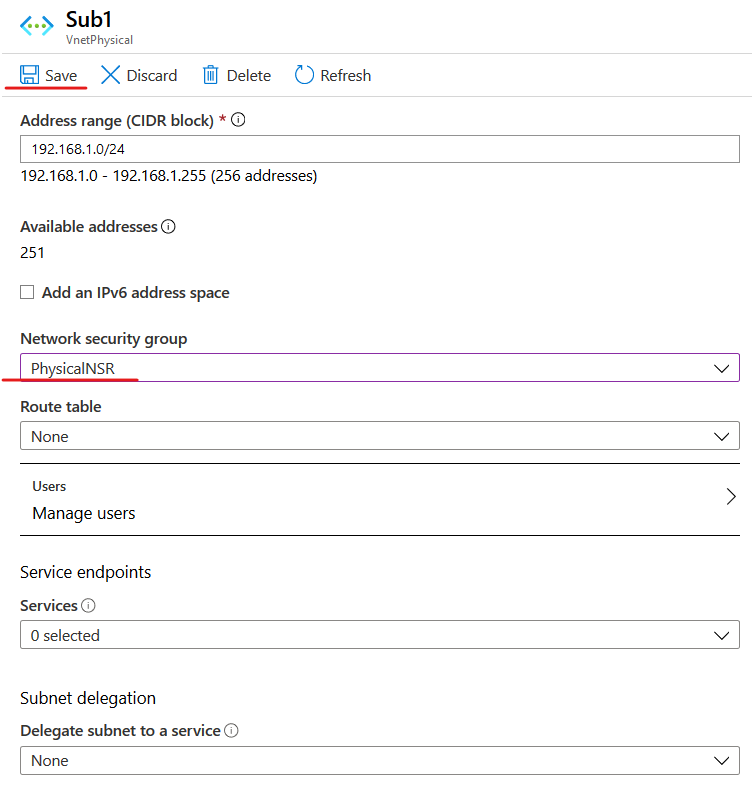
12. Tại Azure vào menu trái chọn Virtual networks, chọn VnetPhysical, menu trái chọn Subnets, vào chọn Sub1
13. Màn hình Sub1, trong phần Network Security Group chọn PhysicalNSG ,ấn Save.
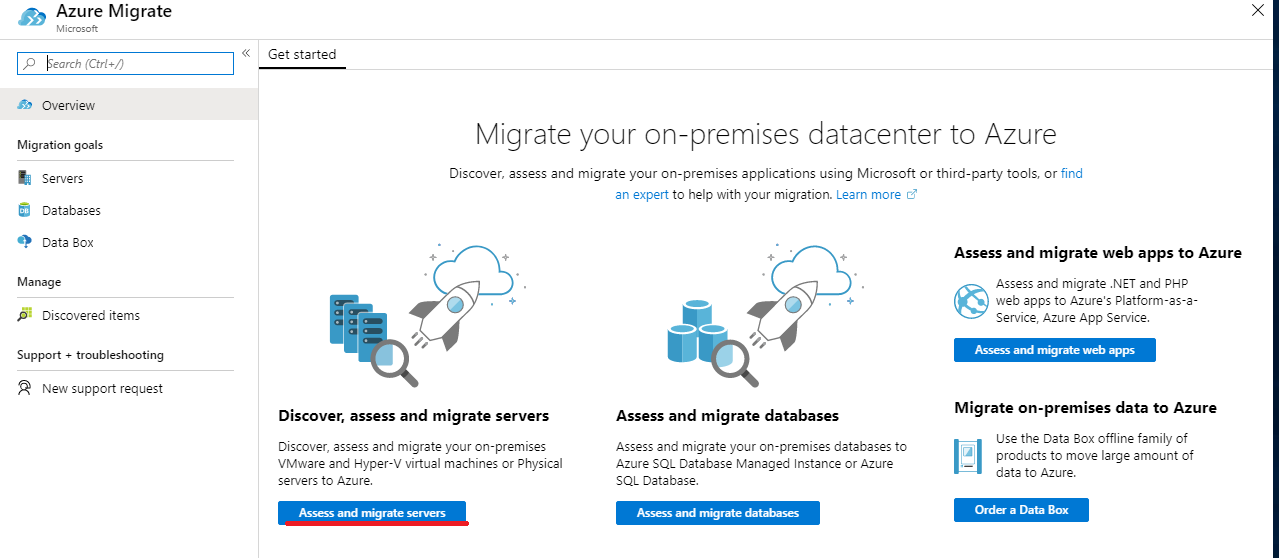
1. Tại Azure portal vào menu trái chọn All services, tìm và chọn icon hinh ngôi sao Azure Migrate.
2. Màn hình Azure Migrate, chọn Access and Migrate Servers
3. Màn hình Azure Migrate – Servers, chọn Create Project
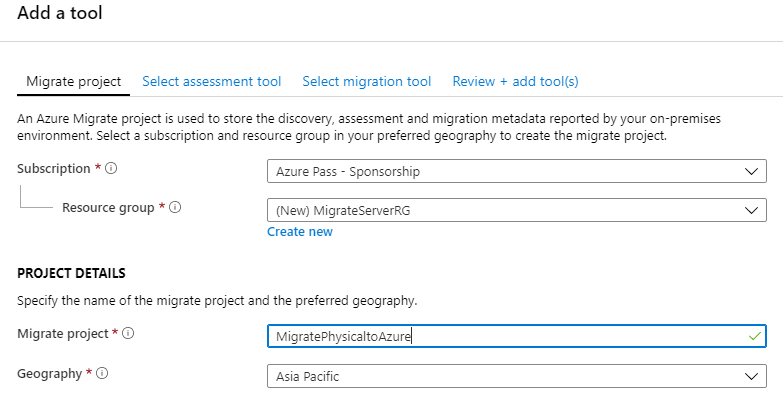
4. Màn hình Add Tool nhập các thông tin sau:
- Subscription: chọn subscription của bạn
- Resource Group: ấn Create New, nhập vào MigrateServerRG, ấn Ok
- Migrate Project: nhập vào MigratePhysicaltoAzure
- Geography: chọn Asia Pacific
- Ấn Create
5. chờ vài phút, trở lại màn hình Azure Migrate – Servers
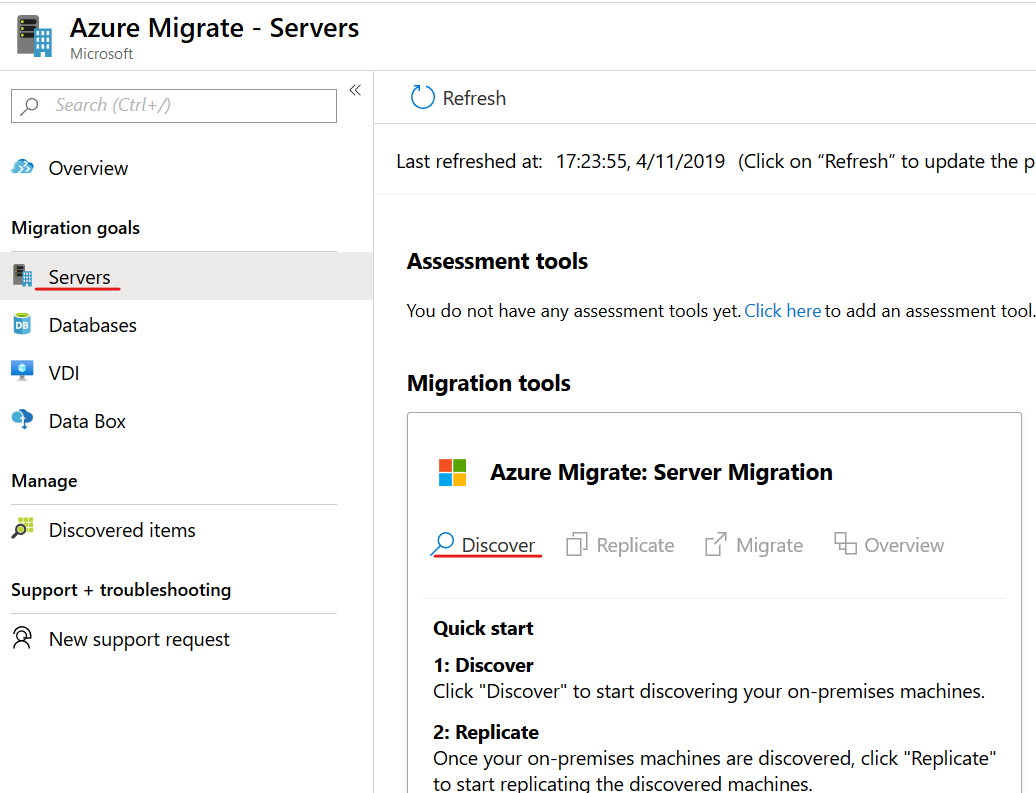
1. Tại màn hình Azure Migrate – Servers, menu trái chọn Server
2. Trong phần Migration tools chọn Discover
3. Màn hình Discover Machines, chọn các thành phần sau:
- Trong phần Are your Machines virtualized? chọn Physical or other
- Trong phần target region: chọn Southeast Asia.
- Check vào Confirm that the target region …
- Ấn Create Resources. (chờ vài phút)

4. Trong phần Do you want to install a new replication appliance or scale-out existing setup?, chọn Install a replication appliance.
5. Trong phần 1. Download and install the replication appliance software., ấn vào link download file MicrosoftAzureSiteRecoveryUnifiedSetup.exe
6. Và trong phần 2. Configure the replication appliance and register it to the Azure Migrate project ấn vào nút Download để download file registration key

1. Thực thi file MicrosoftAzureSiteRecoveryUnifiedSetup.exe trên máy bạn cần cài replication appliance (Ser01).
- Màn hinh before you begin, chọn option Install the configuration server add process server , ấn next
- Check vào checkbox I accept the third party license agreement ấn next.
- Ấn Browse chọn file registration key bạn download ở bước 6 task 2, ấn next
- Chọn option connect directly to Azure…, ấn next
- Chờ kiểm tra xong ấn next
- Đặt password cho SQL Database ấn Next
- Màn hình Environment Details chọn option No ấn next
- Để đường dẫn măc định ấn Next
- Màn hình Network Selection: Chọn card mạng ấn next
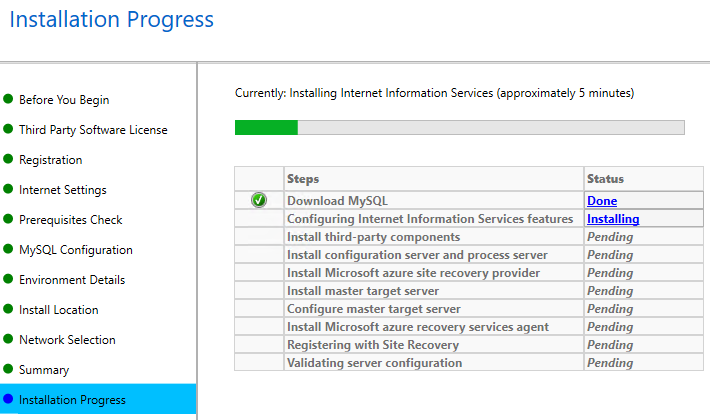
- Màn hình summary ấn Install (chờ cài xong 50 phút), ấn Finish, ấn Ok
- Cửa sổ Configuration Server Passphrase ấn Yes. (để lưu passphrase)
- Trên đĩa C: tạo file Pass.txt và paste passphrase vào.
- Xuất hiện màn hình Microsoft Azure Site recovery Configuration server, tại tab Account ấn Add account, nhập username và password ấn Ok (user và password có thể truy cập vào các máy cần Migrate lên Azure), ấn Close
Khởi động lại máy vừa cài replication appliance (Ser01)

2. Trở lại Azure, tại màn hình Azure Migrate – Servers, menu trái chọn Server
3. Trong phần Migration tools chọn Discover
4. Màn hình Discover Machines, chọn các thành phần sau:
- Trong phần Are your Machines virtualized? chọn Not Virtualized /other
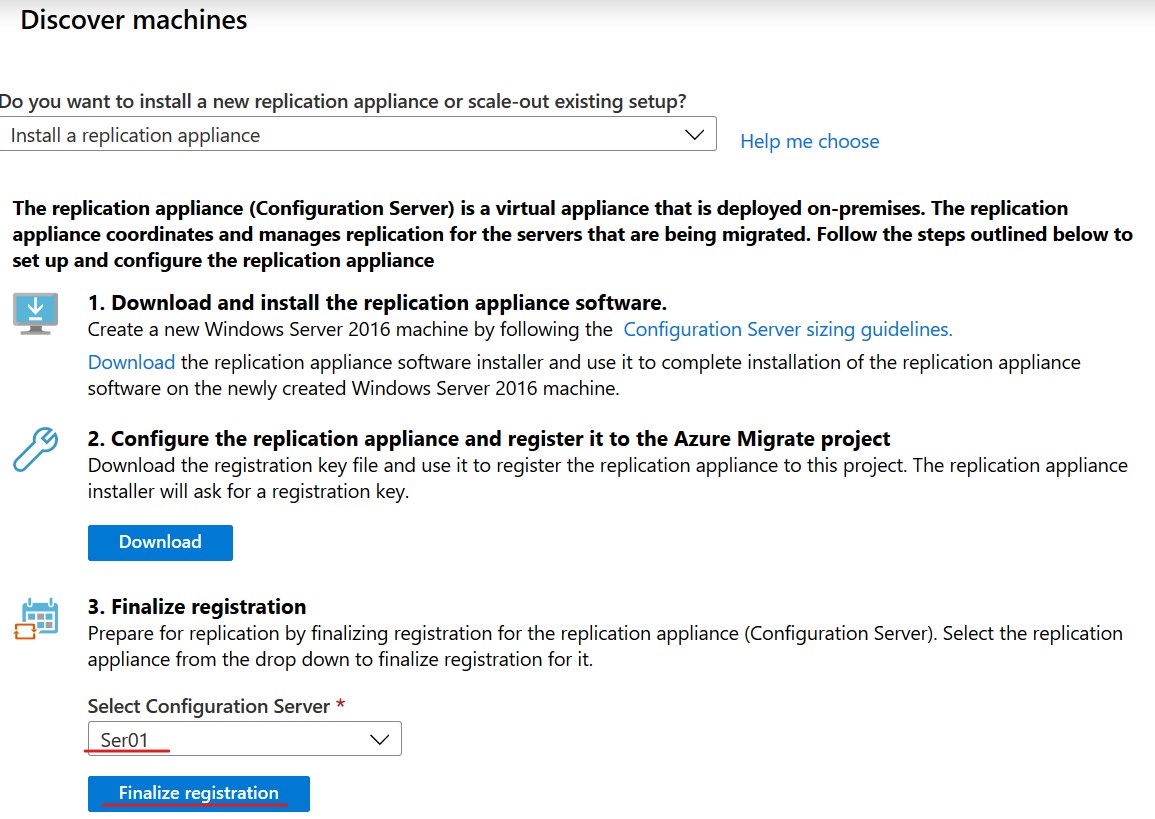
- Trong phần Do you want to install a new replication appliance or scale-out existing setup?, chọn Install a replication appliance
- Trong phần 3. Finalize registration chọn pcname (ser01) máy bạn vừa cài replication appliance ấn Finalize registration. (chờ hoàn tất 5 phút)
- Đóng cửa sổ Discover Machines.
1. Tại máy vừa cài (ser01) vào c:ProgramDataASRhomesvsystems pushinstallsvcrepository copy file Microsoft- ASR_UA_9.29.0.0_Windows_GA_12Sep2019_Release.exe sang máy bạn cần migrate lên Azure
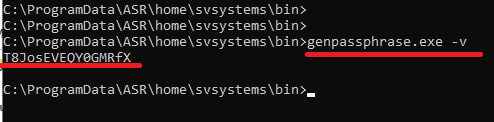
2. Nếu bạn chưa có passphrase thì tại máy vừa cài replication appliance vào cmd thực hiện lệnh sau để lấy passphrase
- cd C:ProgramDataASRhomesvsystemsbin
- genpassphrase.exe -v
- Lưu lại passphrase vào file pass.txt và copy sang máy cần migrate lên Azure (file này bạn đã tạo ở khi mới cài replication appliance)
3. Sang máy cần Migrate (ser02) lên Azure, vào CMD thực hiện các lệnh sau
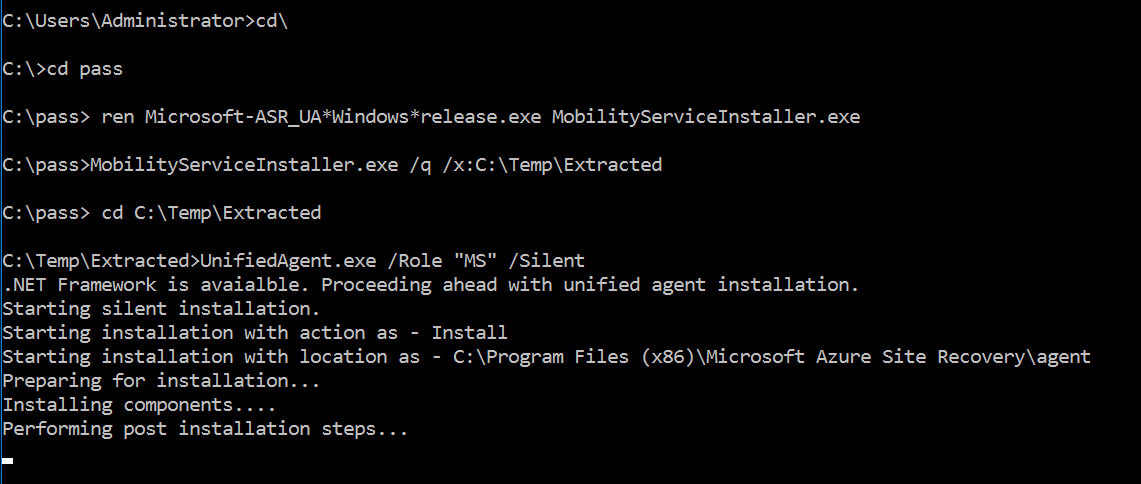
- chuyển sang folder chứa file Microsoft- ASR_UA_9.29.0.0_Windows_GA_12Sep2019_Release.exe mà bạn đã copy sang từ bước 1
- Thực thi lệnh ren Microsoft-ASR_UA*Windows*release.exe MobilityServiceInstaller.exe để đổi tên file
- Thực thi lệnh MobilityServiceInstaller.exe /q /x:C:TempExtracted
- Chuyển vào folder cd C:TempExtracted
- Thực thi lệnh UnifiedAgent.exe /Role “MS” /Silent (chờ thực thi xong)
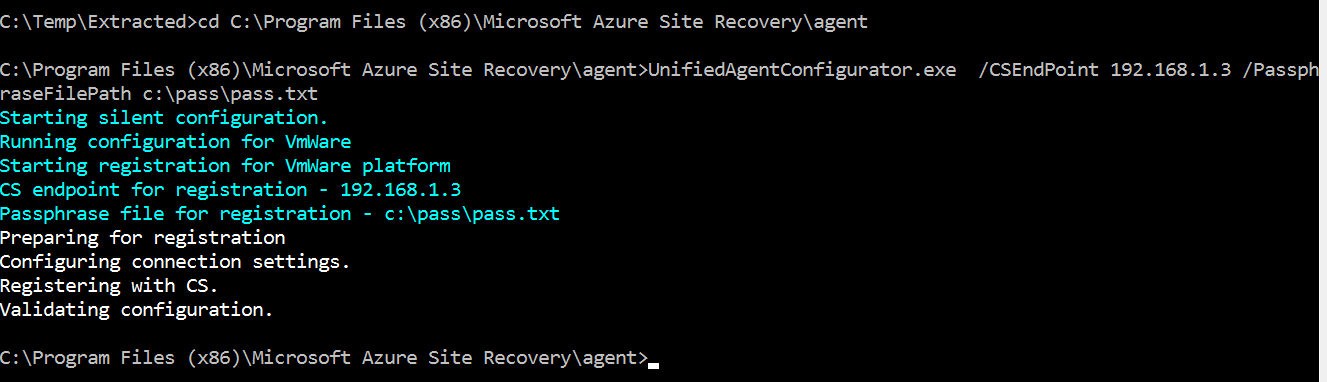
- Chuyển vào folder cd C:Program Files (x86)Microsoft Azure Site Recovery agent
- Thực hiện lệnh sau thay <replication appliance IP adder> bằng Ip máy bạn cài replication appliance (ip máy ser01), thay <Passphrase File Path> bằng file pass.txt lưu passphrase.
UnifiedAgentConfigurator.exe /CSEndPoint <replication appliance IP address> /PassphraseFilePath <Passphrase File Path>
1. Trở lại Azure, vào Menu trái chọn Azure Migrate
2. Màn hình Azure Migrate menu trái chọn Servers.
3. Trong phần Migration tools chọn Replicate

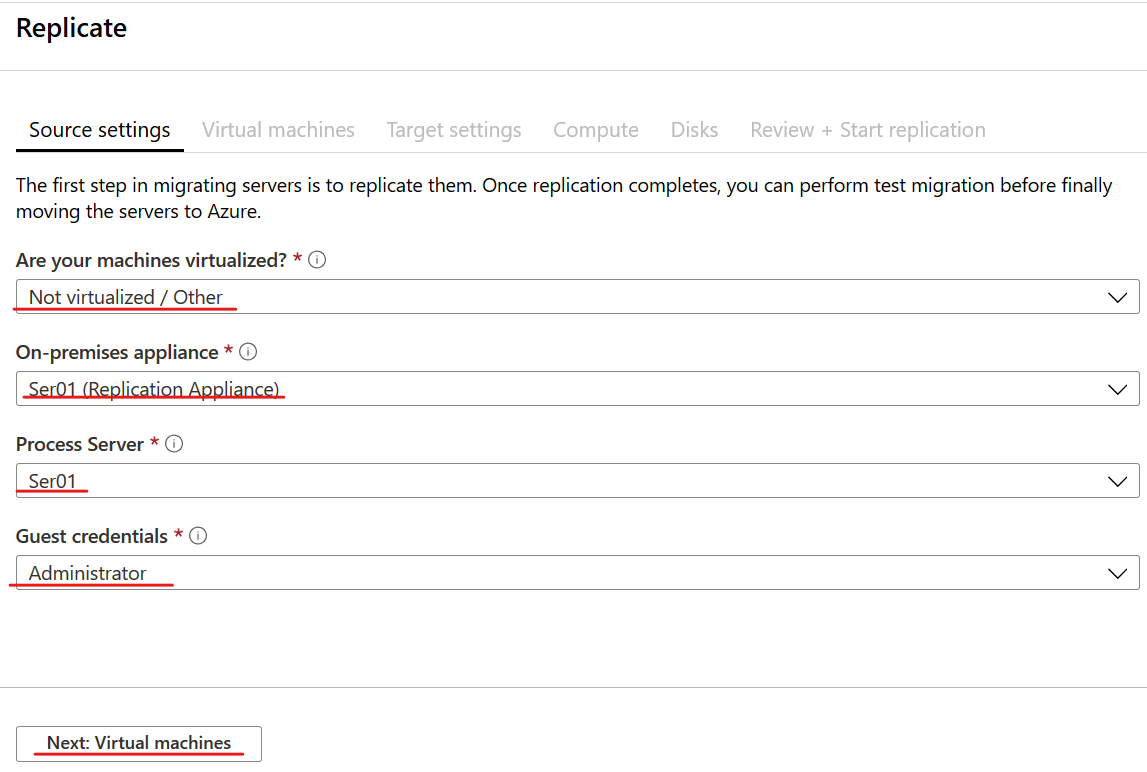
4. Màn hình Replicate chọn các thông tin sau:
- Are your machines virtualized? : Not Virtualized /Other
- On-premises appliance : Ser01
- Process Server : Ser01
- Guest credentials : Administrator
- Ấn Next: Virtual machines
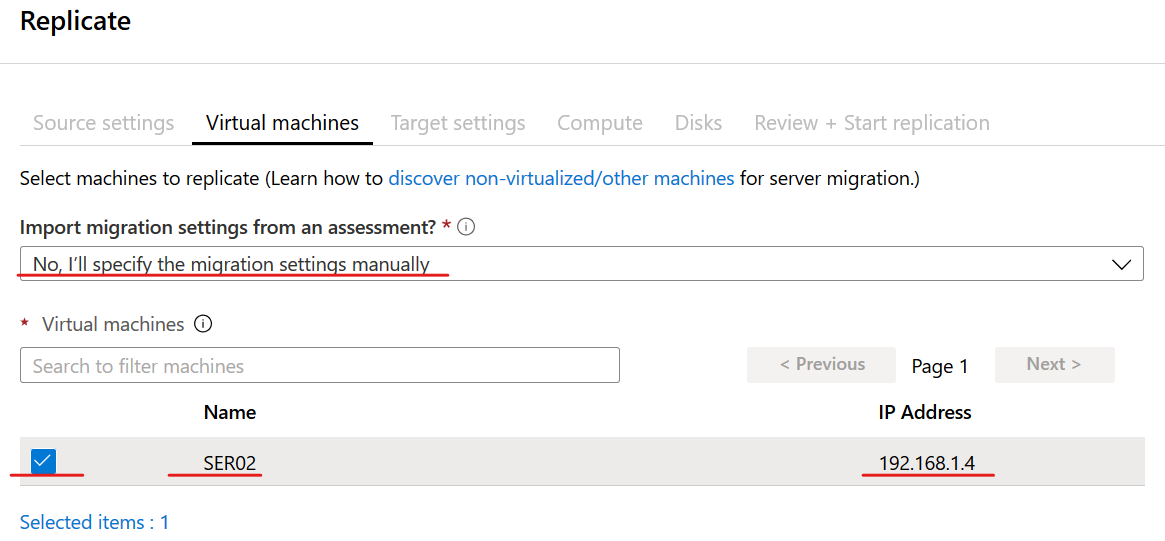
5. Tại Tab Virtual Machines, chọn các thành phần sau:
- Trong phần Import migration settings from an assessment?, chọn No, I’ll specify the migration settings manually
- Trong phần Virtual Machines chọn Ser02
- Ấn Next: Target settings
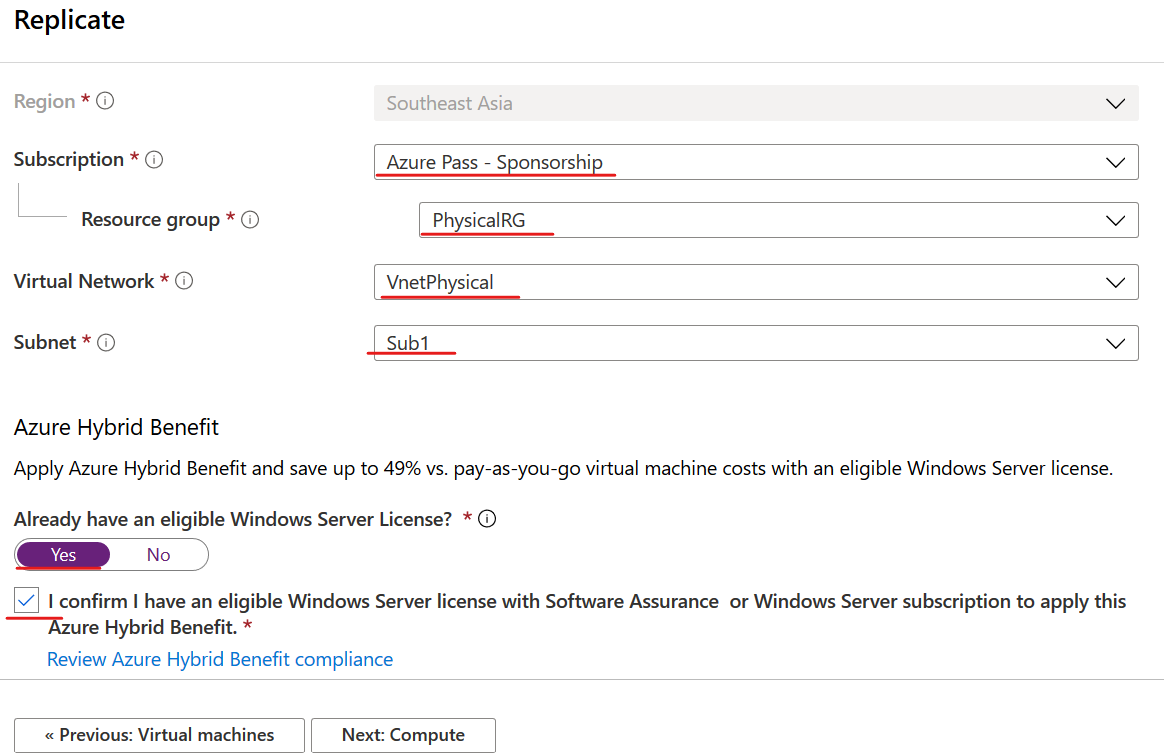
6. Tại tab Target settings, chọn các thông tin sau:
- Subscription: chọn subscription của bạn
- Resurce Group: PhysicalRG.
- Virtual network: VnetPhysical
- Subnet: Sub1
- Azure Hybrid Benefit : chọn Yes và check vào I Confirm…
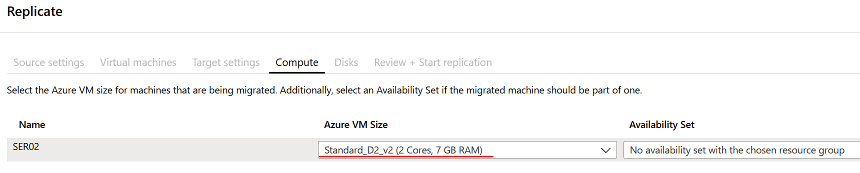
- Ấn Next: Compute
7. Tại tab Compute, trong phần Azure VM Size chọn Standard_D2_V2 ấn next: Disk
8. Tại tab Disk để mặc định, ấn Next: Review + start replication và ấn Replicate (chờ replicate xong)
9. Tại màn hình Azure Migrate – Servers, menu trái chọn Server
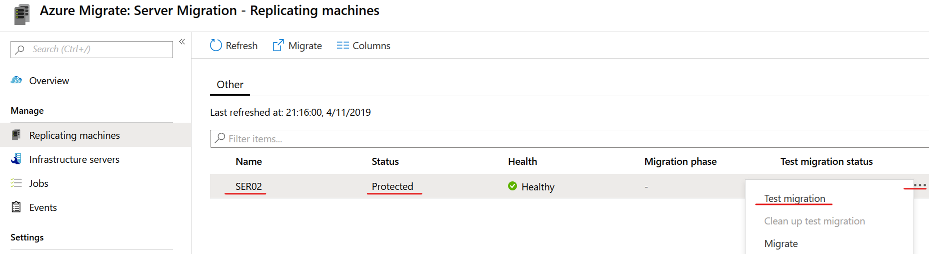
10. Trong phần Migration tools chọn Overview, menu trái chọn Replicating machines, quan sát và chờ cột Status có trạng thái là Protected (khá lâu trên 15 phút)

Trước khi thực hiện Migrate, bạn nên thực hiện test Migrate trước.
1. Cũng tại màn hình Azure Migrate: Server Migration – Replicating machines, chọn vào … bên phải Ser02 chọn Test Migration
2. Màn hình Test migration, trong phần Virtual Network chọn VnetPhysical ấn Test Migration
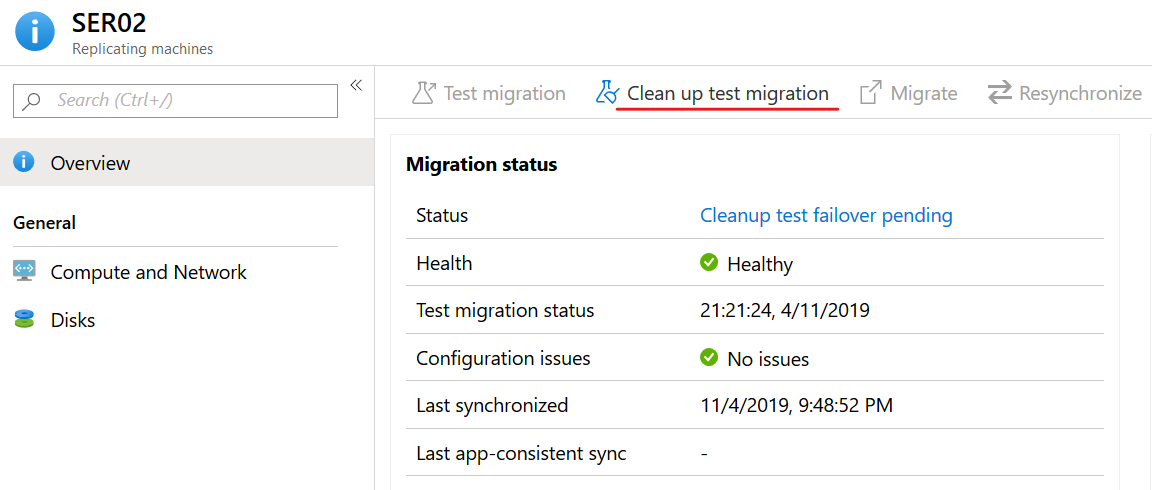
3. Tại màn hình Azure Migrate: Server Migration – Replicating machines chờ cho cột Status có trạng thái là Cleanup test failover pending
4. Bạn có thể kiểm tra bằng cách vào menu trái chọn Virtual Machines, kiểm tra thấy có Ser02-test (thực hiện gán Ip public, kiểm tra truy cập web thử nghiệm)
5. Trở lại màn hình Azure Migrate: Server Migration – Replicating machines chọn Ser02.
6. Chọn Clean up test migration, màn hình Test migrate cleanup, check vào Testing is complete. Delete test virtual machine. ấn Cleanup test (chờ Cleanup xong)
1. Tại Azure, vào menu trái chọn Azure Migrate.
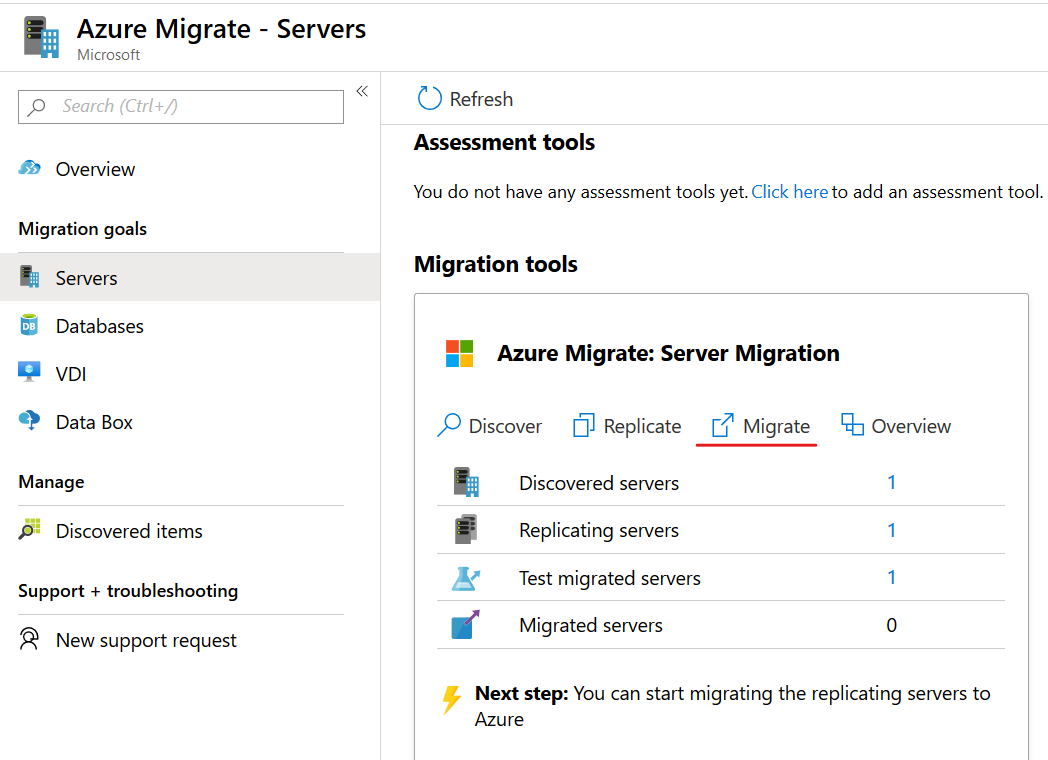
2. Màn hình Azure Migrate, menu trái chọn Servers,
3. Trong phần Migration tools chọn Migrate
4. Màn hình Migrate chọn các thành phần sau:
- Trong phần Shutdown machines before migration minimize data loss, chọn Yes
- Check vào Ser02 ấn Migrate
5. Tại Azure, vào menu trái chọn Virtual Machines, kiểm tra thấy có Ser02 đã được Migrate thành công, thực hiện gán Ip public, kiểm tra truy cập web.

Mr CTL