Theo mặc định, tất cả các sites, lists, and libraries trong site collection kế thừa các quyền từ site chứa nó trong cấu trúc phân cấp site. Điều này có nghĩa là một site kế thừa các quyền từ root site của site collection ( một site con kế thừa các quyền từ site cha của nó). Các Folders, lists và documents kế thừa các quyền từ site chứa chúng, v.v.
SharePoint Site là tập hợp những người dùng có cùng một nhóm quyền trên site và nội dung. Thay vì gán quyền cho từng người một, bạn có thể sử dụng Groups để gán cùng một mức độ quyền cho nhiều người một cách thuận tiện.
Ngoài những Groups và Permissions mặc định, Sharepoint Administrator có thể định nghĩa thêm các Groups và Custom Permissions phù hợp cho yêu cầu của tổ chức.

Bài Lab hướng dẫn cách định nghĩa thêm Custom Permissions và cấp quyền cho Custom Group, Bài lab cũng hướng dẫn bạn cách import excel file vào custom list.
Task 1 – Assign Site Permissions To Your Site
Phần này bạn sẽ định nghĩa các quyền để cấp cho user bên ngoài công ty.
- Đăng nhập vào trang https://admin.microsoft.com/ bằng user têncủabạn@customdomain
- Menu trái chọn Show All và chọn SharePoint
- Tại màn hình Sharepoint admin center, menu trái chọn Sites\Active Sites truy cập vào site Human Resources.
- Tại site Human Resources, click vào icon Settings (bánh răng ở góc trên bên phải) chọn Site Permissions và chọn tiếp Advance permissions settings.
- Xuất hiện cửa sổ Permissions, trên thanh công cụ trong phần Manage, chọn Permission Levels.

6. Cửa sổ Permission Levels, chọn Add a Permission Level.
7. Cửa sổ Add a Permission Level nhập các thông tin sau:
- Name: Restricted Use
- Description: This level restricts the level of use inside the Human Resources site.
- Không check Select All
- Trong phần List Permissions chọn các quyền sau:
- Manage lists (sẽ tự chọn View Items)
- Add items
- Edit items
- View versions (sẽ tự chọn Open Items)
- View Application Pages
- Trong phần Site Permissions chọn các quyền sau:
- Add and Customize Pages (sẽ tự chọn Browse Directories, View Pages, and Open)
- Use Self-Service Site Creation (sẽ tự chọn Browse User information)
- Use Remote interfaces
- Use Client integration features
- Ấn Create, kiểm tra Permission Level Restricted Use đã được tạo

Bước tiếp theo hướng dẫn tạo Group.
8. Trở về cửa sổ Permission, Trên thanh công cụ, trong phần Grant, chọn Create Group và nhập các thông tin sau:
- Name: Consultants
- About Me: This group is used for allowing consultants to modify work products only.
- Who can view the Membership of the Group: Everyone
- Who can edit the membership of the Group: Group Owner
- Allow requests to Join/leave this group: No
- Auto-accept requests: No
- Choose the permission level group members get on this site: check chọn Restricted use – This level restricts the level of use inside the Human Resources site
- Ấn Create

Cấp quyền cho External User:
9. Chọn Group Consultants vừa tạo, chọn New và chọn Add Users.
10. Nhập vào user của bạn mình (User bên ngoài công ty), check vào Send an email invitation, ấn Share
11. Đề nghị bạn mình check mail sẽ nhân được Email từ Human Resources site (lưu ý Bạn mình phải cài Microsoft Authenticator App, quét mã QR Code để đăng nhập vào site)

Task 2 – Upload Excel to Sharepoint List
Phần này bạn sẽ upload nội dung file excel vào Sharepoint list sử dụng user têncủabạn@customdomain (internal user) hay External user mà bạn đã gán quyền ở Task 1
- Mở file Service Request System.xlsx (file này có trong folder Allfiles)
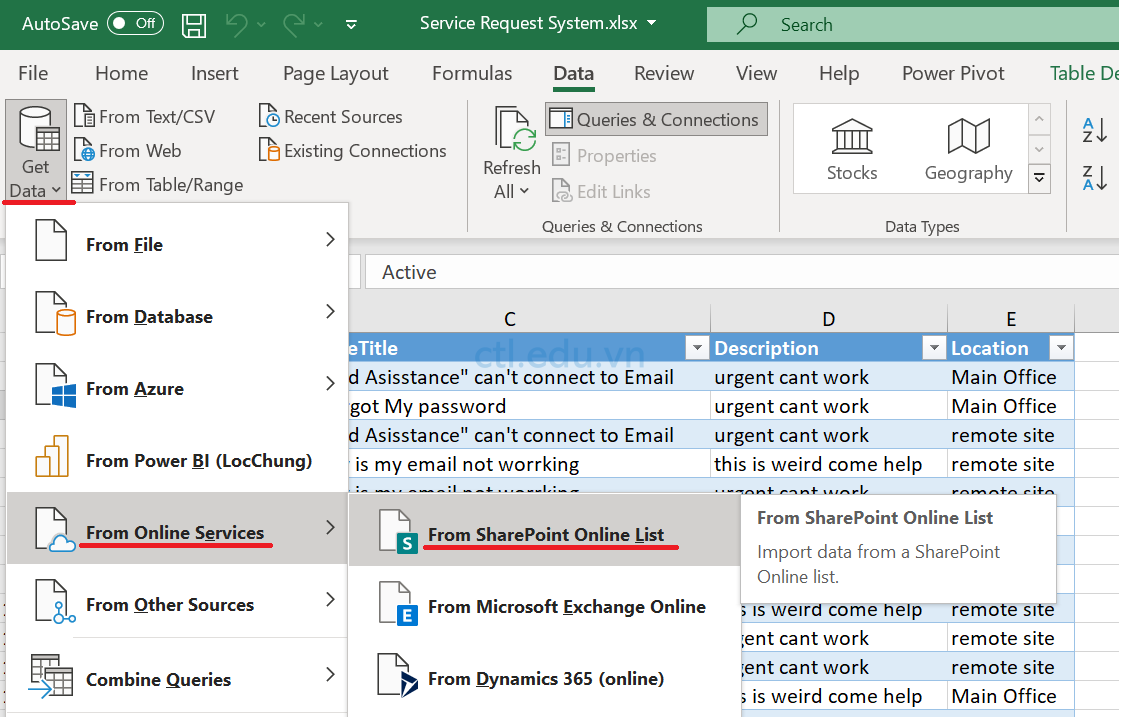
- Tại Excel vào menu Data, trên thanh công cụ trong phần Get & Transform Data, chọn Get Data chọn From Online Services, và chọn From SharePoint Online list.
- Cửa sổ SharePoint Online lists, trong phần Site URL nhập vào link của site HumanResources (https://têncôngty.sharepoint.com/sites/HumanResources) ấn Ok
- Xuất hiện cửa sổ xác thực chọn Microsoft account, nhập vào user và password của têncủabạn@customdomain (internal user) hay External user mà bạn đã gán quyền ở Task 1, ấn Sign in, và ấn Connect.
- Xuất hiện cửa sổ Navigator, điều này chứng tỏ bạn có đã kết nối thành công lên Sharepoint, ấn Cancel để đóng cửa sổ Navigator.

6. Để Upload nội dung file excel lên Sharepoint list, bạn chọn 1 cell bất kỳ trong phần dữ liệu của file excel, vào menu Table Design, trên thanh công cụ trong phần External Table Data, chọn Export Table to SharePoint List.
7. Xuất hiện cửa sổ export nhập các thông tin sau:
- Address: nhập vào link của Human Resources site (https://têncôngty.sharepoint.com/sites/HumanResources)
- Name: List from Excel
- ấn Next, Finish
8. Trở về site Human Resources, Menu trái chọn site content, chọn List from Excel, sẽ thấy toàn bộ nội dung file Excel đã upload lên Sharepoint.

Bạn tìm hiểu thêm cách tạo thêm Columns, và tạo filter views cho SharePoint list
Hoàn tất bài lab
