Microsoft Power Automate là dịch vụ quy trình công việc trực tuyến cho phép một tổ chức làm việc thông minh hơn và hiệu quả hơn bằng cách tự động hóa quy trình công việc trên các ứng dụng và dịch vụ phổ biến nhất của tổ chức
Power Automate cung cấp một nền tảng low-code để xây dựng quy trình công việc và tự động hóa quy trình.

Bài lab này bạn sẽ tìm hiểu cách sử dụng Power Automate để xây dựng và quản lý quy trình công việc đáp ứng nhu cầu kinh doanh và tương tác với dữ liệu của bạn
Flow 1. Sử Dụng Flow Template
Bài Lab hướng dẫn sử dụng Flow Template để lưu trữ tất cả các file đính kèm gửi đến email của bạn, vào một thư mục trên Microsoft OneDrive for Business của bạn.
- Tại trình duyệt truy cập trang https://portal.office.com bằng têncủabạn@customdomain
- Tại màn hình Office 365, menu trái chọn Power Automate
- Màn hình Power Automate, menu trái chọn My Flow, ấn +New Flow và chọn Template.
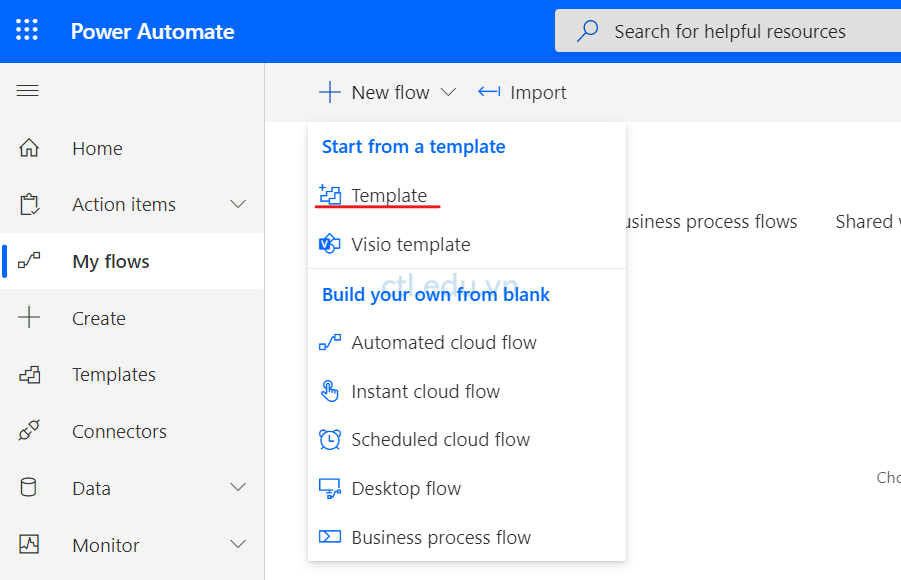
4. Tìm và chọn template Save Office 365 email attachments to OneDrive for Business.
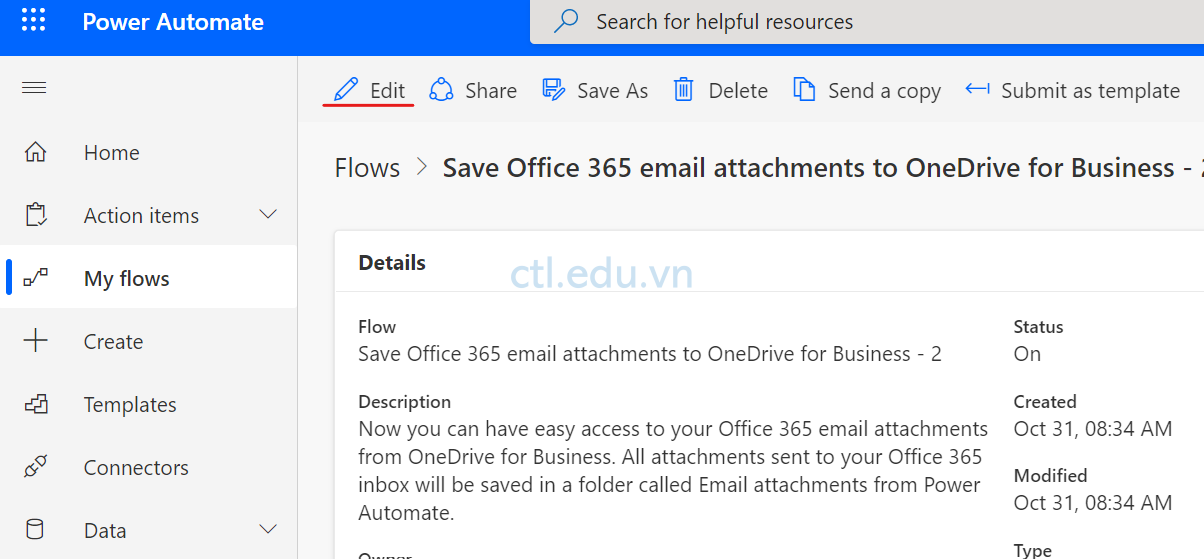
5. Ấn Create Flow, màn hình Save Office 365 email attachments to OneDrive for Business ấn Edit để xem flow.
6. Mở trình duyệt khác truy cập trang https://outlook.office365.com/ bằng user1@customdomain, Tạo email mới kèm theo file bất kỳ gửi cho têncủabạn@customdomain.
7. Chờ vài phút trở lại màn hình Office 365 của têncủabạn@customdomain, menu trái chọn Onedrive, quan sát thấy file user1 gửi kèm đã được lưu vào Onedrive.
Flow 2. Copy File Từ OneDrive for Business sang Google Drive
Bài lab hướng dẫn tạo Flow, khi có file được tạo trong folder của OneDrive for Business, file này sẽ tự copy sang Google Drive.
Để thực hiện bài lab này bạn vào OneDrive for Business tạo folder Datafiles, vào vào Google drive tạo folder GFolder
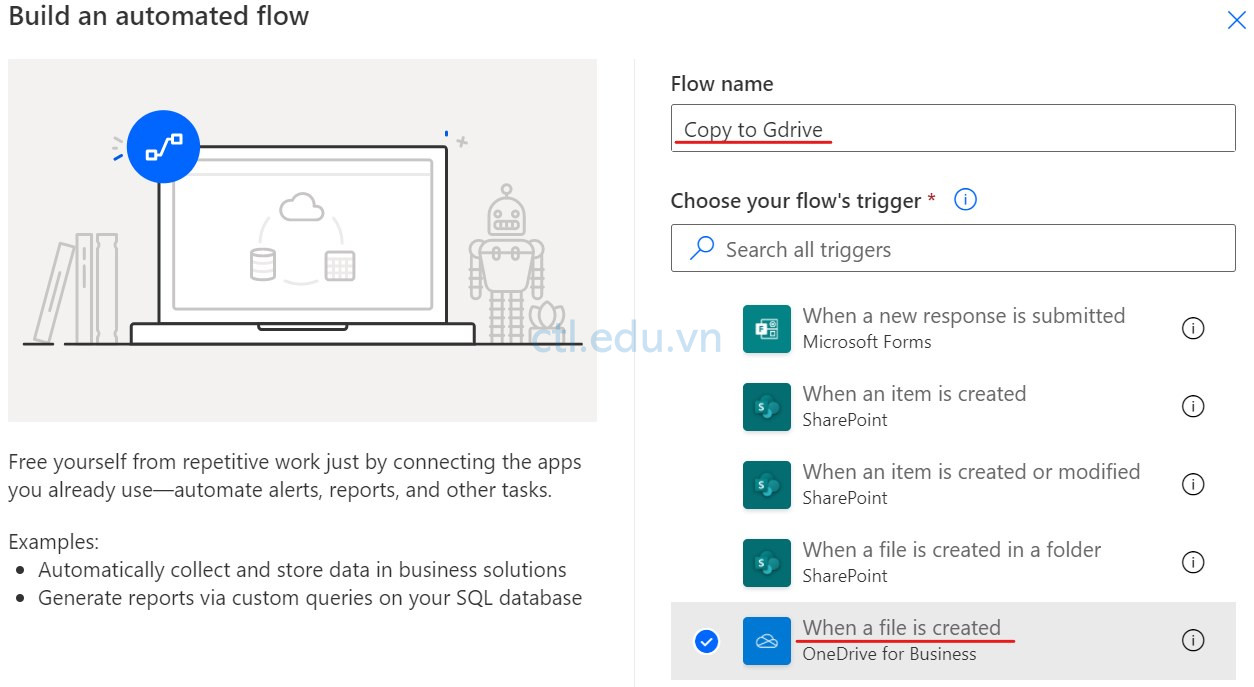
- Màn hình Power Automate, menu trái chọn My Flow, ấn +New Flow và chọn Automated Cloud Flow.
- Flow name nhập vào Copy to Gdrive, và chọn option When a file is Created (OneDrive for Business), ấn Create.
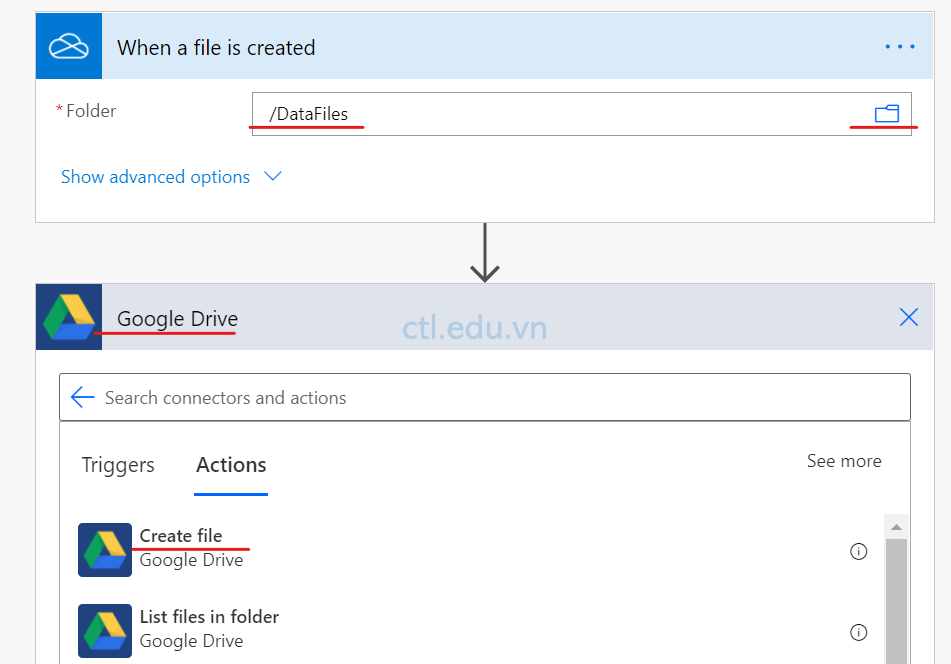
3. Trong phần When a file is Created click vào icon folder chon folder Datafiles.
4. Ấn New Step.
5. Tìm và chọn Google Drive, chọn Create File
6. Trong phần Create File chọn các thông tin sau:
- Folder path: chọn GFolder
- File Name: Chọn File name
- File Content: chọn File Content
- Ấn Save

7. Vào OneDrive for Business tạo File trong folder Datafiles, chờ vài phút vào Google drive chọn folder GFolder, quan sát thấy file từ OneDrive for Business đã được copy sang Google drive.
Flow 3. Tạo Flow Gửi Mail Định Kỳ
Bài Lab này hướng dẫn tạo flow gửi mail định kỳ từ danh sách email address.
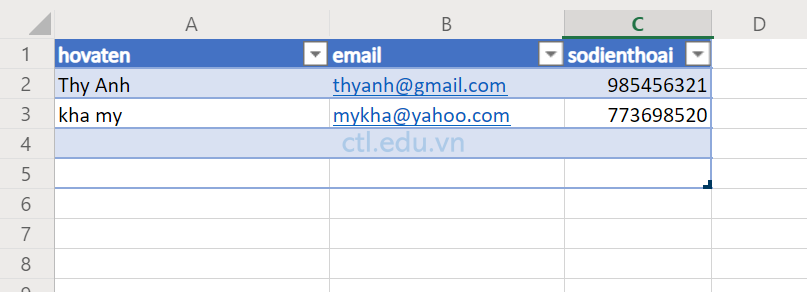
Để thực hiện bài lab này bạn tạo file excel danhsachkhachhang.xlsx trên onedrive có các trường hovaten, email, sodienthoai, và tạo table là vùng chứa dữ liệu.
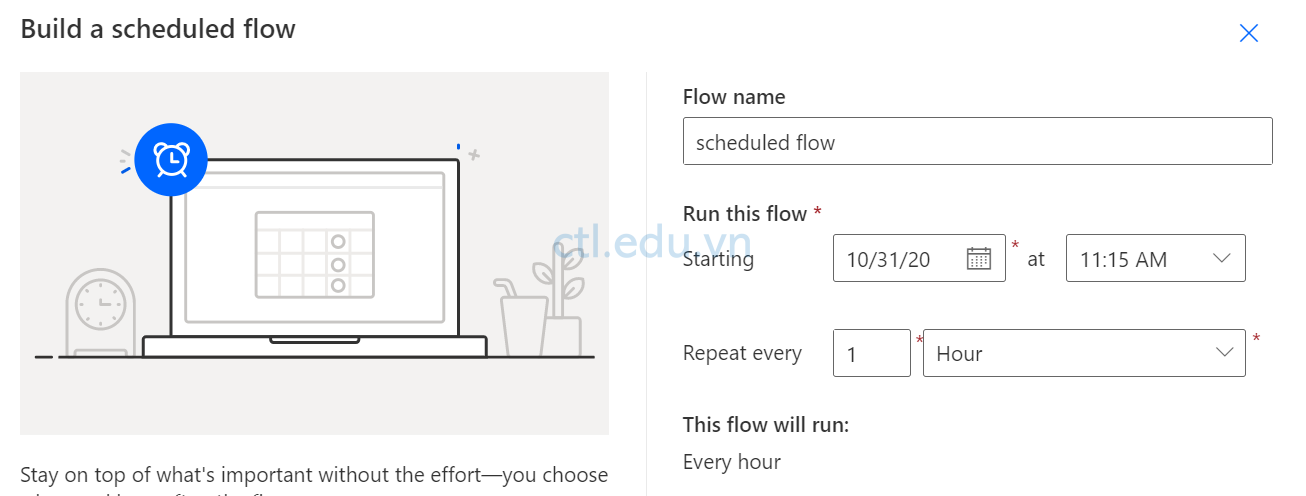
- Màn hình Power Automate, menu trái chọn My Flow, ấn +New Flow và chọn scheduled cloud flow.
- Trong phần Flow name nhập vào scheduled flow, chọn ngày và giờ bắt đầu, Repeat every 1 hour, ấn Create.
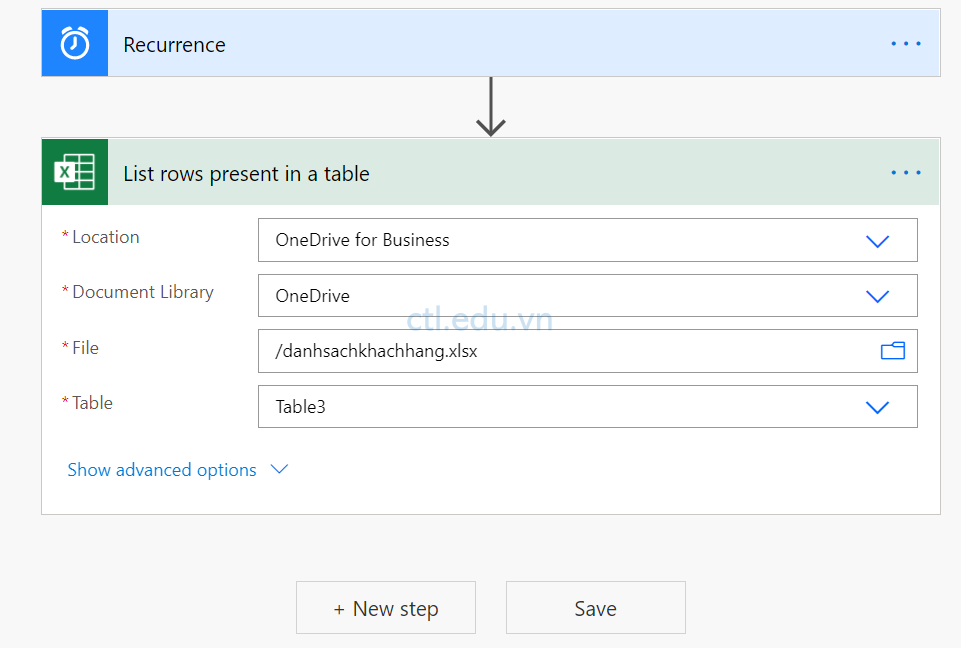
3. Ấn New step, tìm và chọn Excel Online (Business) chọn List rows present in a table.
4. Trong phần List rows present in a table chọn các thông tin sau:
- Location: Chọn Onedrive for business
- Document Library: Chọn Onedrive
- File: chọn file excel của bạn.
- Table: chọn table bạn đã tạo trên file excel.
5. Ấn New Step, tìm và chọn Office 365 Outlook, và chọn Send an Email (V2).
6. Trong phần Send an Email (V2) chọn các thông tin sau:
- To: chọn Add Dynamic Content, chọn Email.
- Subject: nhập vào Chào bạn và chọn hovaten
- Body: nhập vào dung cần gửi mail
- Ấn Save.

7. Chờ đến thời gian định trong Flow, check mail mà bạn đã nhập trong file excel, kiểm tra nội dung email nhận được.
Flow 4. Nhận Thông Báo Từ Flow
Phần này bạn sẽ tạo flow để nhận thông báo trên mobile khi nhận mail từ người quản lý của bạn
Để nhận thông báo, trên mobile bạn cần cài thêm App Microsoft Flow (Microsoft Automate) có sẳn trên Google store hay Apple Store.
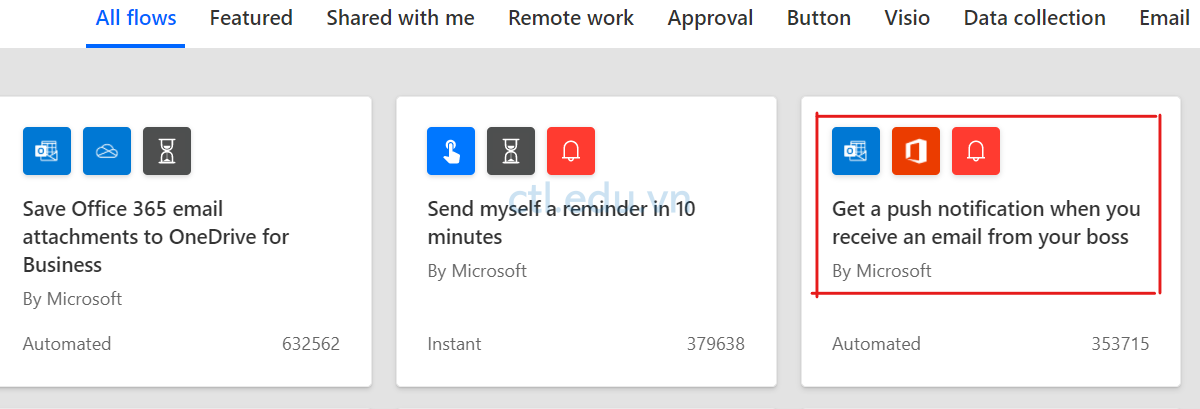
- Màn hình Power Automate, menu trái chọn My Flow, ấn +New và chọn Create from template.
- Tìm và chọn template Get a push notification when you receive an email from your boss
- Ấn Create Flow.
4. Màn hình Get a push notification when you receive an email from your boss ấn Edit.
5. Xem qua các step của flow, ấn Save.
6. Trở lại màn hình Microsoft 365 admin center, menu trái chọn Azure Active Directory.
7. Màn hình Azure Active Directory Admin Center, menu trái chọn users, chọn têncủabạn
8. Màn hình Profile ấn Edit, trong phần Manager ấn Change, chọn user1 ấn Select, ấn Save.
9. Mở trình duyệt khác vào trang outlook.office365.com bằng user1@customdomain, tạo mail mới gửi cho têncủabạn@customdomain trên điện thoại bạn sẽ được thông báo.

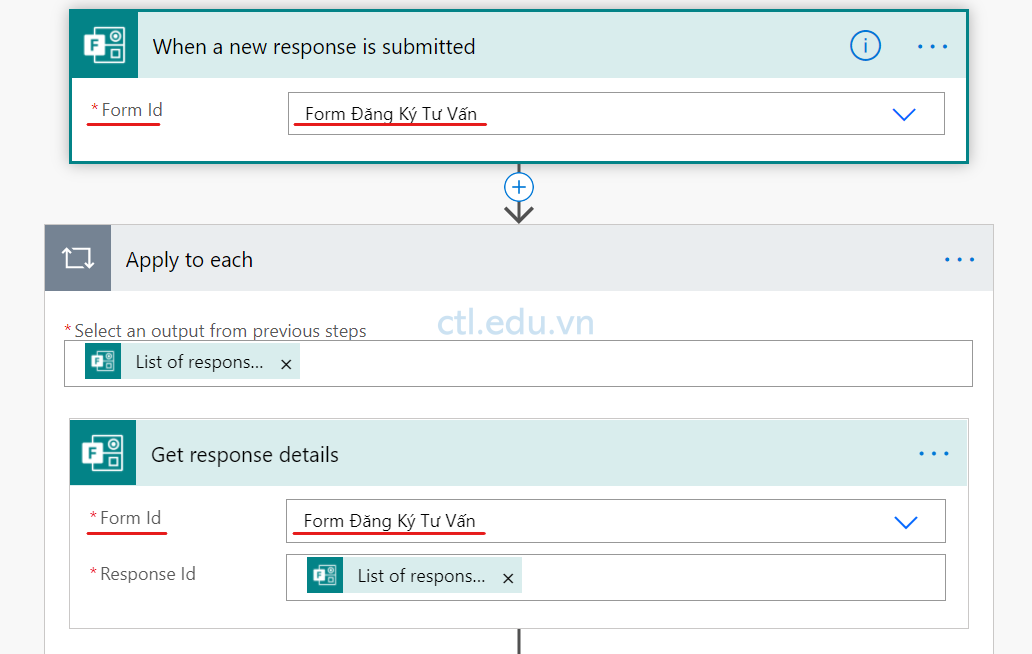
Flow 5. Nhận Thông Báo Khi Nhận Phản Hồi Từ Microsoft Form
Phần này bạn sẽ tạo flow để nhận thông báo trên mobile khi nhận phản hồi mới từ Microsoft Form
Trước khi thực hiện bài lab này bạn phải tạo form Đăng ký tư vấn, gồm các thông tin như: Họ và tên, Email, Số Điện thoại.
Bạn đã cài App Microsoft Flow (Microsoft Automate) trên mobile của bạn
- Màn hình Power Automate, menu trái chọn My Flow, ấn +New Flow và chọn Template.
- Tìm và chọn template Send a notification when Microsoft Forms responses are received
- Ấn Continue.

4. Tại phần When a new response is submitted, trong phấn Form Id chọn form Đăng ký tư vấn
5. Tại phần Get response details, trong phần Form Id chọn form Đăng ký tư vấn
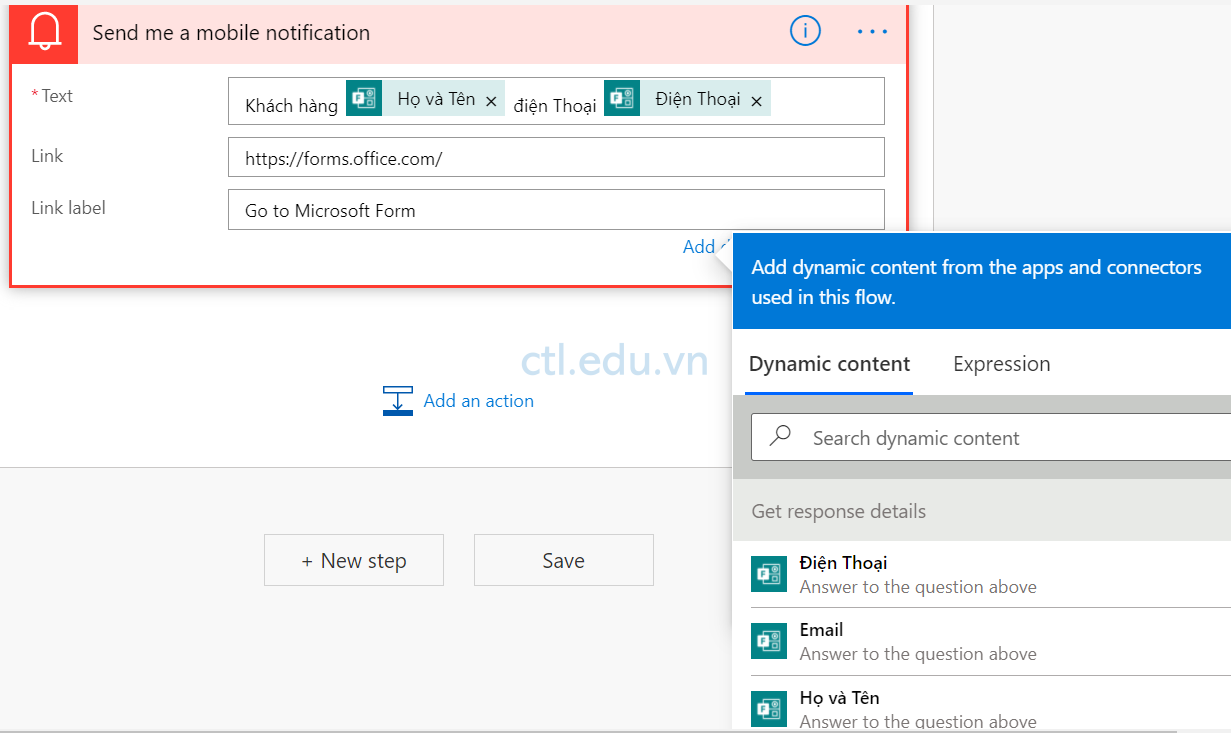
6. Tại phần Send me a mobile notification nhập các thông tin sau:
- Text: Khách hàng (chọn) Họ và tên, Điện Thoại (chọn) Điện Thoại
- Link: https://forms.office.com
- Link Label: Go to Microsoft Form
- Ấn Save
7. Thực hiện phản hồi từ Microsoft form, bạn sẽ nhận thông báo từ điện thoại.
Hoàn tất bài lab