Windows Server 2016 giới thiệu một số công nghệ lưu trữ và cải tiến các công nghệ lưu trữ hiện có. Bạn có thể sử dụng Storage Spaces, một tính năng của Windows Server 2016, cung cấp dung lượng lưu trữ từ storage pools và virtual disks.
Data Deduplication là một tính năng mà bạn có thể sử dụng để tìm và xóa dữ liệu trùng lặp trong khi vẫn duy trì tính toàn vẹn của dữ liệu.
Module này hướng dẫn cách sử dụng hai tính năng mới này trong kiến trúc lưu trữ Windows Server.
Trước khi thực hiện bài lab này bạn cần tạo thêm 6 virtual disk cho máy client02
Lab A: Triển khai Storage Spaces
Exercise 1: Tạo Storage Space
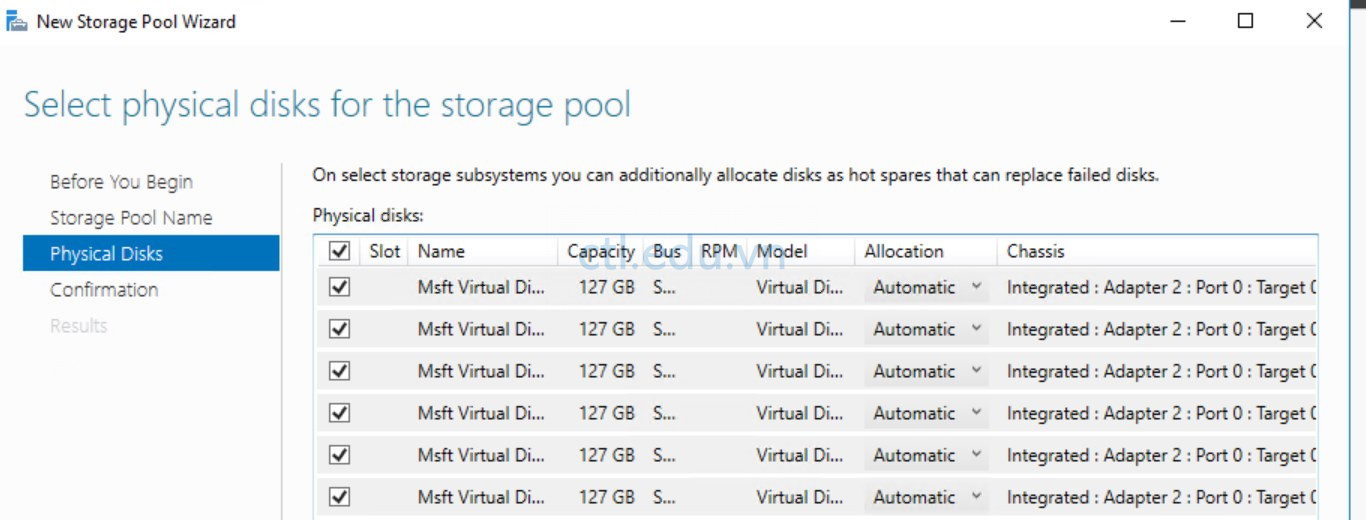
Task 1: Tạo storage pool từ 6 đĩa cứng đã gắn vào server
- Tại máy client02, vào Server Manager.
- Tại Server Manager, bên trái chọn File and Storage Services, và chọn Storage Pools
- Cửa sổ STORAGE POOLS, chọn TASKS, và chọn New Storage Pool

4. Cửa sổ Before you begin ấn Next.
5. Cửa sổ Specify a storage pool name and subsystem, trong phần Name nhập StoragePool1, ấn Next
6. Cửa sổ Select physical disks for the storage pool, trong phần Physical disks chọn 6 đĩa ấn Next
7. Cửa sổ Confirm selections, ấn Create
8. Chờ hoàn thành ấn Close
Task 2: Tạo three-way mirrored virtual disk (cần ít nhất 5 đĩa)
- Cửa sổ VIRTUAL DISKS, chọn TASKS, và chọn New Virtual Disk.
- Cửa sổ Select the storage pool chọn StoragePool1, ấn OK.
- Cửa sổ Before you begin ấn Next

4. Cửa sổ Specify the virtual disk name, trong phần Name nhập vào Mirrored Disk, ấn Next.
5. Cửa sổ Specify enclosure resiliency, ấn Next
6. Cửa sổ Select the storage layout, trong phần Layout chọn Mirror, ấn Next
7. Cửa sổ Configure the resiliency settings, chọn option Three-way mirror, và ấn Next

8. Cửa sổ Specify the provisioning type, chọn Thin, và ấn Next
9. Cửa sổ Specify the size of the virtual disk, trong phần Specify size nhập vào 10G, ấn Next
10. Cửa sổ Confirm selections, ấn Create.
11. Chờ hoàn tất ấn Close.
12. Xuất hiện cửa sổ Before you begin, ấn Next.
13. Cửa sổ Select the server and disk, trong phần Disk, chọn Mirrored Disk virtual disk, ấn Next

14. Cửa sổ Specify the size of the volume, để dung lượng mặc định, ấn Next.
15. Cửa sổ Assign to a drive letter or folder, trong phần Drive letter chọn H: ấn Next.
16. Cửa sổ Select file system settings, trong phần File system chọn ReFS, trong phần Volume label nhập vào Mirrored Volume, ấn Next.
17. Cửa sổ Confirm selections, ấn Create.
18. Chờ hoàn tất ấn Close.

Task 3: Copy file vào đĩa H
- Tại máy client02, vào H: vừa tạo
- Tạo nhiều file .txt vào đĩa H:, các file này phải có nội dung.

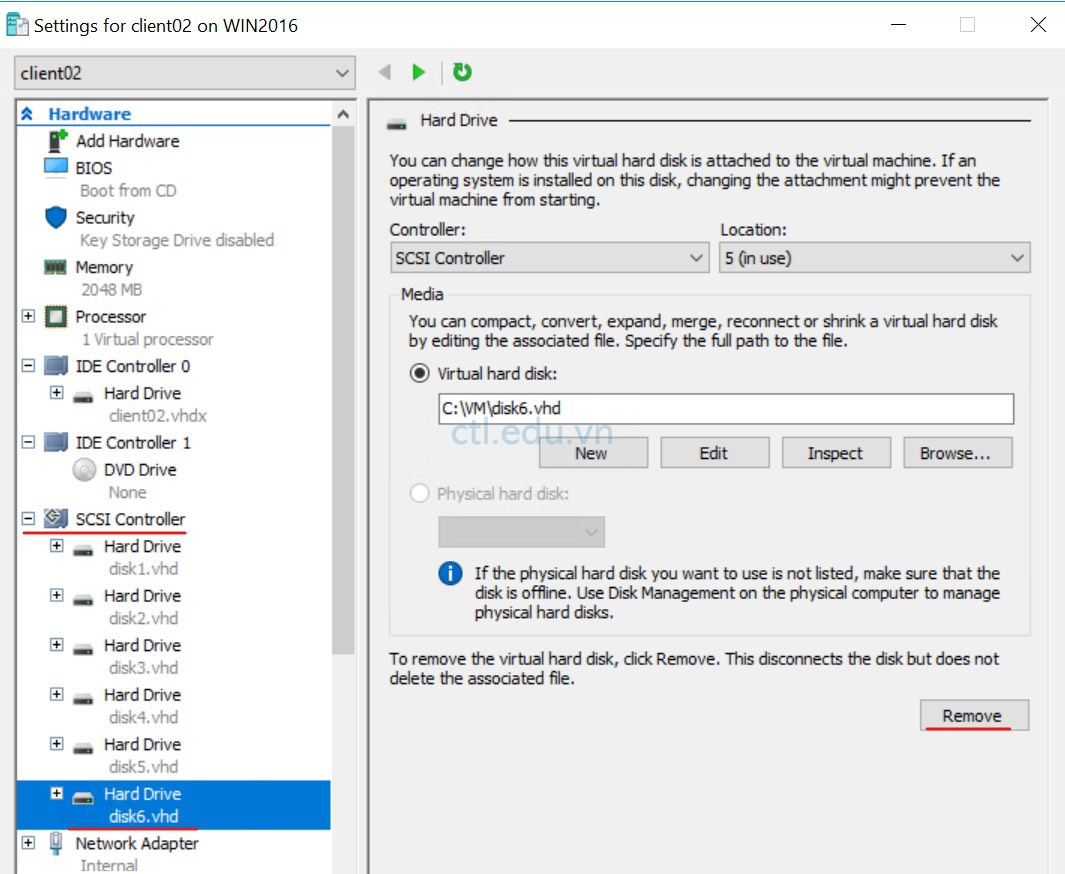
Task 4. Giả lập lỗi đĩa
- Trở về máy Host (máy cài Hyper V), vào Hyper-V Manager
- Phải chuột vào máy client02 chọn Settings
- Trong phần SCSI Controller, chọn 1 ổ đĩa ấn remove, ấn Ok,
Task 5 Kiểm tra dữ liệu đĩa H:
- Trở lại máy client vào đĩa H: kiểm tra dữ liệu vẫn còn
- Trở lại Server Manager, trong cửa sổ STORAGE POOLS ấn Refresh
- Xuất hiện icon warning trên đĩa Mirrored Disk.
- Cửa sổ VIRTUAL DISK, phải chuột vào Mirrored Disk, chọn Properties
- Cửa sổ Mirrored Disk Properties, menu trái chọn Health, xem tình trạng của ổ đĩa, ấn Ok

Task 6: Thêm đĩa mới vào storage pool và remove đĩa bị lỗi
- Trở lại máy Host, vào Hyper-V Manager, Phải chuột vào máy client02 chọn Settings, Trong phần SCSI Controller, add thêm đĩa cứng mới, ấn Ok,
- Trở lại máy client02, vào Server Manager, Cửa sổ STORAGE POOLS ấn Refresh
- Tại cửa sổ STORAGE POOLS, phải chuột vào StoragePool1, ấn Add Physical Disk
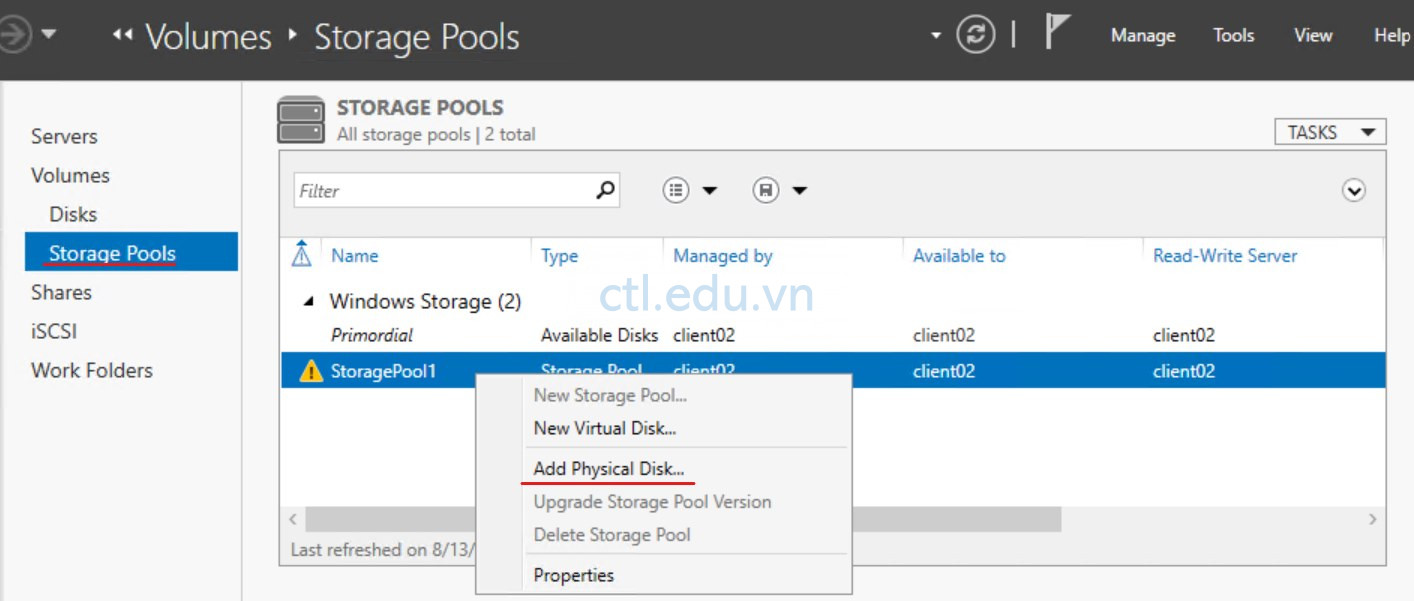
4. Cửa sổ Add Physical Disk, chọn đĩa cứng mới, ấn OK
5. Tại máy client02 vào Windows PowerShell, thực hiện lệnh Get-PhysicalDisk xem FriendlyName của đĩa có cột OperationalStatus là Lost Communication
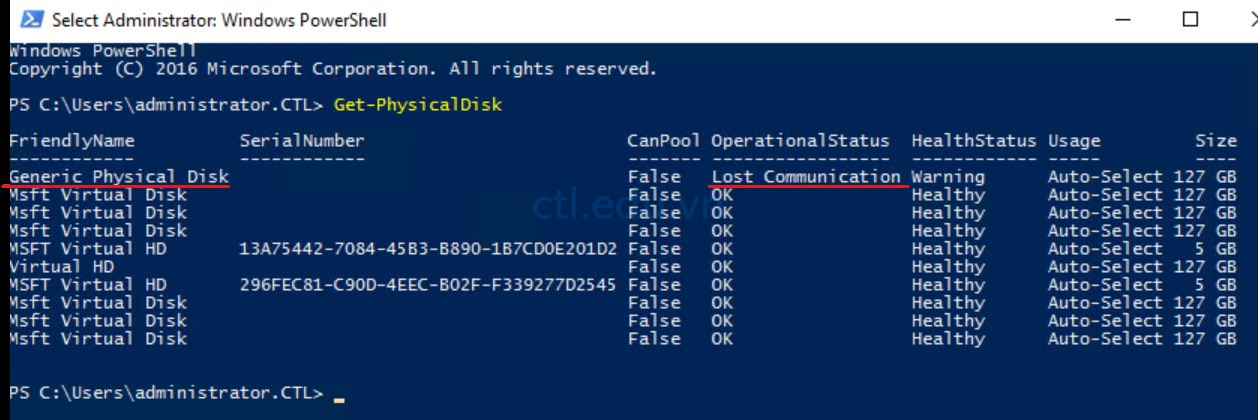
6. Tiếp tục thực hiện lệnh $Disk = Get-PhysicalDisk -FriendlyName ‘diskname’ (thay diskname bằng FriendlyName bạn đã xem ở bước 5)
7. Thực hiện lệnh sau và ấn Y, để remove đĩa bị lỗi
Remove-PhysicalDisk -PhysicalDisks $disk -StoragePoolFriendlyName StoragePool1
8. Trở lại Server Manager, trong phần STORAGE POOLS ấn Refresh xem lại icon warnings không còn.
9. Kiểm tra lại đĩa H: dữ liệu vẫn còn.

Exercise 2: Kích hoạt và cấu hình storage tiering
Trước khi làm Exercise 2, bạn cần gắn máy client02 thêm 3 virtual đĩa.
Task 1: Dùng Lệnh Get-PhysicalDisk xem tất cả các đĩa có trên hệ thống
- Tại máy client02, vào Windows PowerShell, thực hiện lệnh Get-PhysicalDisk để xem các ổ đĩa hiện có, chú ý cột canpool có một số đĩa là true

Task 2: Tạo storage pool mới
- Tại PowerShell tiếp tục gõ lệnh $canpool = Get-PhysicalDisk –CanPool $true (gán các đĩa có canpool là true vào biết $canpool)
- Sử dụng lệnh sau để tạo storage pool mới:
New-StoragePool -FriendlyName “TieredStoragePool” -StorageSubsystemFriendlyName “Windows Storage*” -PhysicalDisks $canpool
3. Vào đĩa C:\Labfiles\Mod04, phải chuột vào file mod4.ps1, chọn Run with PowerShell, và ấn Y (để gán tên cho các ổ đĩa, dùng cho bài lab tiếp theo)
4. Tại máy client02, vào Server Manager, menu trái chọn File and Storage Services, và chọn Storage Pools, cửa sổ Storage Pools chọn TieredStoragePool, cửa sổ Physical disks quan sát thấy các ổ đĩa được đổi thành Physicaldisk1, Physicaldisk2, Physicaldisk3
hay bạn có thể trở lại PowerShell dùng lệnh sau để xem
Get-StoragePool –FriendlyName TieredStoragePool | Get-PhysicalDisk | Select FriendlyName, MediaType, Usage, BusType

Task 3: Thay đổi media type của đĩa.
- Tại PowerShell máy client02, thực hiện lênh sau để thay đổi media type của physicaldisk1 thành SSD
Set-PhysicalDisk –FriendlyName PhysicalDisk1 –MediaType SSD
2. Tiếp tục thực hiện lệnh sau để thay đổi media type của physicaldisk2 thành HDD
Set-PhysicalDisk –FriendlyName PhysicalDisk2 –MediaType HDD
3. Dùng lệnh sau để xem lại kết quả
Get-PhysicalDisk | Select FriendlyName, MediaType, Usage, BusType

Task 4: Tạo pool-level storage tiers dùng Windows PowerShell
- Tại PowerShell máy client02 thực hiện lệnh sau để tạo storage tier HDD
New-StorageTier –StoragePoolFriendlyName TieredStoragePool -FriendlyName HDD_Tier –MediaType HDD
2. Tương tự dùng lệnh sau để tạo storage tier SDD
New-StorageTier –StoragePoolFriendlyName TieredStoragePool -FriendlyName SSD_Tier –MediaType SSD
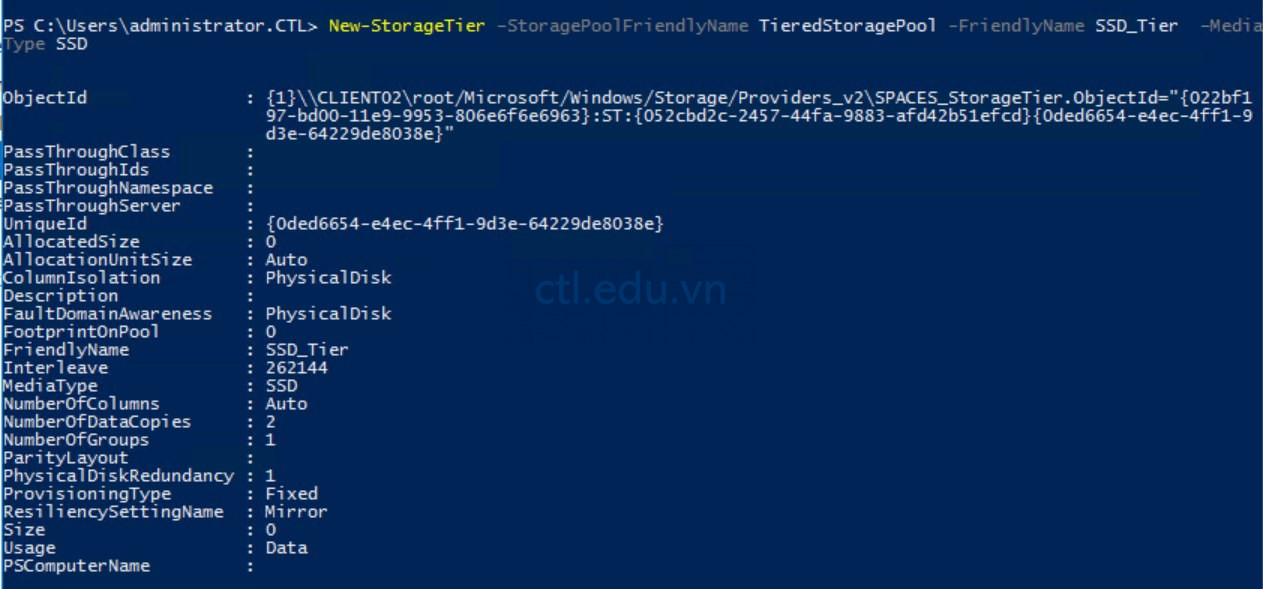
Task 5: Tạo new virtual disk với storage tiering Dùng New Virtual Disk Wizard
- Tại máy Client02, vào Server Manager, chọn File and Storage Services, chọn Storage Pools ấn Refresh, và chọn TieredStoragePool
- Cửa sổ VIRTUAL DISKS, chọn TASKS, và chọn New Virtual Disk.

3. Cửa sổ Select the storage pool, chọn TieredStoragePool, ấn OK.
4. Cửa sổ Before you begin, ấn Next.
5. Cửa sổ Specify the virtual disk name, trong phần Name nhập vào TieredVirtDisk, check vào Create storage tiers on this virtual disk, ấn Next

6. Cửa sổ Specify enclosure resiliency, ấn Next
7. Cửa sổ Select the storage layout, chọn Simple, ấn Next
8. Cửa sổ Specify the provisioning type, ấn Next
9. Cửa sổ Specify the size of the virtual disk, trong 2 phần Specify size nhập vào 2G, ấn Next
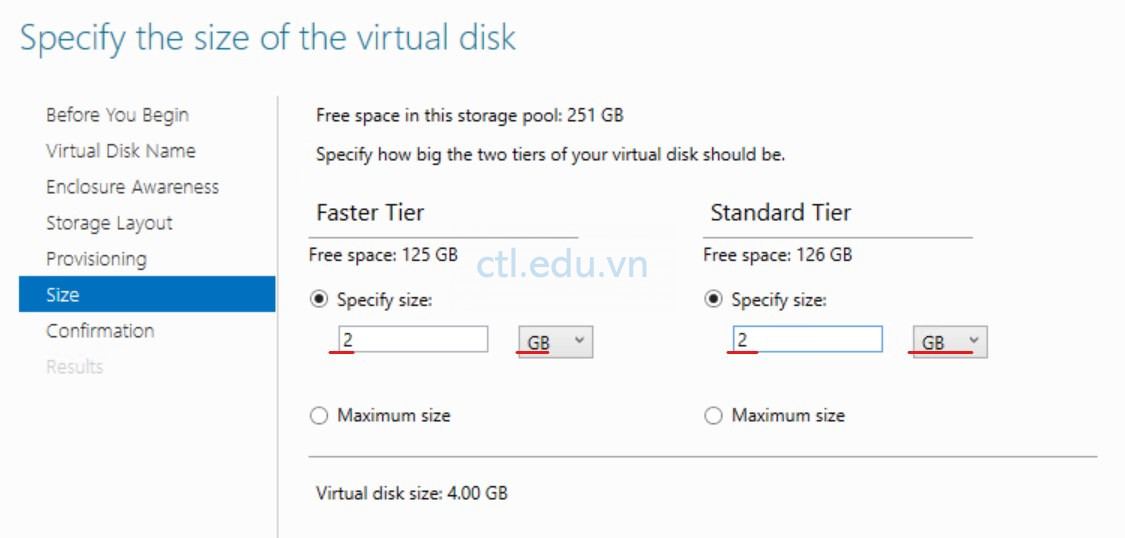
10. Cửa sổ Confirm selections, ấn Create
11. Chờ hoàn tất ấn Close. Xuất hiện cửa sổ Before you begin, ấn Next
12. Cửa sổ Select the server and disk, trong phần Disk, chọn TieredVirtDisk virtual disk, ấn Next
13. Cửa sổ Specify the size of the volume, ấn Next.
14. Cửa sổ Assign to a drive letter or folder, chọn ổ đĩa E: ấn Next
15. Cửa sổ Select file system settings, trong phần File system chọn NTFS, trong phần Volume label nhập vào Tiered Volume, ấn Next.
16. Cửa sổ Confirm selections, ấn Create
17. Chờ hoàn tất ấn Close
18. Phải chuột vào virtual disk vừa tạo chọn Properties
19. Cửa sổ TieredVirtDisk Properties, chọn tab General, quan sát Capacity, Allocated space, và Used pool space.

Lab B: Triển Khai Data Deduplication
Trước khi thực hiện bài lab này, trên client02 copy thư mục C:\Allfiles\Shares vào E: vừa tạo (chỉ copy folder shares)
Exercise 1: Cài Data Deduplication
Task 1: Cài Data Deduplication role service
- Tại máy client02, vào Server Manager, chọn Add roles and features
- Cửa sổ Before you begin ấn Next.
- Cửa sổ Select installation type, ấn Next.
- Cửa sổ Select destination server, ấn Next
- Cửa sổ Select server roles, chọn mũi tên File and Storage Services (4 of 12 installed), chọn mũi tên File and iSCSI Services (3 of 11 installed), check chọn Data Deduplication ấn Next.
- Cửa sổ Select features, ấn Next
- Cửa sổ Confirm installation selections, ấn Install
- Chờ cài xong ấn Close

Task 2: Kiểm tra trạng thái của Data Deduplication
- Tại Client02, vào PowerShell, thực hiện lệnh Get-DedupVolume
- Sau đó thực hiện lệnh Get-DedupStatus
(Cả 2 lệnh đều không có kết quả vì Data Deduplication chưa được enable sau khi cài)
3. Tiếp tục thực hiện lệnh Measure-Command -Expression {Get-ChildItem –Path E:\ -Recurse}
(Chụp màn hình để ghi nhớ kết quả để so sánh với phần Lab sau)

Exercise 2: Cấu hình Data Deduplication
Task 1: Cấu hình Data Deduplication
- Tại máy Client02, vào Server Manager, chọn File and Storage Services, và chọn Disks
- Cửa sổ Disks, chọn TieredVirtDisk, cửa sổ VOLUMES, chọn E:
- Phải chuột vào E: chọn Configure Data Deduplication

4. Cửa sổ Tiered Volume (E:\), Trong phần Data deduplication chọn General purpose file server. Trong phần Deduplicate files older than (in days) nhập vào 0. ấn Set Deduplication Schedule

5. Cửa sổ client02 Deduplication Schedule, check vào Enable throughput optimization ấn OK

6. Trở lại cửa sổ Tiered Volume (E:\), ấn ADD
7. Cửa sổ Select Folder, chọn (E:), và chọn folder shares, ấn Select Folder, ấn Ok

Task 2: Cấu hình optimization và xem trạng thái của nó
- Tại Client02, vào PowerShell, thực hiện lệnh sau để start Data Deduplication trên E:
Start-DedupJob E: -Type Optimization –Memory 50
2. Tiếp tục thực hiện lệnh để xem kết quả:
Get-DedupJob –Volume E:
(Thực hiện lại lệnh này cho đến khi thấy Progress là 100%.)

Task 3: Kiểm tra file đã được Tối Ưu
- Tại máy client02, vào File Explorer, chọn E:\Labfiles\Mod04
- Phải chuột vào file ContosoP1AnnualReport.docx, chọn Properties
- xem sự khác biệt của Size và Size on disk (có thể thực hiện lại bước 2 nhiều lần để thấy kết quả)
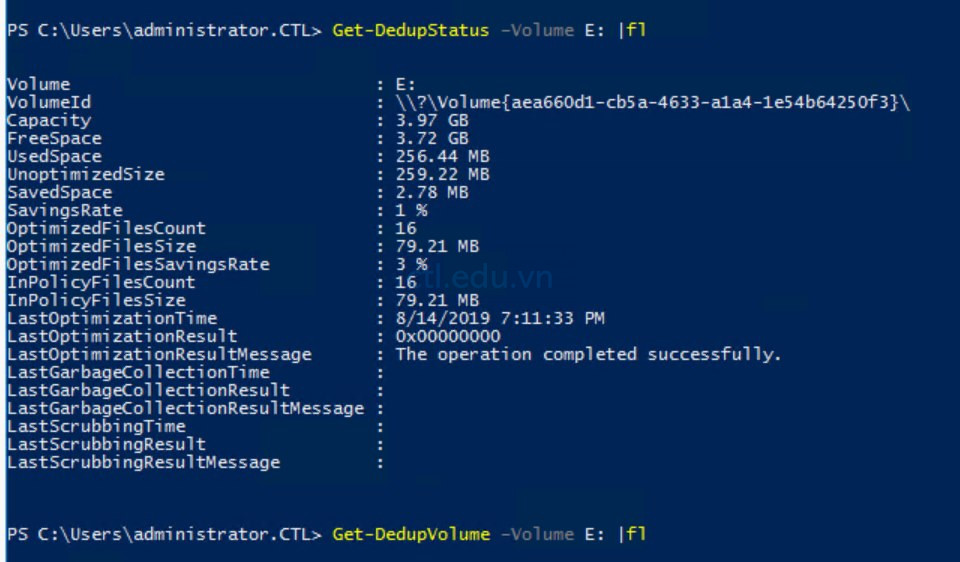
- trở lại PowerShell thực hiện lệnh Get-DedupStatus –Volume E: |fl
- Tiếp tục thực hiện lệnh: Get-DedupVolume –Volume E: |fl
(xem số file và dung lượng đươc tối ưu, 2 lênh này sẽ không có kết quả khi bạn thực hiện ở Exercise 1 Task 2)
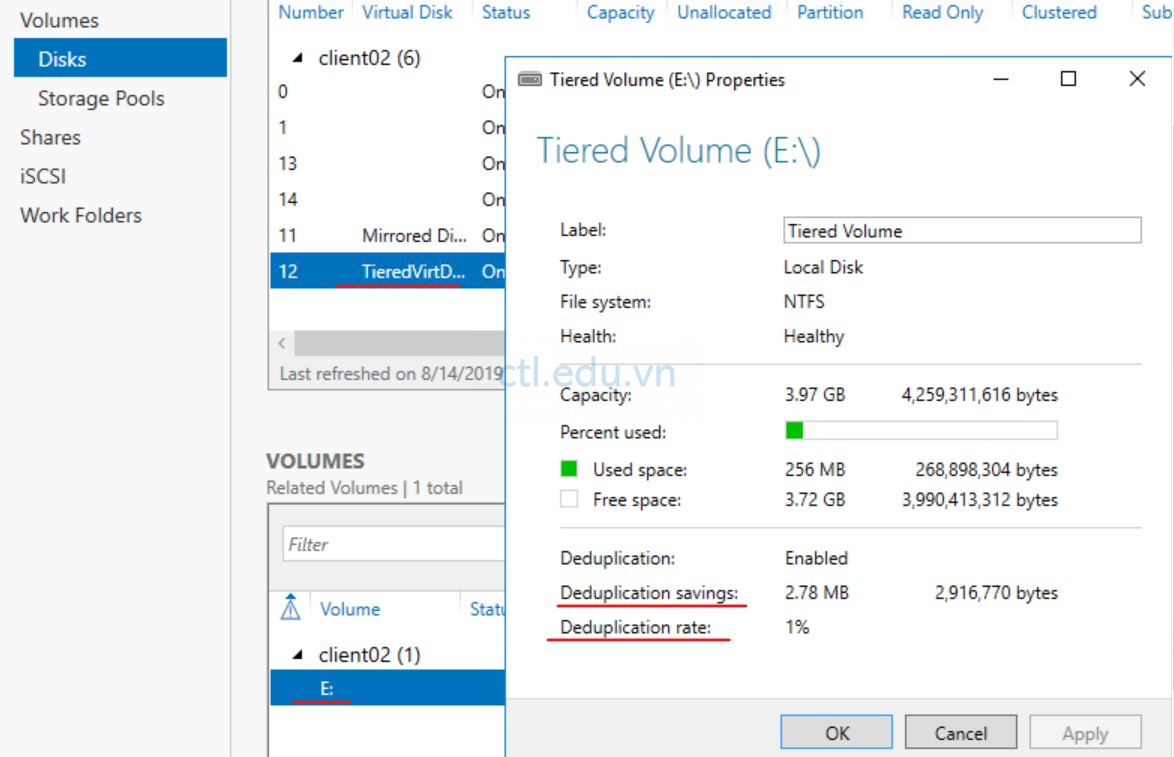
6. Vào Server Manager, chọn File and Storage Services, và chọn Disks
7. Cửa sổ Disks, chọn TieredVirtDisk, cửa sổ VOLUMES, chọn E:
8. Phải chuột vào E: chọn Properties, xem giá trị của Deduplication Rate và Deduplication Savings
9. Trở lại PowerShell thực hiện lệnh
Measure-Command -Expression {Get-ChildItem –Path D:\ -Recurse}
So sánh với kết quả bạn đã thực hiện ở bước 3, Exercise 1, Task 2

Hoàn Tất Bài Lab
Lab Windows Server 2016 Module 5