Module 8 bạn sẽ:
- Cấu hình Windows Defender Credential Guard.
- Xác định các tài khoản có vấn đề.
- Triển Khai LAPS (Local Administrator Password Solution)
Exercise 1: Configuring Windows Defender Credential Guard
- Tại Máy DC1, vào run gõ lệnh GPMC.MSC để vào Group Policy Management.
- Cửa sổ Group Policy Management, chọn Forest: ctl.local > Domains > ctl.local, phải chuột vào OU HCM chọn Create a GPO in this domain, and Link it here
- Cửa sổ New GPO, trong phần Name nhập vào CredentialGuard_GPO, ấn OK

4. Phải chuột vào CredentialGuard_GPO vừa tạo chọn Edit
5. Cửa sổ Group Policy Management Editor, chọn Computer Configuration\Policies\Administrative Templates\System\Device Guard.
6. Cửa sổ bên phải double click vào Turn On Virtualization Based Security.
7. Cửa sổ Turn On Virtualization Based Security chọn Enable và các thông tin sau:
- Select Platform Security Level: chọn Secure Boot and DMA Protection.
- Credential Guard Configuration: chọn Enabled with UEFI lock.
- Secure Launch Configuration: chọn Enabled, ấn OK
8. Đóng cửa sổ Group Policy Management Editor.
9. Đóng cửa sổ Group Policy Management

10. Vào Powershell thực hiện lệnh sau để Enable Windows Defender Credential Guard using the hypervisor-protected code integrity and Windows Defender Credential Guard hardware readiness tool (download file DG_Readiness_Tool.ps1 tại https://www.microsoft.com/en-us/download/details.aspx?id=53337 lưu vào C:\lab8)
- cd\
- CD c:\lab8
- DG_Readiness_Tool.ps1 -Enable -AutoReboot
11. Khởi động lại máy DC1
Exercise 2: Xác Định Tài Khoản Có Vấn Đề
- Tại máy DC1, vào Powershell thực hiện lệnh sau để xác định user nào có Password Never Expires
Get-ADUser -Filter {Enabled -eq $true -and PasswordNeverExpires -eq $true}
2. Dùng lệnh sau để set Password Never Expires bằng False
Get-ADUser -Filter {Enabled -eq $true -and PasswordNeverExpires -eq $true} | Set-ADUser -PasswordNeverExpires $false
3. Sử dụng lại lệnh sau để xác định không còn user nào có Password Never Expires bằng True
Get-ADUser -Filter {Enabled -eq $true -and PasswordNeverExpires -eq $true}

4. Sử dụng lệnh sau để xác định và disable các user trong vòng 30 ngày chưa logon
$days = (Get-Date).Adddays(-30)
Get-ADUser -Filter {LastLogonDate -lt $days -and enabled -eq $true} -Properties LastLogonDate
(sẽ không có user nào)
5. Nếu có dùng lệnh sau để disable các user đó
Get-ADUser -Filter {LastLogonDate -lt $days -and enabled -eq $true} -Properties LastLogonDate | Disable-ADAccount

6. Dùng lệnh sau để xem các user đã được tạo trong 30 ngày qua
$day = ((Get-Date).AddDays(-30)).Date
Get-ADUser -Filter {whenCreated -ge $day} -Properties whenCreated
Exercise 3: Triển Khai LAPS (Local Administrator Password Solution)
Task 1. Tạo OU và Computer Accounts cho LAPS (Local Administrator Password Solution)
- Tại máy DC1 thực hiện lênh sau để tạo OU HN, và move PC02 vào OU HN (thay ctl.local bằng domain của bạn)
- New-ADOrganizationalUnit -Name “HN”
- Get-ADComputer PC02 | Move-ADObject –TargetPath “OU=HN,DC=ctl,DC=local”
2. Thực hiện lệnh sau để cài Local Administrator Password Solution ( download file LAPS.x64.msi tại https://www.microsoft.com/en-us/download/details.aspx?id=46899 lưu vào C:\lab8)
Msiexec /I C:\lab8\LAPS.x64.msi
3. Cửa sổ Local Administrator Password Solution Setup Wizard ấn Next.
4. Check chọn I accept the terms in the License Agreement, ấn Next.
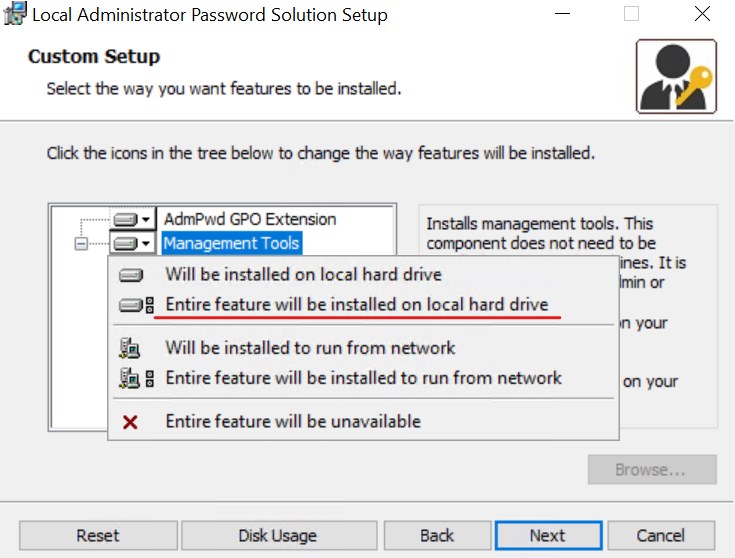
5. Cửa sổ Custom Setup, trong phần Management Tools chọn drop-down menu, chọn Entire feature will be installed on the local hard drive.
6. Ấn Next, ấn Install, và Finish.
7. Khởi động lại DC1.

8. Tại máy DC1 vào PowerShell thực hiện 2 lệnh sau để cập nhật Schema
- Import-module AdmPwd.PS
- Update-AdmPwdADSchema
9. Vào Run nhập lệnh DSA.MCS để vào Active Directoty Users and Computers
10. Tạo group AdminPass trong OU HN và add user Administrator và user nào bạn muốn cấp quyền truy cập vào password local.
11. Trở lại Powershell thực hiện lệnh sau để cấp quyền cho Group AdminPass truy cập vào Password local
- Set-AdmPwdReadPasswordPermission -Identity “HN” -AllowedPrincipals “AdminPass”
- Set-AdmPwdComputerSelfPermission -Identity “HN”
12. Khởi động lại máy DC1 để cập nhật Schema
Task 2: Chuẩn Bị AD DS (Active Directory) Cho LAPS
1. tại máy DC1 vào run gõ lệnh GPMC.MSC để vào Group Policy Management.
2. Tại Group Policy Management chọn Forest: ctl.local > Domains> ctl.local, phải chuột vào OU HN, chọn Create a GPO in this domain, and Link it here.
3. Cửa sổ New GPO, trong phần Name nhập vào LAPS_GPO, ấn OK
4. Phải chuột vào LAPS_GPO vừa tạo, chọn Edit.
5. Cửa sổ Group Policy Management Editor, trong phần Computer Configuration, chọn Policies > Administrative Templates > LAPS.
6. Cửa sổ bên phải double click vào Enable local admin password management chọn enable. ấn Ok
7. Tiếp tục double click vào Password Settings, chọn Enabled, trong phần configure Password Length: nhập vào 20. Password Age (Days): 30, ấn OK.
8. Đóng Group Policy Management Editor.

Task 3. Cài LAPS Cho PC02
- Copy file LAPS.x64.msi từ DC1 vào C:\lab8 máy PC02
- Tại PC02 vào PowerShell (run as administrator)thực hiện lệnh sau:
Msiexec /I c:\lab8\LAPS.x64.msi
3. Cửa sổ Local Administrator Password Solution Setup Wizard ấn Next.
4. Check chọn I accept the terms in the License Agreement, ấn Next, Next, Install và ấn Finish.
6. Khởi động lại PC02.
Task 4. Kiểm Tra LAPS
- Tại máy DC1 vào Start, chọn LAPS, và chọn LAPS UI.
- Cửa sổ LAPS UI, trong phần ComputerName nhập vào PC02, ấn Search.
- Xem giá trị Password và the Password expires ấn Exit.
- Vào Windows PowerShell, thực hiện một trong 2 lệnh sau để xem password trên máy PC02
Get-ADComputer PC02 -Properties ms-Mcs-AdmPwd
Get-AdmPwdPassword -ComputerName “PC02”
5 .Dùng Password vừa xem đăng nhập vào máy PC02 bằng quyền local Administrator
Hoàn tất Bài Lab
Lab Windows Server 2019 Module 9
