Module 1 Lab Windows server 2019 hướng dẫn bạn cài đặt và cấu hình Windows Server Core 2019. Bạn sẽ tìm hiểu về cách cài đặt và sử dụng các công cụ để định cấu hình và quản lý Windows Server Core.
Tùy chọn Server Core là một tùy chọn cài đặt tối thiểu khi bạn triển khai phiên bản Standard hoặc Datacenter của Windows Server. Bạn phải biết cách sử dụng và thực hiện quản lý từ xa máy chủ của bạn, vì Server Core không cung cấp công cụ quản lý đồ họa.
- Để thực hiện bài lab này bạn cần chuẩn bị máy Host cài Hyper V.
- Tại Hyper-V Host tạo và cài máy ảo Windows Server 2019 (DC01) là máy domain controller.
- Tạo máy ảo Server Core (xem mô hình)

Exercise 1: Cài và Cấu Hình Server Core
Exercise 1 bạn sẽ:
- Install Server Core.
- Cấu hình Server Core dùng sconfig và PowerShell.
- Cài Features trên Server Core.
1. Vào Hyper-V Manager, khởi động máy ảo windows Server Core đã có sẳn file
windows_server_2019.iso.
2. Màn hình Windows Setup, ấn Next, tiếp tục ấn Install Now.
3. Màn hình Select the operating System you want to Install, chọn Windows
Server 2019 Datacenter, ấn Next.
4. Check vào I Accept the Lisence terms.
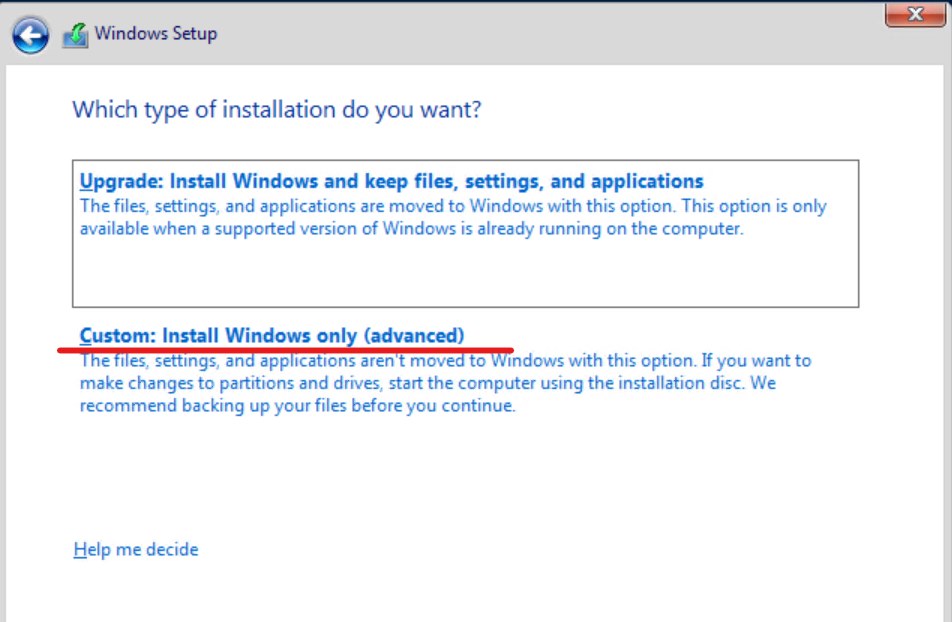
5. Chọn Custom: Install Windows Only,
6. Chọn partition cần cài, ấn next
7. Chờ cài Windows xong, sẽ tự khởi động lại.
8. Sau khi khởi động xong, chọn Ok để thiết lập password cho administrator.
1. Tại command prompt Server Core, Nhập vào lệnh sconfig, ấn Enter.
2. Để vào Network Settings, ấn số 8, ấn Enter.
3. Ấn 1, ấn Enter, Để chọn card mạng có index #1,
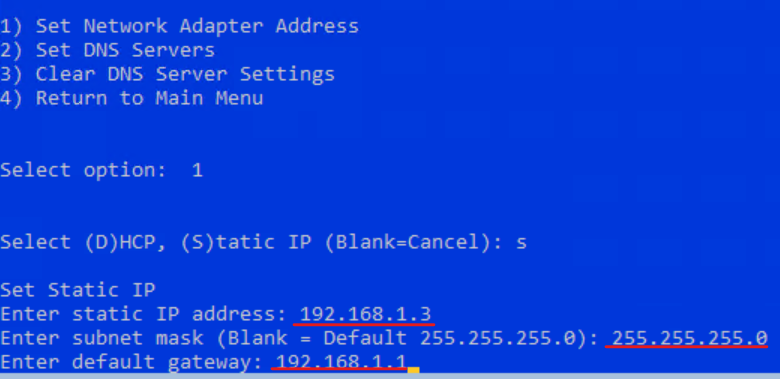
4. Ấn 1, ấn Enter, để chọn set network adapter address.
5. Ấn S, Enter để khai bao IP Static.
6. Trong phần Enter Static IP address, nhập vào 192.168.1.3 ấn Enter.
7. Trong phần subnet mask, nhập vào 255.255.255.0, ấn Enter.
8. Trong phần Default Gateway nhập vào 192.168.1.1, ấn Enter.

9. Ấn số 2, Enter để Set DNS Server.
10. Nhập vào 192.168.1.2 (Ip máy Domain), ấn Enter. xuất hiện cửa sổ ấn OK.
11. Trong phần alternate DNS server ấn Enter (để trống).
12. Ấn số 4, Enter để quay về menu chính.
13. Ấn 15, Enter để thoát khỏi Sconfig.
14. Tại command prompt, nhập vào PowerShell, ấn Enter.
15. Tại PowerShell gõ lệnh sau để đổi tên PCName
Rename-Computer -NewName ServerCore -restart -force,
16. Chờ Server Core Khởi động xong, chọn Ctrl+Alt+Del, nhập password để đăng nhập.
17 Tại command prompt, nhập vào PowerShell, ấn Enter.
18. Tại PowerShell thực hiện lệnh sau (thay CTL bằng domain của bạn) để join Server core vào domain.
Add-Computer -DomainName CTL.local -Credential ctl\Administrator -restart -force
19. Xuất hiện cửa sổ nhập password của Administrator ấn OK. Tự động khởi động lại máy.

Task này bạn sẽ cài thêm tính năng cho Server Core
Trước khi thực hiện task này kiểm tra file windows_server_2019.iso đã được insert vào máy ảo Server Core, và máy Server core kết nối mạng với internet.
1. Tại máy ảo Server Core, ấn Ctrl+Alt+Del, nhập Password để đăng nhập vào server core.
2. Tại Command prompt, gõ lệnh Explorer.exe, lệnh bị lỗi.
3. Tại command prompt, nhập vào PowerShell, ấn Enter.
4. Tại PowerShell thực hiện lệnh (thay D: bằng đĩa DVD của bạn)
D: (chuyển sang đĩa D)
Add-Windowscapability -Online -Name Servercore.Appcompatibility~~~~0.0.1.0 -Source D:
5. Sau khi lệnh hoàn tất (khá lâu) thực hiện lệnh Restart-computer.
6. Sau khi khởi động xong (không turn off), tại command prompt, gõ lệnh Explorer.exe. lệnh thực thi thành công. Bạn kiểm tra thêm các lệnh sau:
- ncpa.cpl
- firewall.cpl
- diskmgmt.msc
- control.exe
- …

Exercise 2: Cài và Sử Dụng Remote Server Administration
Phần này bạn sẽ cài và sử dụng Windows Admin Center for remote administration
Exercise 2 gồm các phần sau:
- Cài Windows Admin Center.
- Add servers for remote administration.
- Cấu hình Windows Admin Center extensions.
- Kiểm Tra remote administration.
- Quản trị servers bằng Remote PowerShell.
1. Vào tại máy Hyper-V host vào trình duyệt truy cập vào link https://www.microsoft.com/en-us/evalcenter/evaluate-windows-admin-center download file WindowsAdminCenter2009.msi
2. Tại Hyper-V Host ,thực thi file WindowsAdminCenter2009.msi để cài Windows Admin Center với các giá trị mặc định.

1. Tại máy Hyper-V host, vào Microsoft Edge truy cập vào https://pcname của Hyper-V host để vào Windows Admin Center.
2. Tại Windows Admin Center, ấn Add.
3. Xuất hiện cửa sổ Add or create resources trong phấn Server ấn Add
4. Trong phần Server name nhập vào DC1, chọn option Use another account for this connection nhập vào username và password của Domain admin ấn Add.
5. Thực hiện lại từ bước 2 đến bước 6 để Add PCName của Server Core.

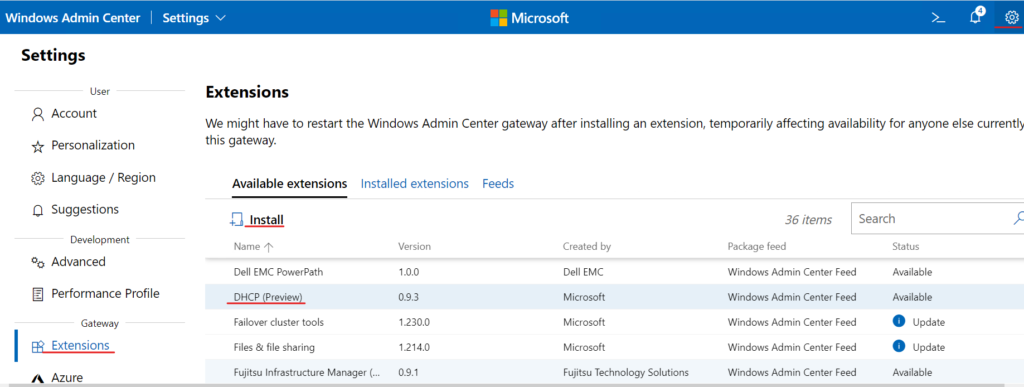
1. Góc trên bên phải chọn Settings (icon bánh răng).
2. Màn hình Settings, menu trái chọn Extensions.
3. Tại tab Available extensions, chọn DNS (Preview) chọn Install.
4. Tương tự chọn Active Directory, chọn Install.

5. Màn hình Settings, ở góc trên bên trái chọn drop-down Settings, chọn Server Manager.
6. Màn hình Server connections chọn DC1, đăng nhập bằng user và Password của domain admin
7. Menu trái lần lượt chọn DNS, Active Directory, PowerShell quan sát giao diện.
1. Cũng tại Windows Admin Center, menu trái chọn Overview xem thông tin về server information và performance monitoring, giống như Task Manager.
2. Menu trái chọn Roles and Features xem các Role và Features đã cài và chưa cài. tìm và check chọn Telnet Client, ấn Install, chờ Install xong.

3. Menu trái chọn Remote Desktop, chọn Go to settings, chọn option Allow remote connections to this computer ấn Save. (enable Remote Desktop)
4. Đóng Windows Admin Center.
1. Tại máy Hyper-V Host vào PowerShell.
2. Tại Power Shell thực hiện lệnh sau để kết nối đến máy Dc1: (thay CTL bằng tên domain của bạn)
Enter-PSSession -ComputerName DC1 -Credential ctl\administrator
3. thực hiện tiếp lệnh và quan sát services đang stop
Get-Service -Name AppIDSvc
4. Thực hiện tiếp lệnh:
Start-Service -Name AppIDSvc
5. Thực hiện lại lệnh và quan sát services đã start
Get-Service -Name AppIDSvc

Mr CTL

