Khi bạn chỉ sử dụng AD DS tại chỗ, người dùng của bạn không thể tự mình đặt lại mật khẩu đã quên. AD DS trong Windows Server vốn không hỗ trợ user tự reset lại mật khẩu (self-service password reset). Azure AD cung cấp chức năng self-service password reset.
Nếu bạn sử dụng license Azure AD Premium P1 hoặc P2, bạn có thể mở rộng chức năng này cho AD DS cục bộ của mình khi bạn sử dụng dịch vụ self-service password reset cùng với chức năng password writeback. Khi bạn thực hiện việc này, mật khẩu mà người dùng đặt lại trong Azure AD sẽ được writeback vào AD DS tại chỗ. Điều này có nghĩa là người dùng có thể thay đổi mật khẩu của mình trong cả môi trường đám mây hoặc tại chỗ.
Nếu thiết bị của bạn được quản lý bởi Intune, bạn có thể quản lý thiết bị cách sử dụng device compliance policies. Compliance policies xác định các điều kiện mà thiết bị phải đáp ứng để tuân thủ và có thể truy cập tài nguyên của công ty.
Microsoft Endpoint Manager cung cấp một số tùy chọn khác nhau để tạo và xem báo cáo. Cả Trình quản lý Endpoint Configuration Manager and Intune đều cung cấp các báo cáo sẵn dùng. Bạn cũng có thể tạo báo cáo tùy chỉnh bằng cách tận dụng các dịch vụ như Intune Data Warehouse và các công cụ như Power BI.

Trong bài lab này bạn sẽ thực hiện cấu hình Self-service password Reset (SSPR), cấu hình Compliance Policies, tạo Conditional Access Policy và tạo Device Inventory Reports
A. Dùng Azure AD Cấu Hình Self-service password Reset (SSPR) Cho User Accounts
Task 1: Cấu Hình Password Writeback
- Tại máy domain controller trên desktop double-click vào Azure AD Connect.
- Cửa sổ Welcome to Azure AD Connect ấn Configure.
- Cửa sổ Additional tasks chọn Customize synchronization option và ấn Next.
- Cửa sổ Connect to Azure AD nhập têncủabạn@customdomain và password ấn Next.
- Cửa sổ Connect to your directories ấn Next.
- Cửa sổ Domain and OU filtering ấn Next.
- Cửa sổ Optional features chọn thêm Password writeback, và ấn Next.
- Cửa sổ Ready to configure ấn Configure.
- Cửa sổ Configuration complete ấn Exit

Task 2: Cấu Hình Self-Service Password Reset
- Tại máy domain controller, truy cập vào trang https://portal.azure.com bằng user têncủabạn@customdomain
- Tại Microsoft Azure, menu trái chọn Azure Active Directory
- Màn hình Azure Active Directory menu trái chọn Users, và chọn Password reset.
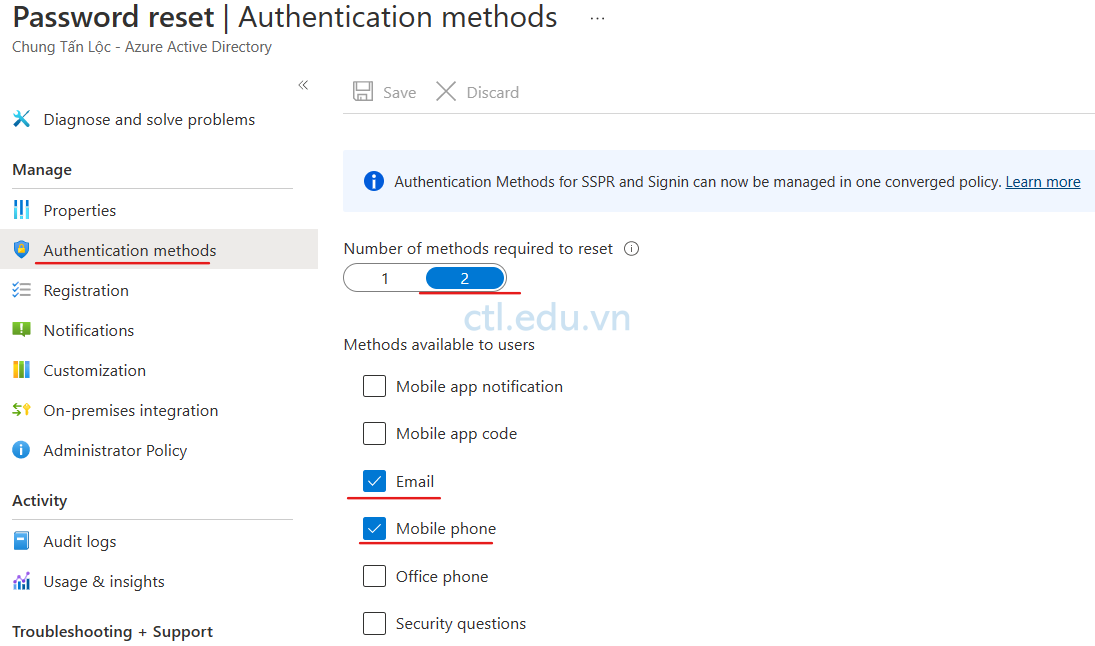
- Màn hình Password reset | Properties, trong phần Number of methods required to reset chọn 2 ấn Save.
- Màn hình Password reset | Properties menu trái chọn Authentication methods.
- Trong phần methods available to users, check chọn Mobile Phone và Email.
- Màn hình Password reset | Properties menu trái chọn Registration trong phần Require users to register when signing in chọn No và ấn Save. (Nếu bạn chọn Yes, thì lần đầu tiên User sign-in sẽ yêu cầu user cung cấp thông tin Mobile Phone và Email)
- Màn hình Password reset | Properties menu trái chọn On-premises integration.
- Kiểm tra Write back passwords to your on-premises directory? đang là Yes
Task 3: Kiểm Tra Self-Service Password Reset
- Tại máy đã join vào domain local, logon bằng aduser2@customdomain
- Vào Microsoft Edge truy cập trang https://office.com bằng user aduser2@customdomain
- Tại màn hình Microsoft, ở góc trên bên phải click vào icon aduser2 chọn View Account
- Màn hình My Account chọn Security info
- Màn hình Security info chọn Add Sign-in Method
- Màn hình Add a method, chọn Phone ấn Add
- Chọn country or region, nhập số phone của bạn, ấn text me.
- Nhận và nhập code ấn verify
- Màn hình Security info chọn Add Sign-in Method, lần này chọn email, nhập email bạn có thể nhận code reset password, ấn next
- Check mail nhân vào nhập code ấn verify.
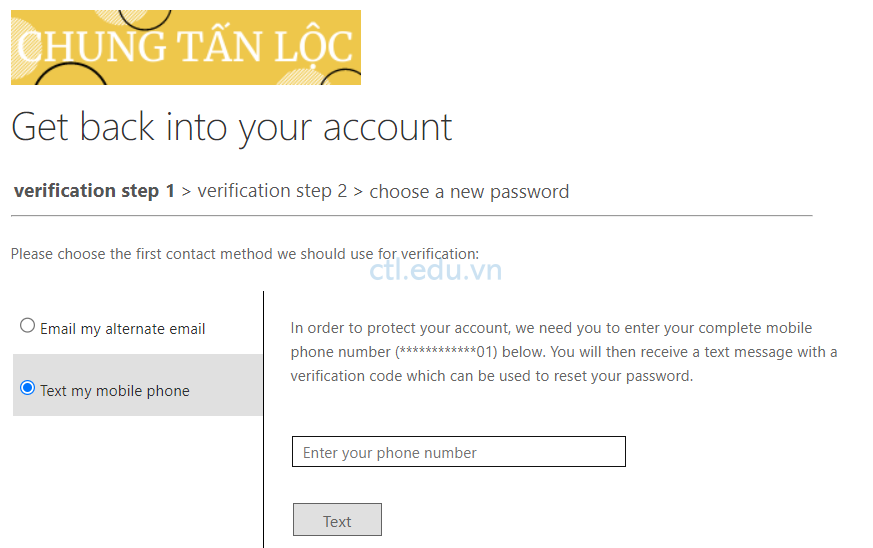
- Sign-out aduser2, thực hiện reset password aduser2
Task 4: Kiểm Tra Password Writeback
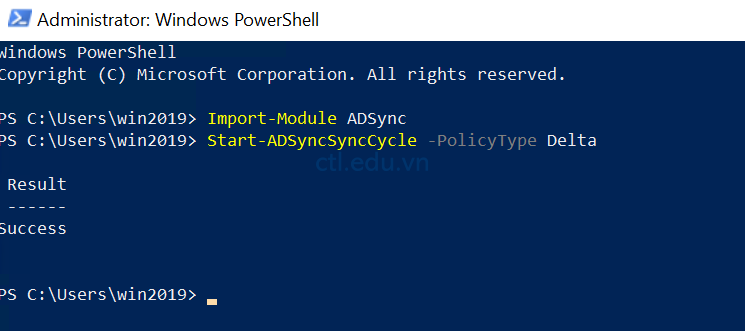
- Tại máy domain controller vào Windows PowerShell thực hiện lệnh sau:
- Import-Module ADSync
- Start-ADSyncSyncCycle –PolicyType Delta
(chờ vài phút)
2. Tại máy đã join vào domain local, logon bằng têndomainlocal\aduser2 bằng password mới đã đổi ở bước 11 task 3, Logon thành công.(Password Writeback thành công)
B. Cấu Hình Compliance Policies
Task 1: Create and Assign Compliance Policy – Enrollment Restrictions
- Tại máy domain controller, truy cập vào trang https://endpoint.microsoft.com bằng user têncủabạn@customdomain
- Màn hình Microsoft Intune admin center, Menu trái chọn Devices, và chọn Compliance Policies.
- Màn hình Compliance policies | Policies ấn Create Policy
- Màn hình Create a policy trong phần Platform chọn Windows 10 and later ấn Create

5. Tại tab Basics trong phần Name nhập vào Compliance1 ấn Next
6. Tại tab Compliance settings chọn Device Health và xem các cấu hình hiện có.
7. Tại tab Compliance settings chọn Device Properties, trong phần Minimum OS version nhập vào 10.0.16299.15
8. Tại tab Compliance settings chọn System Security, trong phần Windows Defender Antimalware chọn Require, ấn Next.

9. Tại tab Actions for noncompliance, ấn Next.
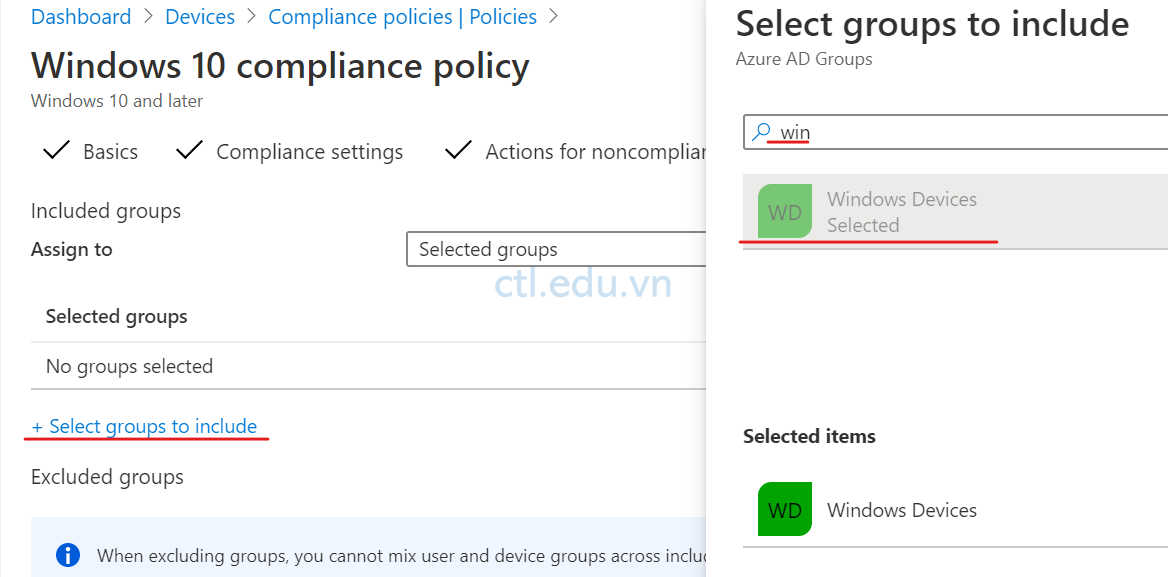
10. Tại tab Assignments, trong phần Included groups ấn Add a Group, tìm và chọn Windows Devices (group bạn đã tạo trước đó) ấn Select, và ấn Next.
11. Ấn Create.
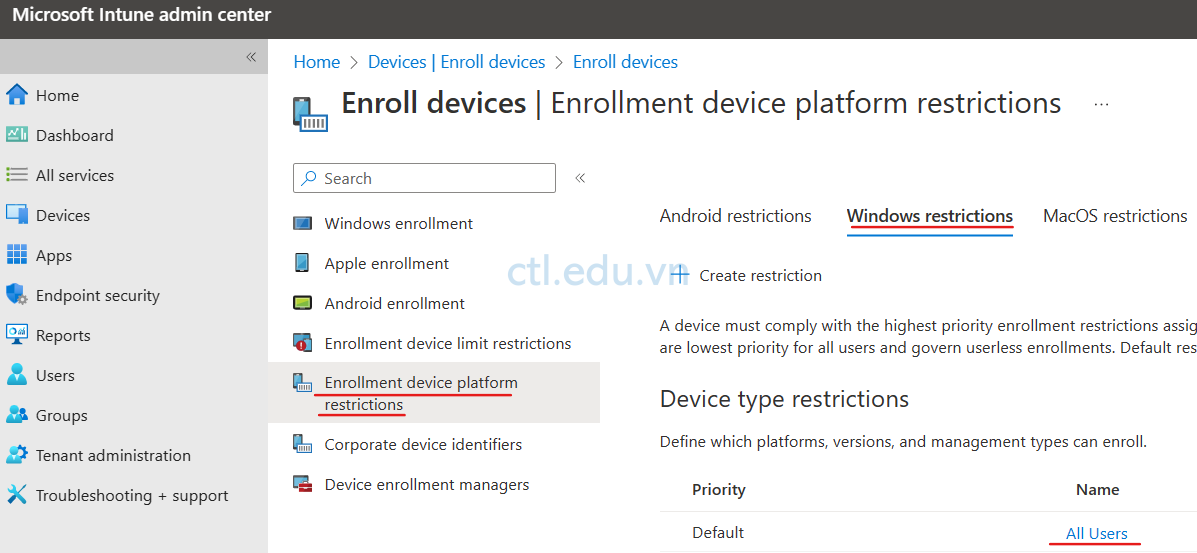
12. Màn hình Microsoft Intune Admin Center, Menu trái chọn Devices, và chọn Enroll devices.
13. Màn hình Enroll devices chọn Enrollment device platform restrictions.
14. Chọn tab Windows restrictions, trong phần Device type restrictions tại dòng Default chọn All Users.
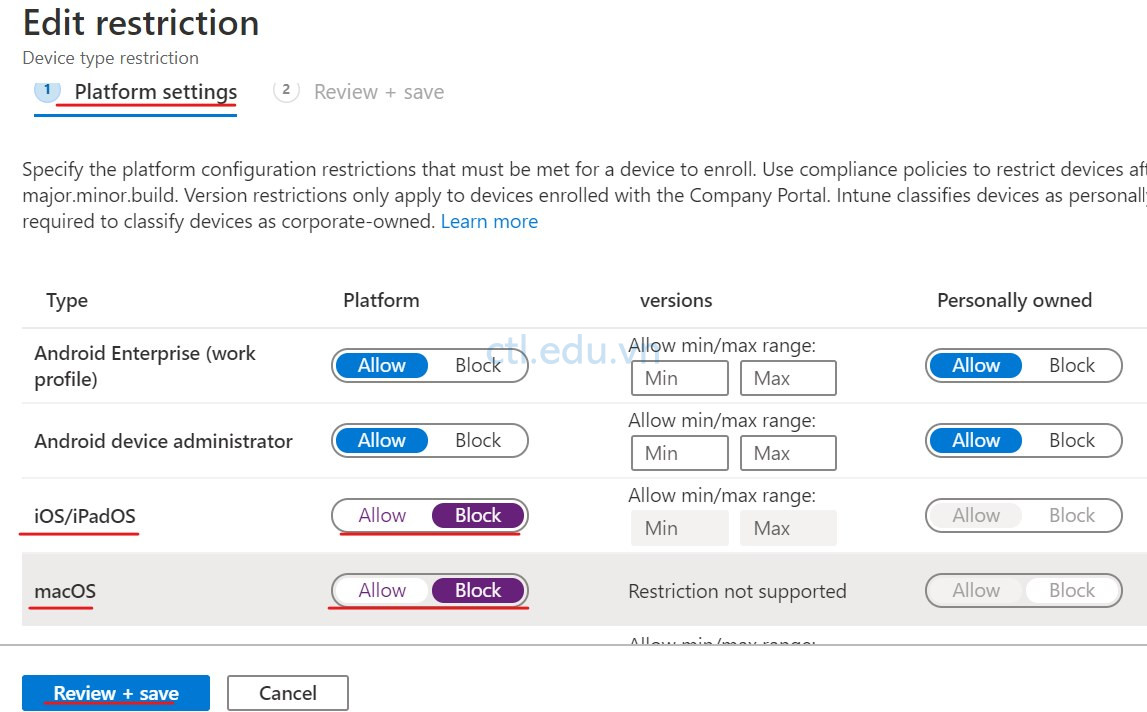
15. Màn hình All Users chọn Properties, trong phần Platform settings chọn Edit.
16. Tại Tab Platforms settings tại cột Platform chọn Block các dòng iOS/iPadOS và macOS, ấn Review + save và ấn Save.
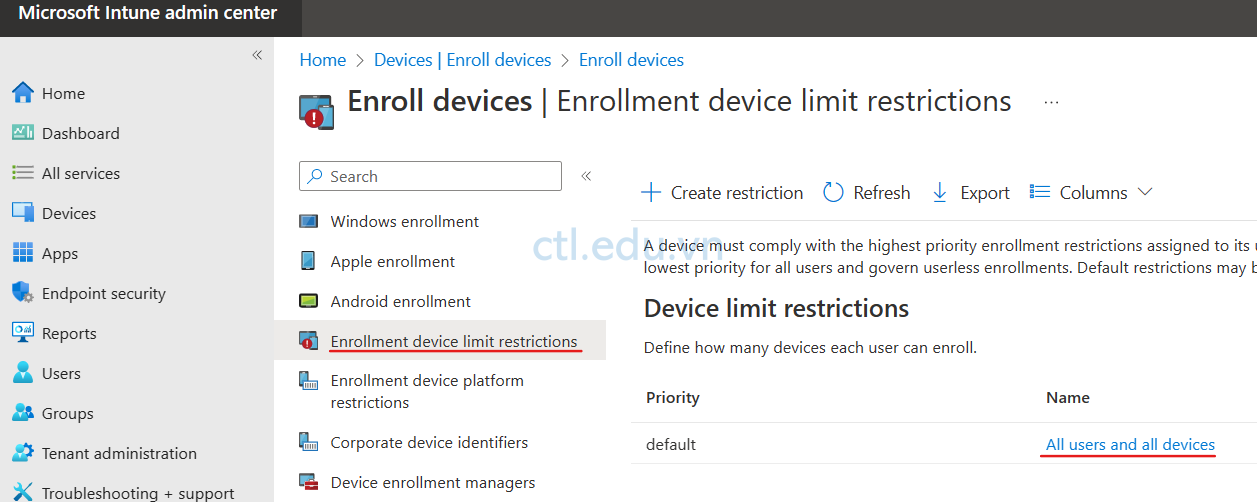
17. Màn hình Microsoft Intune admin center, Menu trái chọn Devices, và chọn Enroll devices
18. Màn hình Enrollment devices chọn Enrollment device limit restrictions
19. Trong phần Device limit restrictions chọn All Users and All Devices và chọn Properties.
20. Tại phần Device limit ấn Edit, sửa lại giá trị là 3, ấn Review + Save, và ấn Save.
C. Tạo Conditional Access Policy
Task 1: Tạo Conditional Access Policy
- Màn hình Microsoft Endpoint Manager admin center, Menu trái chọn Devices, và chọn Conditional Access.
- Màn hình Conditional Access | Policies, chọn New policy
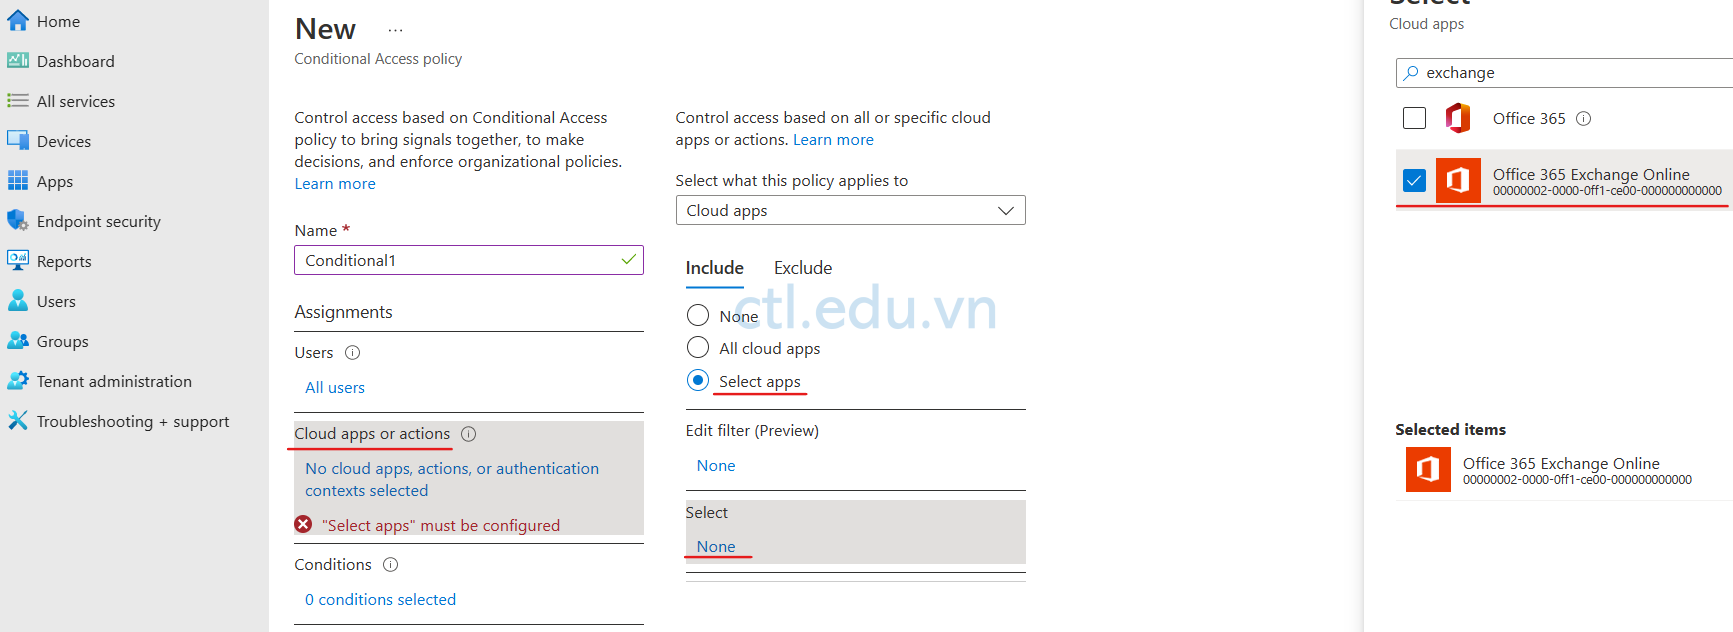
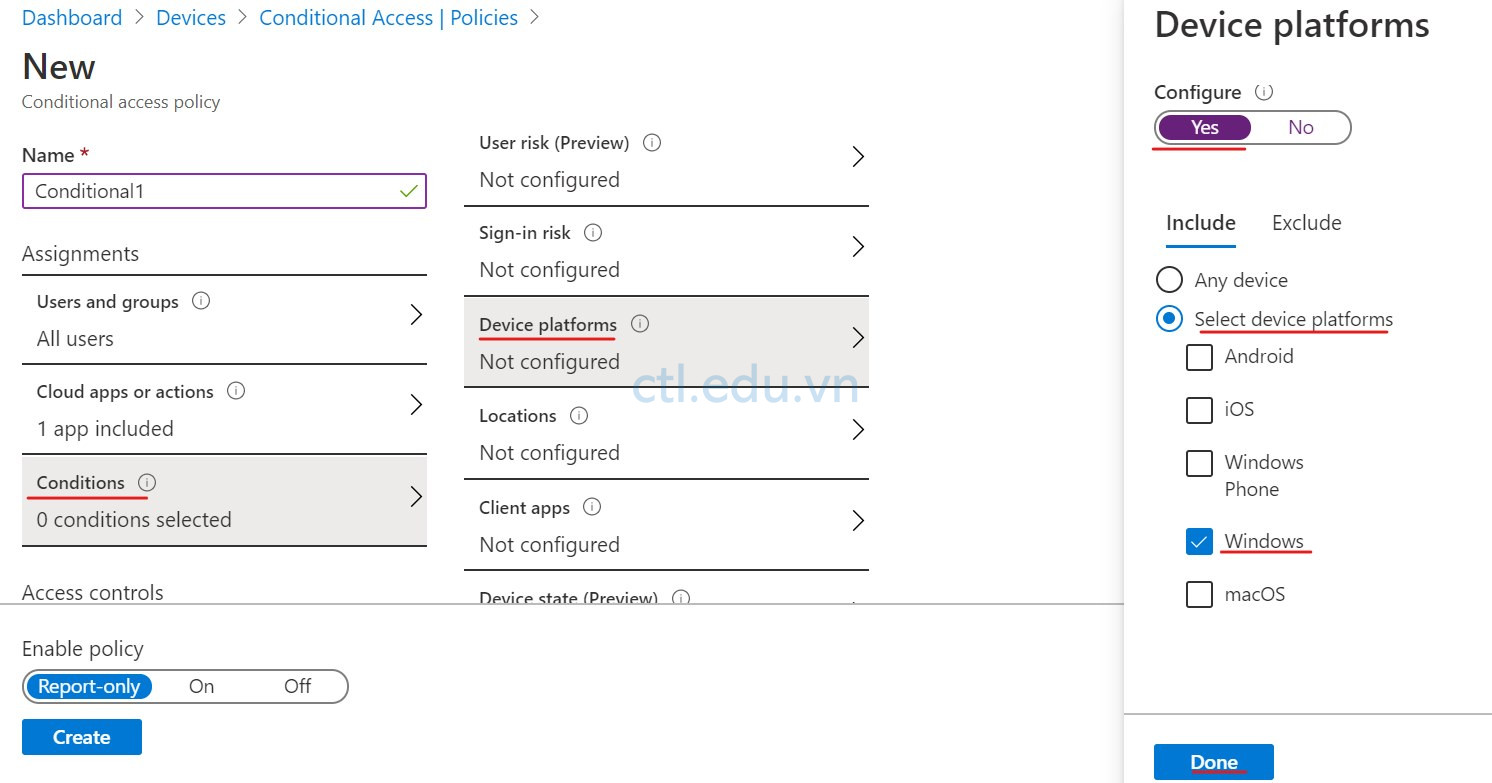
- Màn hình New trong phần Name nhập vào Conditional1, trong phần Assignments chọn Users and groups
- Màn hình Users and groups, tại tab include chọn option All users.
- Màn hình New chọn Cloud apps or actions, chọn option Select apps ấn Select, chọn Office 365 Exchange Online, ấn Select
6. Cũng tại Màn hình New chọn Conditions, chọn Device platforms, trong phần Configure chọn Yes, chọn option Select device platforms và chọn checkbox Windows ấn Done.
7. Trở lại Màn hình New, trong phần Access controls, chọn Grant, check vào Require device to be marked as compliant ấn Select.
8. Tại Màn hình New, trong phần Enable policy chọn On và ấn Create.

Task 2: Kiểm Tra Conditional Access Policy
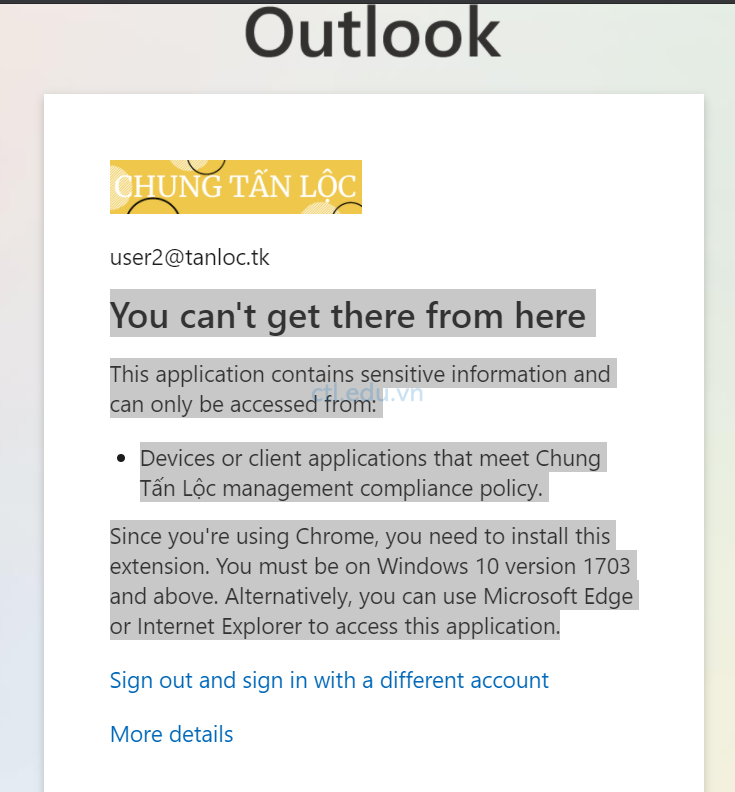
- Tại máy không join vào Azure AD, dùng trình duyệt Chrome, truy cập trang https://portal.office.com bằng user2@cuctomdomain
- Tại màn hình office 365 chọn Outlook, bạn sẽ nhân được thông báo “You can’t get there from here“. (do máy này không join vào Azure AD, Intune không quản lý nên không được đánh dấu là compliant.)
3. Tại máy đã join vào Azure AD, dùng Microsoft Edge, truy cập vào https://portal.office.com, bằng user user2@customdomian.
4. Tại màn hình office 365 chọn Outlook, bạn sẽ truy cập thành công do được đánh dấu là compliant
D. Tạo Device Inventory Reports
Bài Lab hướng dẫn dùng Intune, Excel, PowerBI xem báo cáo
Task 1: Xem Device Inventory
- Tại máy domain controller, truy cập vào trang https://endpoint.microsoft.com bằng user têncủabạn@customdomain
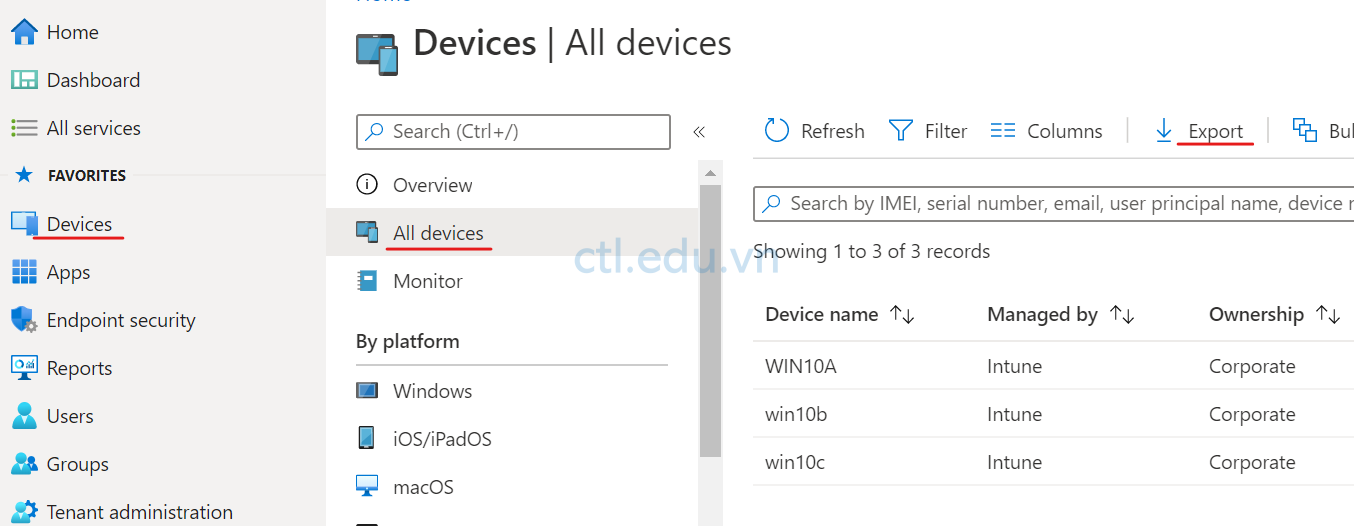
- Màn hình Microsoft Intune admin center, Menu trái chọn Devices, và chọn All devices, và chọn một thiết bị đã join vào Azure AD.
- Menu trái Properties và xem thông tin Management name, Device category và Device ownership.
- Menu trái chọn Hardware để xem cấu hình phần cứng của thiết bị.
- Menu trái chọn Discovered apps để xem app inventory trên thiết bị

Task 2: Export Intune Data Thành File Excel.
- Màn hình Microsoft Endpoint Manager admin center, Menu trái chọn Devices, và chọn All devices, chọn Export và ấn Yes.
- Chờ Export xong, Download file .zip và giải nén
Task 3: Import Intune data Vào Microsoft Excel
- Vào Excel open file vừa giải nén.
- Cửa sổ Text Import Wizard – Step 1 of 3 chọn option Delimited ấn Next.
- Cửa sổ Text Import Wizard – Step 2 of 3 dialog box, bỏ checkbox Tab và check vào Comma, ấn Next.
- Cửa sổ Text Import Wizard – Step 3 of 3 ấn Finish xem kết quả.

Task 4: Cài và Kết Nối Power BI Đến Intune Data Warehouse
- Tại máy windows 10 đã join vào Azure AD, đăng nhập vào bằng user têncủabạn@customdomain
- Vào trình duyệt truy cập vào https://aka.ms/pbiSingleInstaller download file PBIDesktopSetup_x64.exe (file này cũng có trong folder Allfile)
- Download xong, cài PowerBI trên PC.
- Sau khi cài xong vào Start và chọn Power BI Desktop.
- Màn hình Welcome to Power BI Desktop, chọn sign in và đăng nhập vào têncủabạn@customdomain
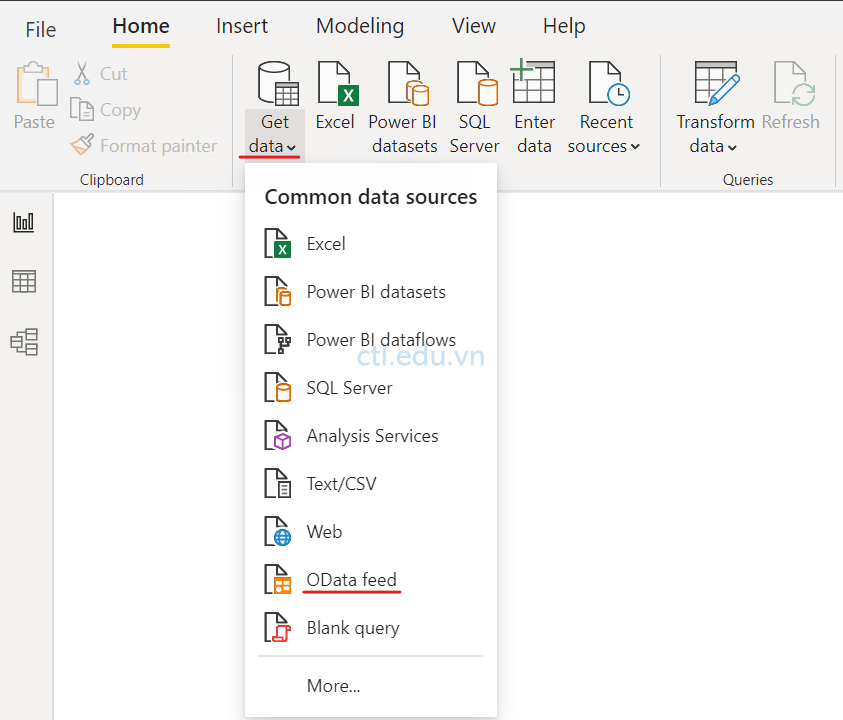
- Tại PowerBI, chọn tab Home chọn Get Data chọn OData feed.
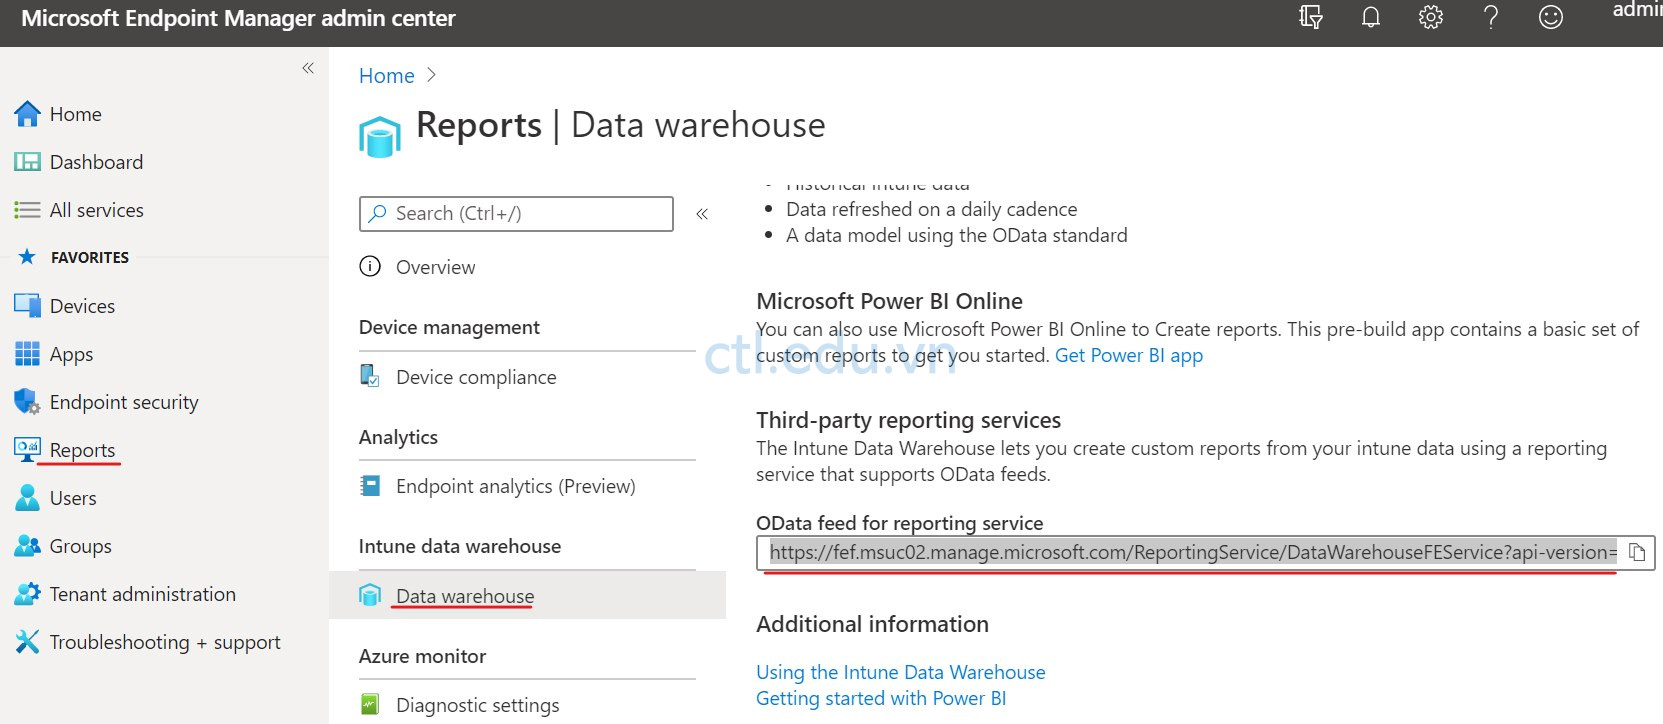
7. Vào trình duyệt, truy cập vào trang https://endpoint.microsoft.com bằng user têncủabạn@customdomain
8. Màn hình Microsoft Intune admin center, Menu trái chọn Reports và chọn Data warehouse.
9. Copy URL trong phần OData feed for reporting service.
10. Trở về PowerBI, paste OData URL vào URL ấn OK
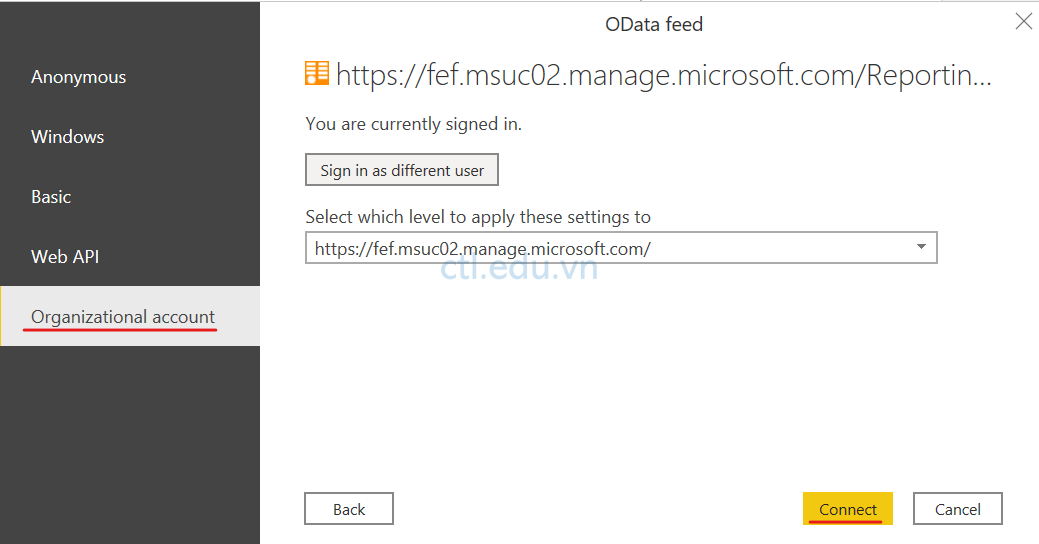
11. Cửa sổ OData feed chọn Organizational account, chọn Sign in, đăng nhập vào têncủabạn@customdomain và ấn Connect
12. Cửa sổ Navigator chọn tất cả tables, ấn Load, chờ load data xong (để chọn nhanh bạn chọn table đầu tiên, ấn shift chọn table cuối cùng)
Task 5: Tạo Custom Report Dùng Power BI và Intune Data Warehouse
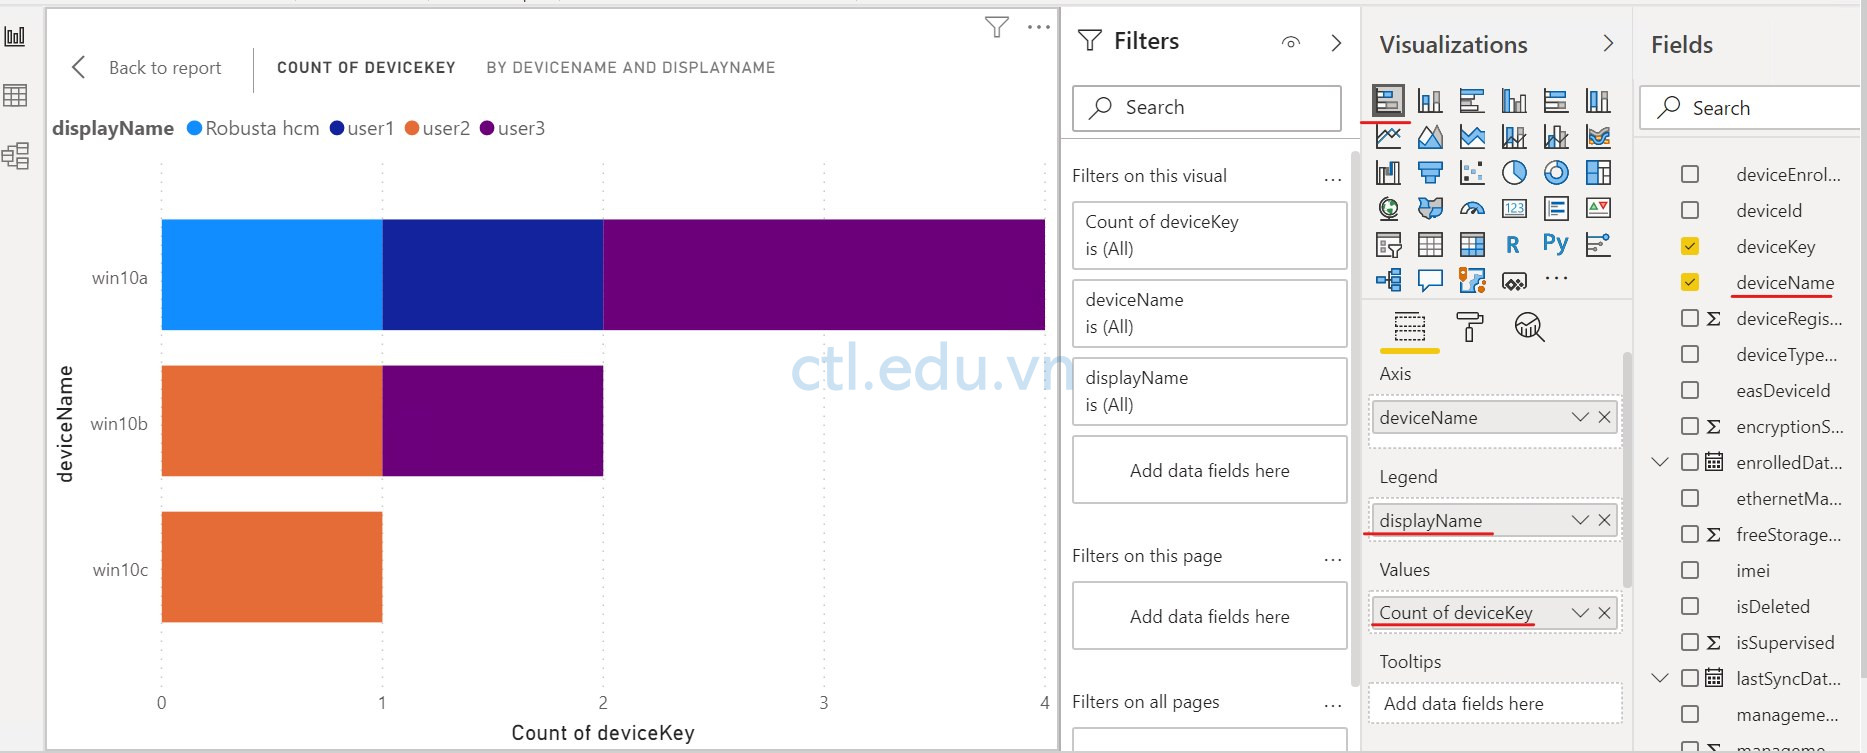
- Trong phần Visualizations chọn một kiểu biểu đồ.
- Trong phần Fields tìm table devices và mở rộng ra.
- Trong table Devices, chọn và kéo field deviceName vào biểu đồ.
- Trong table Devices, chọn và kéo field deviceKey vào ô Values trong phần Visualizations.
- Trong phần Fields tìm table users và mở rộng ra.
- Trong table Devices, chọn và kéo field displayName vào ô legend trong phần Visualizations.
- Vào File, chọn Export to PDF, xem báo cáo từ file PDF.
Hoàn tất bài lab.
Mr-CTL