Azure Firewall là dịch vụ bảo mật trên đám mây được triển khai để bảo vệ tài nguyên Azure Virtual Network của doanh nghiệp. Azure Firewall cung cấp khả năng bảo vệ tốt nhất trước các mối đe dọa cho khối lượng công việc đang làm việc trong môi trường Azure.
Azure Firewall là một dịch vụ tường lửa, có đầy đủ các chức năng, được tích hợp sẵn tính sẵn sàng cao và khả năng mở rộng trên đám mây không hạn chế.
Bài Lab mô tả cách Tường lửa Azure bảo vệ tài nguyên Azure Virtual Network , bao gồm các tính năng, quy tắc, các tùy chọn triển khai và quản trị của Tường lửa Azure với Azure Firewall Manager.
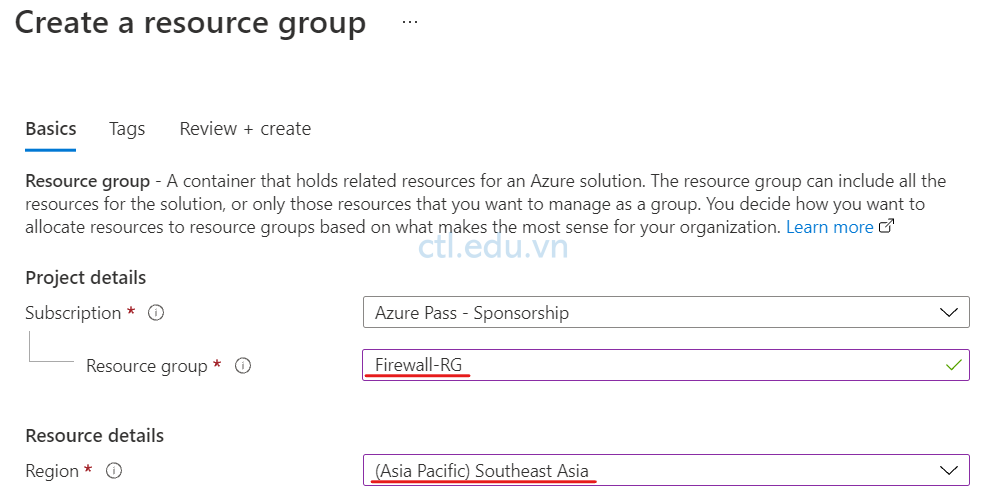
Task 1. Tạo Resource Group
- Truy cập vào trang https://portal.azure.com, bằng user bạn đăng ký Microsoft Azure.
- Tại Azure portal, Menu trái chọn Resource groups tại màn hình Resource groups ấn Create, và nhập các thông tin sau:
- Subscription: chọn subscription của bạn.
- Resource group: nhập vào Firewall-RG.
- Region: chọn Southeast Asia.
- Ấn Review + create.
- Ấn Create.
Task 2. Tạo VNet
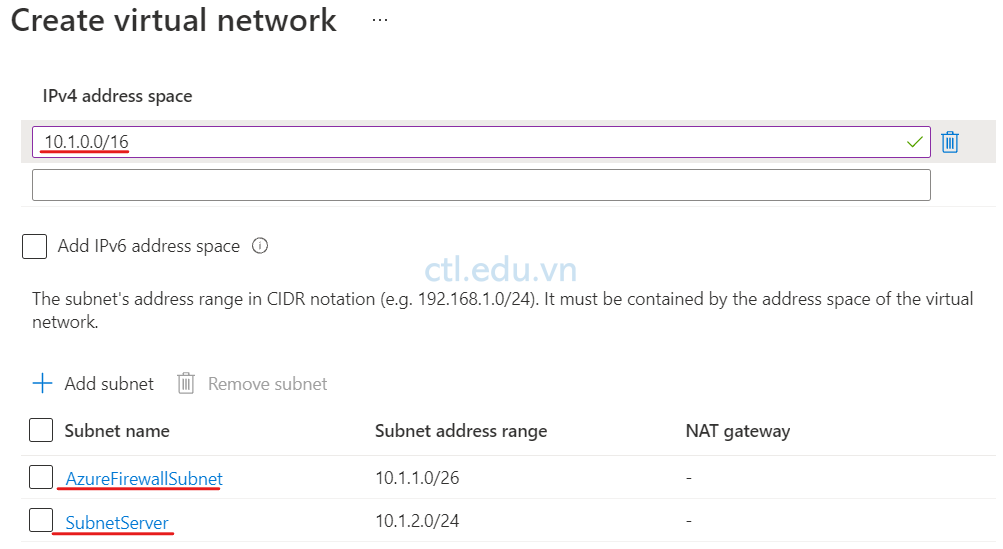
- Tại Azure portal, menu trái chọn Virtual networks, màn hình Virtual networks ấn + Create và nhập các thông tin sau:
- Subscription: chọn subscription của bạn
- Resource group: chọn FireWall-RG.
- Name: nhập vào Vnet-FW.
- Region: chọn Southeast Asia
- Ấn Next: IP addresses.
- IPv4 Address space: nhập vào 10.1.0.0/16.
- Ấn + Add Subnet, Subnet name nhập vào AzureFirewallSubnet (firewall sẽ dùng subnet có tên là AzureFirewallSubnet), trong phần Subnet Address range: nhập vào type 10.1.1.0/26.ấn Add.
- Tiếp tục ấn +Add subnet, Subnet name nhập vào SubnetServer, trong phần Subnet address range nhập vào 10.1.2.0/24, ấn Add.
- Ấn Review + create, và ấn Create.
Task 3 Tạo Virtual Machine
- Tại Azure portal, menu trái chọn Virtual machines.
- Màn hình Virtual machines, chọn +Create, chọn Virtual machines, và nhập các thông tin sau:
- Resource group: FireWall-RG
- Virtual machine name: Win2022
- Region: Southeast Asia
- Availability Option: No Infrastructure Redundancy Required
- Image: Windows Server 2022 Datacenter
- Size: Standard_DC2ds_v3
- User name: Win2022
- Password: P@ssw5.d@1234
- Public inbound ports: chọn None
- Trong phần Licensing check chọn 2 checkbox
- Ấn Next: Disk, Ấn Next: Networking
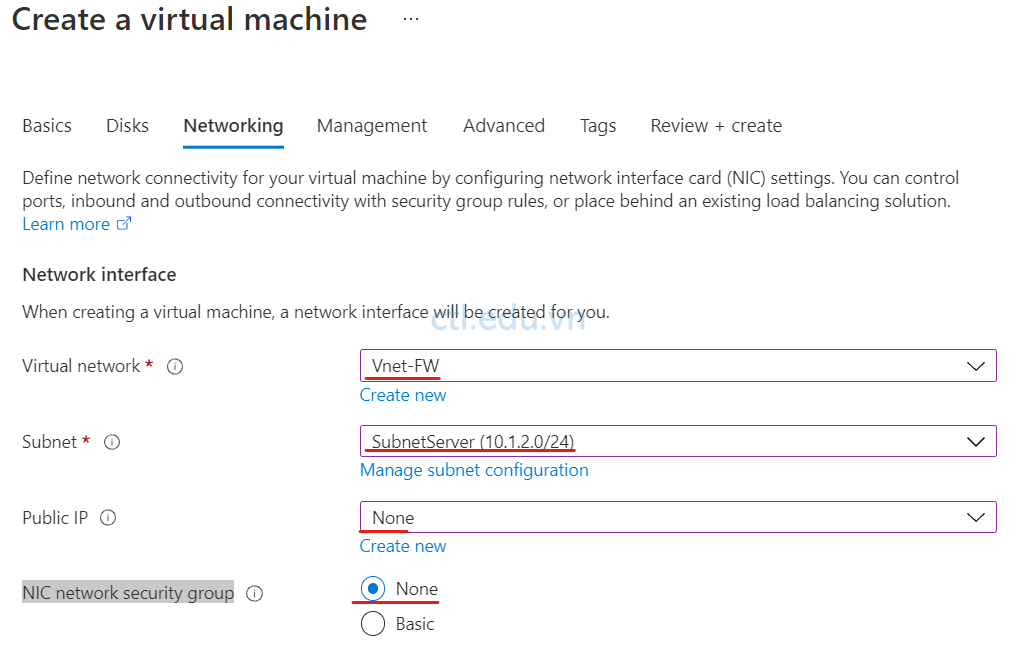
- Tại tab Networking chọn các thông tin sau:
- Virtual Network:chọn Vnet-FW
- Subnet: chọn SubnetServer
- Public IP: chọn None
- NIC network security group: chọn None.
- Ấn Review + Create , và Create
Task 4. Triển Khai Azure Firewall
- Tại Azure portal, trong phần search tìm và chọn Firewalls.
- Màn hình Firewalls, ấn Create, và nhập các thông tin sau:
- Subscription: chọn subscription của bạn
- Resource group: chọn Firewall-RG
- Name: Firewall1.
- Region: Southeast Asia
- Firewall tier: chọn Standard.
- Firewall management: chọn option Use Firewall rules (classic) to manage this firewall
- Choose a virtual network: chọn option Use existing
- Virtual network: Chọn Vnet-FW
- Public IP address: ấn Add new, trong phần Name: nhập vào fw-pip ấn Ok
- Ấn Review + create, và Create .

- Chờ quá trình tạo Firewall xong, vào Firewall1 ghi nhớ lại IP private và IP public của Firewall để thực hiện các phần lab sau.

Task 5. Tạo Default Route
- Tại Azure portal, trong phần search tìm và chọn Route tables.
- Màn hình Route tables, ấn Create, và nhập các thông tin sau:
- Subscription: chọn subscription của bạn
- Resource group: chọn Firewall-RG.
- Region: Chọn Southeast Asia.
- Name: nhập Router1.
- Propagate gateway routes: Yes
- Ấn Review + create, và Create.

3. Chờ quá trình tạo Router xong, chọn Router1 vừa tạo
4. Màn hình Router1, menu trái chọn Subnet, và ấn + Associate
5. Cửa sổ Associate subnet, trong phần Subnet chọn SubnetServer, ấn Ok

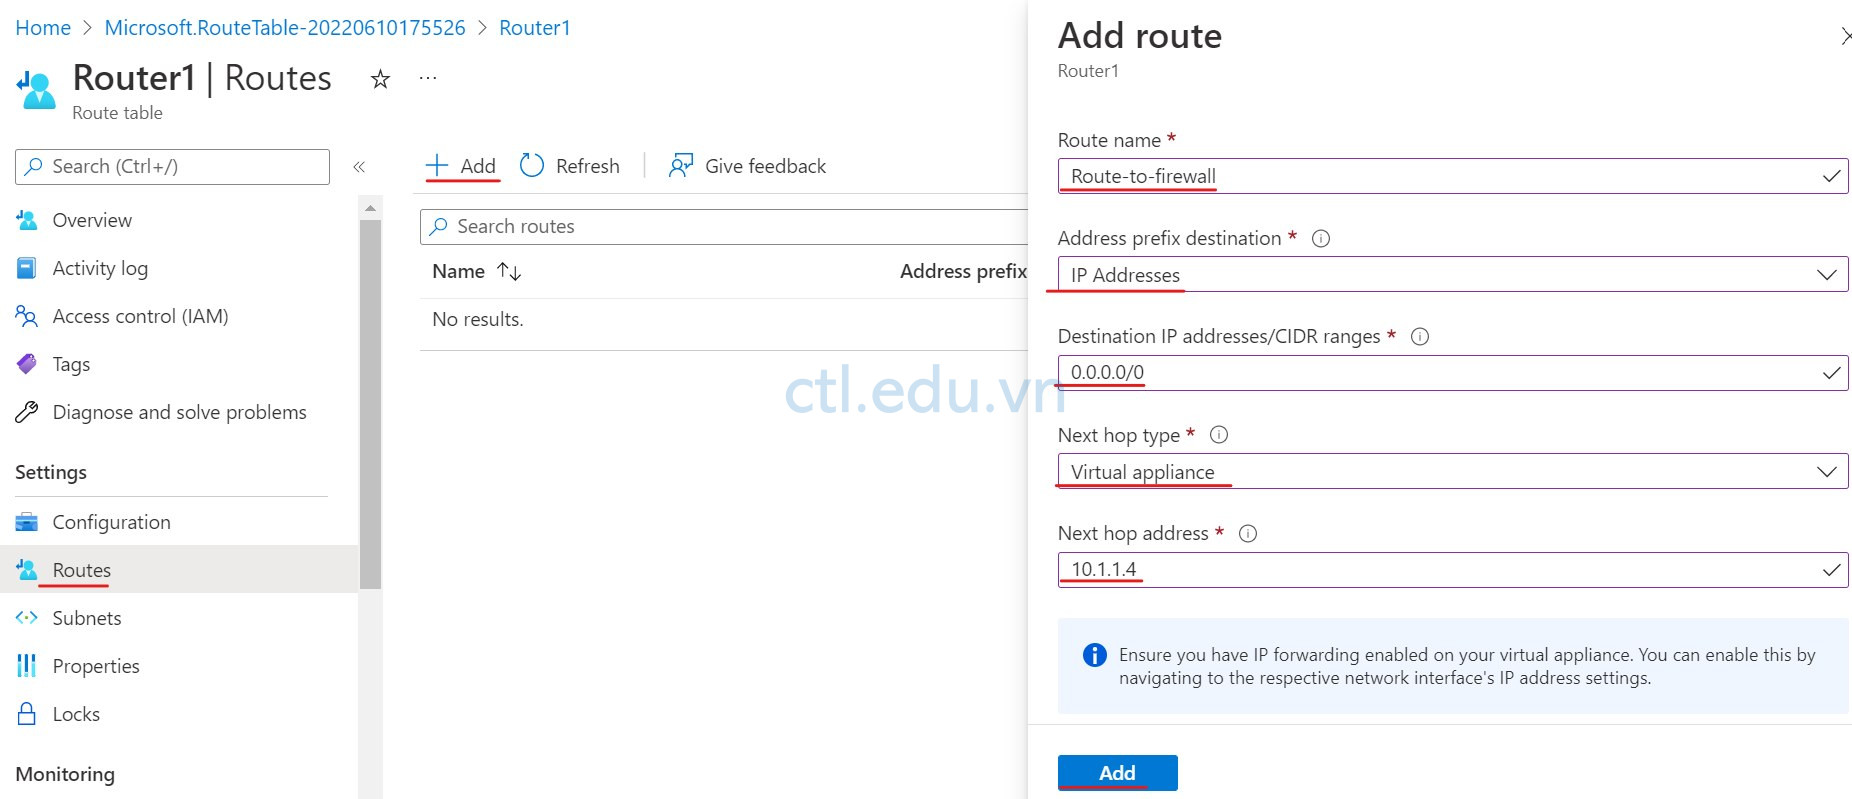
6. Màn hình Router1, menu trái chọn Routes, và ấn + Add
7. Màn hình Add Route nhập các thông tin sau:
- Route name: nhập Route-to-firewall.
- Address prefix destination: chọn IP Addresses
- Destination IP Addresses: nhập 0.0.0.0/0
- Next hop type: chọn Virtual appliance.
- Next hop address: nhập IP private của firewall mà bạn đã xem ở task 4.
8. Ấn OK.
Task 6. Tạo Application Rule
- Tại Azure portal, trong phần search tìm và chọn Firewalls, Màn hình Firewall1, menu trái chọn Rules (classic)
- Màn hình Rules (classic), chọn tab Application rule collection, chọn + Add application rule collection
- Màn hình Add application rule collection chọn các thông tin sau:
- Name: nhập vào Allow-all
- Priority: 1000.
- Action: chọn Allow
- Trong phần Target FQDNs nhập các thông tin sau:
- Name: nhập vào Allow-All.
- Source type: chọn IP address.
- Source: nhập 10.1.2.0/24.
- Protocol:port nhập vào http, https.
- Target FQDNS: *
- Ấn Add.
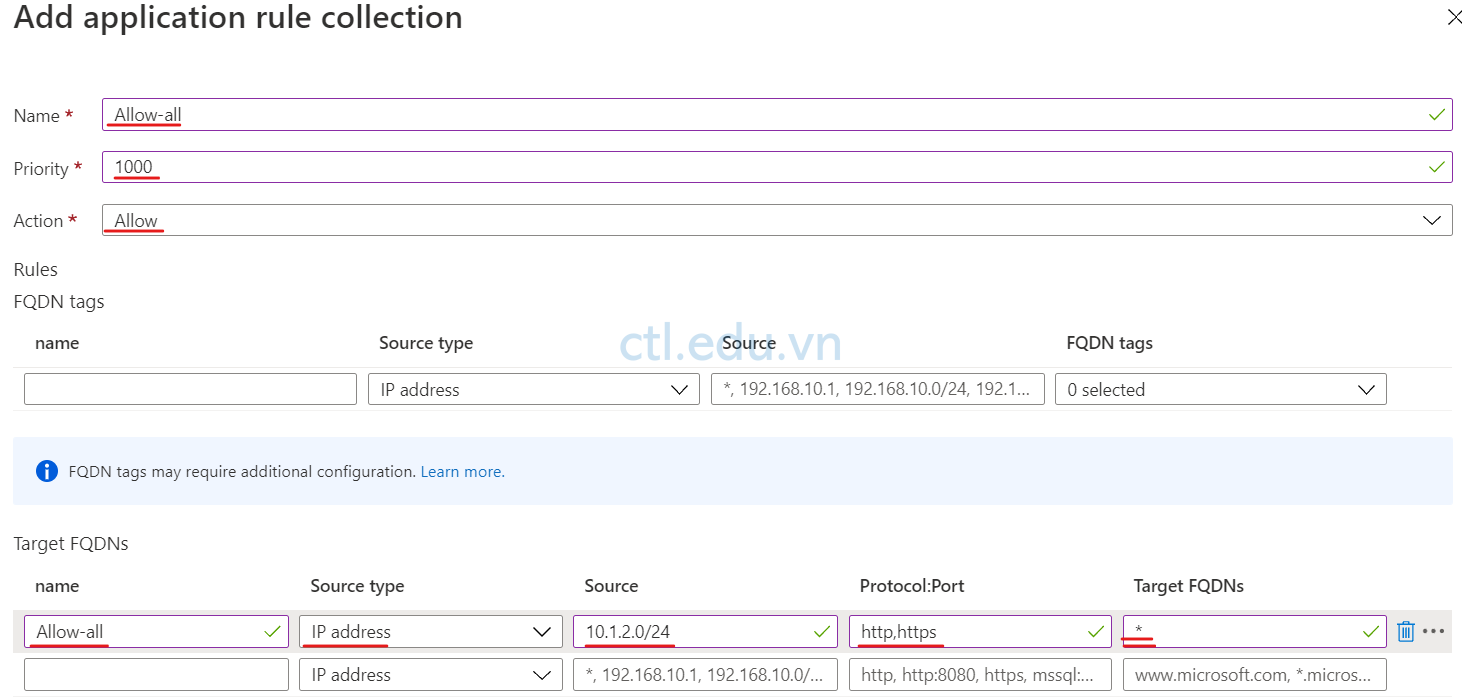
- Cũng tại tab Application rule collection, chọn + Add application rule collection
- Màn hình Add application rule collection chọn các thông tin sau:
- Name: nhập vào Deny-Web
- Priority: 500.
- Action: chọn Deny
- Trong phần Target FQDNs nhập các thông tin sau:
- Name: nhập vào Deny-vnexpress.
- Source type: chọn IP address.
- Source: nhập 10.1.2.0/24.
- Protocol:port nhập vào http, https.
- Target FQDNS: *.vnexpress.net
- Ấn Add.

Task 7. Tạo NAT Rule Collection
- Màn hình Firewall1, menu trái chọn Rules (classic)
- Màn hình Rules (classic), chọn tab NAT rule collection, chọn + Add NAT rule collection
- Màn hình Add NAT rule collection chọn các thông tin sau:
- Name: Nat-Rule.
- Priority: 200.
- Name: rdp-nat.
- Protocol: chọn TCP.
- Source type: chọn IP address.
- Source: *.
- Destination address: nhập vào IP public của firewall (bạn đã xem ở task 4)
- Destination Ports: 3389.
- Translated address: nhập vào IP private của máy ảo (máy win2022).
- Translated port: 3389.
- Tiếp dòng thứ 2.
- Name: Webserver.
- Protocol: chọn TCP.
- Source type: chọn IP address.
- Source: *.
- Destination address: nhập vào IP public của firewall (bạn đã xem ở task 4)
- Destination Ports: 80.
- Translated address: nhập vào IP private của máy ảo (máy win2022).
- Translated port: 80.
- Ấn Add.

Task 8. Tạo Network Rule
- Màn hình Firewall1, menu trái chọn Rules (classic)
- Màn hình Rules (classic), chọn tab Network rule collection, chọn + Add Network rule collection
- Màn hình Add Network rule collection chọn các thông tin sau:
- Name: Allow-Rule.
- Priority: 200.
- Action: chọn Allow.
- Trong phần IP addresses, nhập các thông tin sau
- Name: Allow-DNS.
- Protocol: UDP.
- Source type: chọn IP address.
- Source: 10.1.2.0/24. (dãy IP thuộc SubnetServer)
- Destination type: chọn IP address.
- Destination address, nhập vào 8.8.8.8, 8.8.4.4
- Destination Ports: 53.
- Ấn Add.

Task 9. Thay Đổi DNS Của Virtual Machine
- Tại Azure portal, menu trái chọn Virtual machines, chọn máy Win2022
- Màn hình Win2022, Menu trái chọn Networking và chọn Network Interface: Win2022xxx
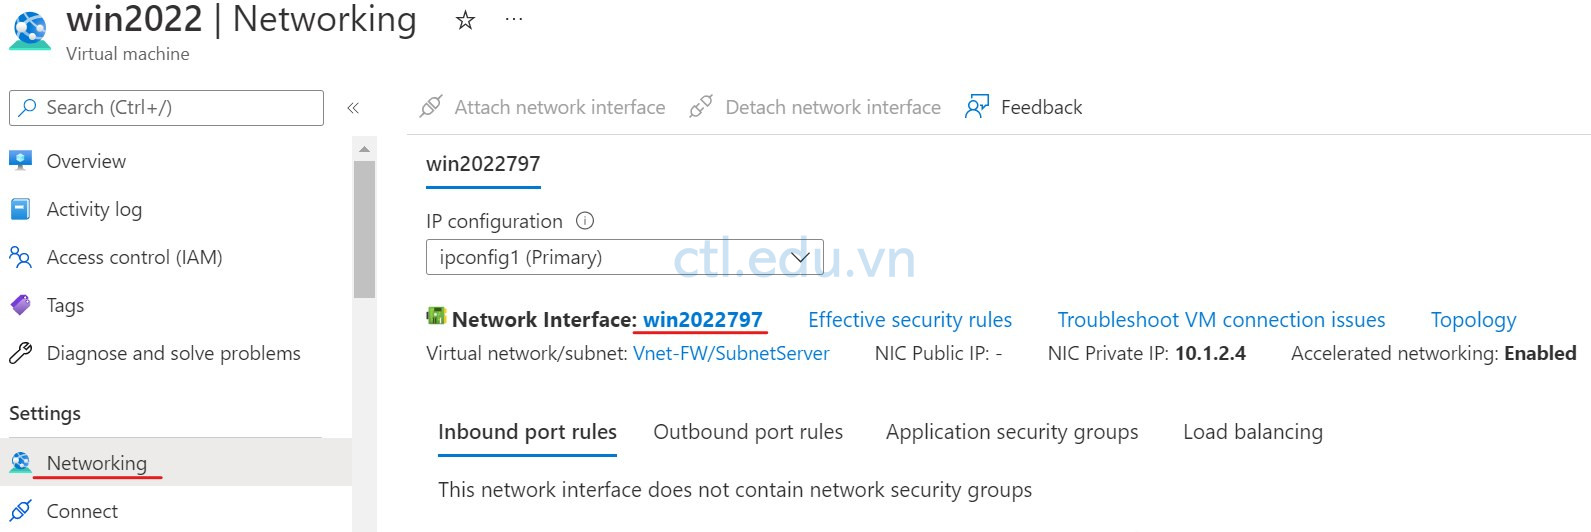
3. Màn hình Win2022xxx, menu trái chọn DNS Servers, và chọn Custom và nhập vào 8.8.8.8 và 8.8.4.4 ấn Save.

Task 10. Kiểm Tra Firewall
- Tại máy windows 10, vào run gõ lệnh MSTSC, thực hiện remote vào IP public của Firewall1 và nhập User name: Win2022, Password: P@ssw5.d@1234 để remote thành công vào máy ảo Win2022
- Tại máy win2022, vào trình duyệt Microsoft Edge hay cài Google Chrome nếu có.
- Vào trình duyệt, truy cập trang vnexpress.net không thành công vì đã bị chặn.
- Trên máy Win2022 cài Web Server và tạo Web Default.
- Tại máy windows 10, vào trình duyệt truy cập vào ip public của Firewall1, sẽ truy cập thành công vào Web Default trên Win2022.
Hoàn tất bài Lab
