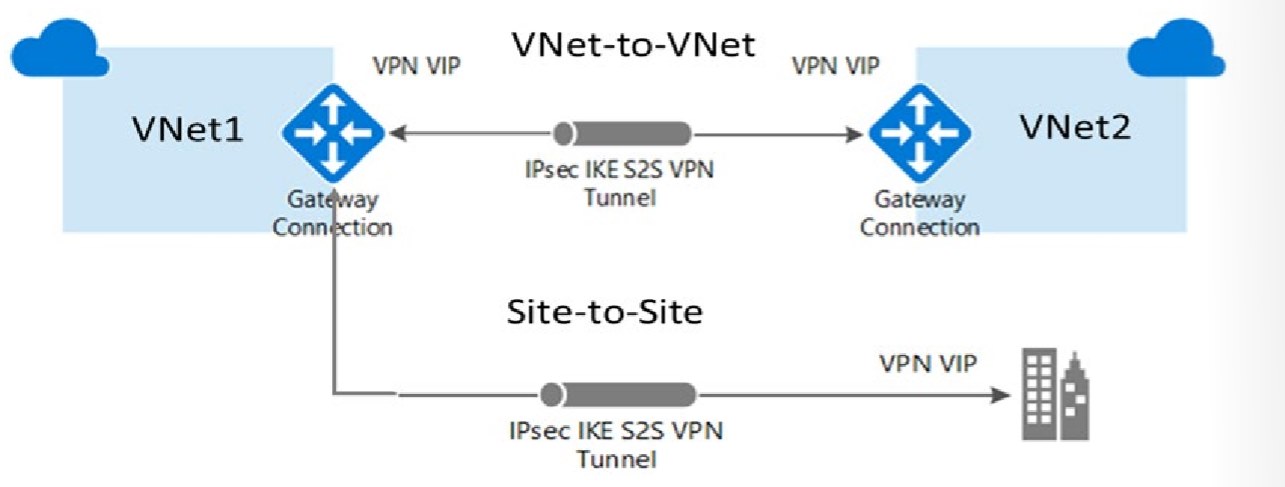
Lab Microsoft Azure Module 5 hướng dẫn bạn tạo kết nối VPN Vnet to Vnet, các Virtual networks có thể khác regions hay khác subscriptions và thiết lập Vnet peering giữ 2 Vnet khác region.
Exercise 1. Kết Nối VNet to VNet
1. Truy cập trang https://portal.azure.com, và đăng nhập bằng tài khoản mà bạn dùng để đăng ký Azure subscription.
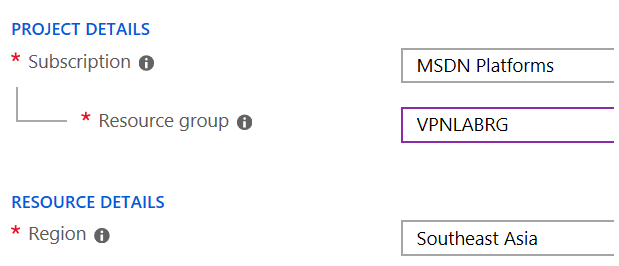
2. Tạo Resource Group ở Southeast Asia, Menu trái chọn Resource group, và chọn add.
3. Tại màn hình create resource goup, nhập các thông tin sau và ấn Review + Create và ấn Create.
- Resource group: VPNLABRG
- Region: Southeast Asia
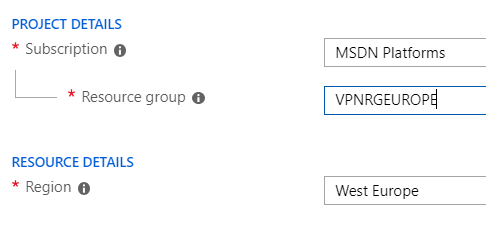
4. Tiếp tục tạo resource group ở West Europe, Menu trái chọn Resource group, và chọn add.
5. Tại màn hình create resource goup, nhập các thông tin sau và ấn Review + Create và ấn Create.
- Resource group: VPNRGEUROPE
- Region: West Europe
1. Tạo Virtual network ở Southeast Asia, Menu trái chọn Virtual networks, và ấn Add.
2. Màn hình Create virtual network nhập các thông tin sau và ấn Create.
- Subscription: chọn subscription của bạn.
- Resource Group: chọn VPNLabRG
- Name: VPNNetwork
- Region: Southeast Asia
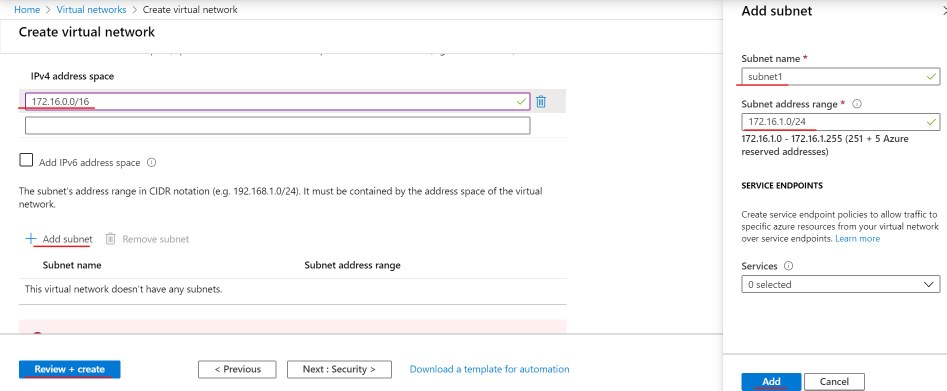
- Ấn Next: Ip Addresses
- IPv4 address space xóa dãy ip có sẳn, nhập vào: 172.16.0.0/16
- Ấn Add Subnet
- Subnet name: subnet1
- Subnet Address range: 172.16.1.0/24
- Ấn Add
- Ấn Review + Create
- Ấn Create
3. Tại Virtual network chọn VPNNetwork vừa tạo
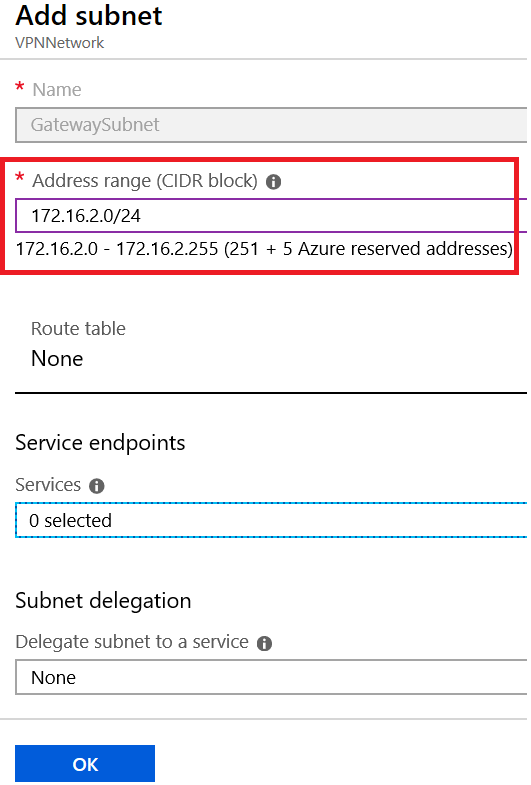
4. Màn hình VPNNetwork bên trái chọn Subnets, bên phải chọn Gateway subnet.
5. Màn hình Add subnet nhập các thông tin sau ấn OK:
- Address range (CIDR block) : 172.16.2.0/24
- Route table: None
- Services : 0 selected
- Delegate subnet to a service: None
6. Tương tự tạo Virtual network ở West Europe, Menu trái chọn Virtual networks, và ấn Add
7. Màn hình Create virtual network nhập các thông tin sau và ấn Create.
- Subscription: chọn subscription của bạn.
- Resource Group: chọn VPNRGEUROPE
- Name: NetworkEurope
- Region: West Europe
- Ấn Next: Ip Addresses
- IPv4 address space 10.1.0.0/16
- Trong phần Subnet Name ấn vào Default
- Subnet Name: đổi thành sub1
- Subnet Address range: 10.1.0.0/24
- Ấn Save
- Ấn Review + Create
- Ấn Create
8. Tại Virtual network chọn NetworkEurope vừa tạo
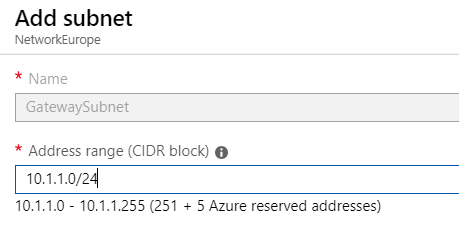
9. Màn hình NetworkEurope bên trái chọn Subnets, bên phải chọn Gateway subnet.
10. Màn hình Add subnet nhập các thông tin sau ấn OK:
- Address range (CIDR block) : 10.1.1.0/24
- Route table: None
- Services : 0 selected
- Delegate subnet to a service: None
1. Tạo Virtual network gateway ở Southeast Asia, Menu trái chọn All services, trong phần filter nhập vào virtual network gateway và chọn Virtual network gateways
2. Màn hình Virtual network gateways ấn Add
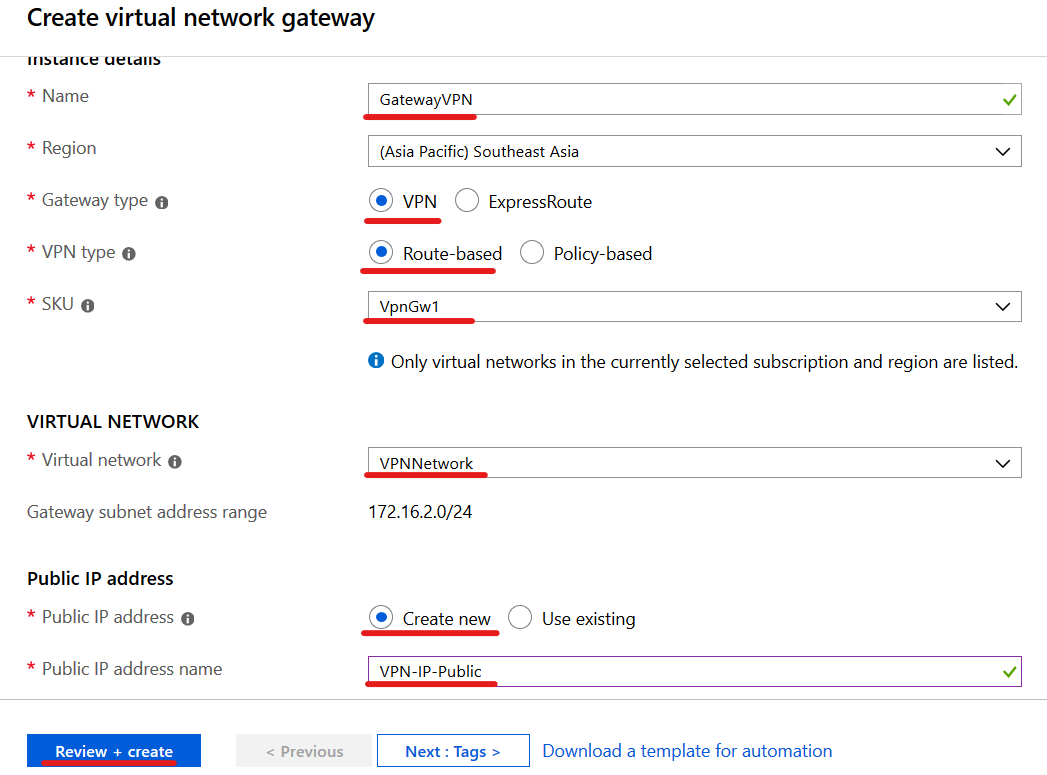
3. Màn hình Create virtual network gateway nhập các thông tin sau
- Name: GatewayVPN
- Region: Southeast Asia
- Gateway type: VPN
- VPN type: Route-based
- SKU: VpnGw1
4. Trong phần Vitual network chọn VPNNetwork
5. Trong phần Public ip address chọn option Create new và nhập vào VPN-IP- Public, Ấn Create
6. Chờ khoảng 30 phút để tạo Virtual network gateway xong. (Bạn có thể làm tiếp phần sau)
7. Tương tự tạo Virtual network gateway ở West Europe, Menu trái chọn All services, trong phần filter nhập vào virtual network gateway và chọn Virtual network gateways
8. Màn hình Virtual network gateways ấn Add
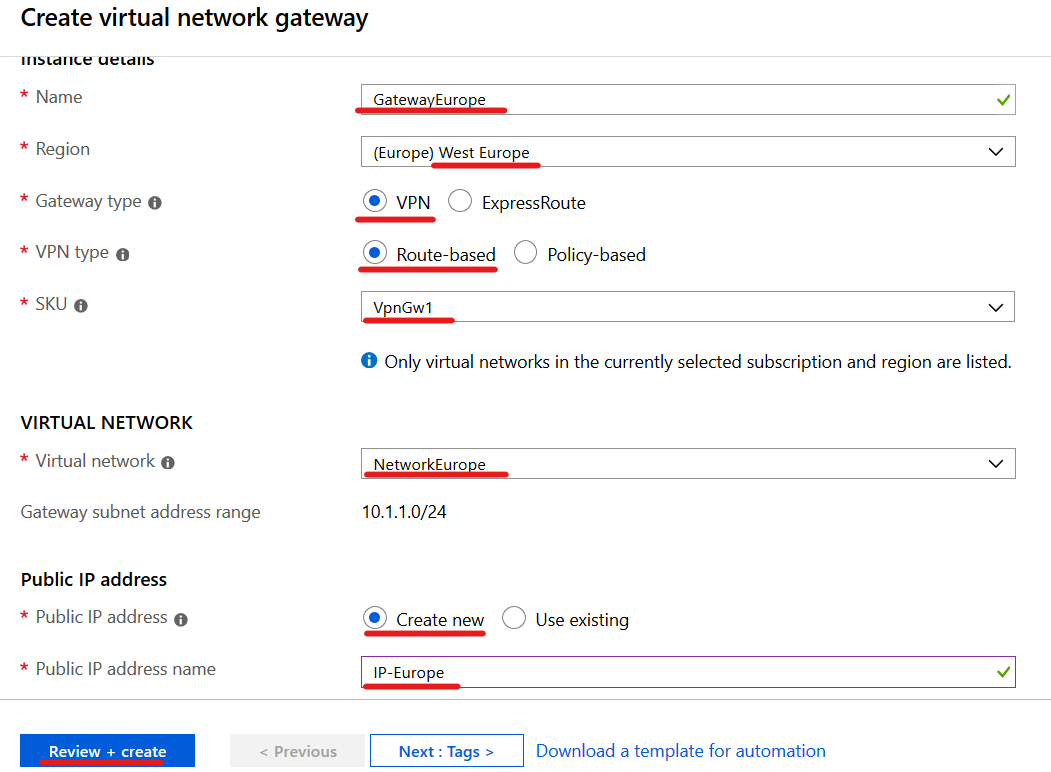
9. Màn hình Create virtual network gateway nhập các thông tin sau
- Name: GatewayEurope
- Region: chọn West Europe giống như bạn đã chọn khi tạo resource group.
- Gateway type: VPN
- VPN type: Route-based
- SKU: VpnGw1
10. Trong phần Vitual network chọn NetworkEurope
11. Trong phần Public ip address chọn option Create new và nhập vào IP-Europe, Ấn Create
12. Chờ khoảng 30 phút để tạo Virtual network gateway xong. (Bạn phải chờ tạo Virtual network gateway xong mới có thể làm tiếp Task 4)
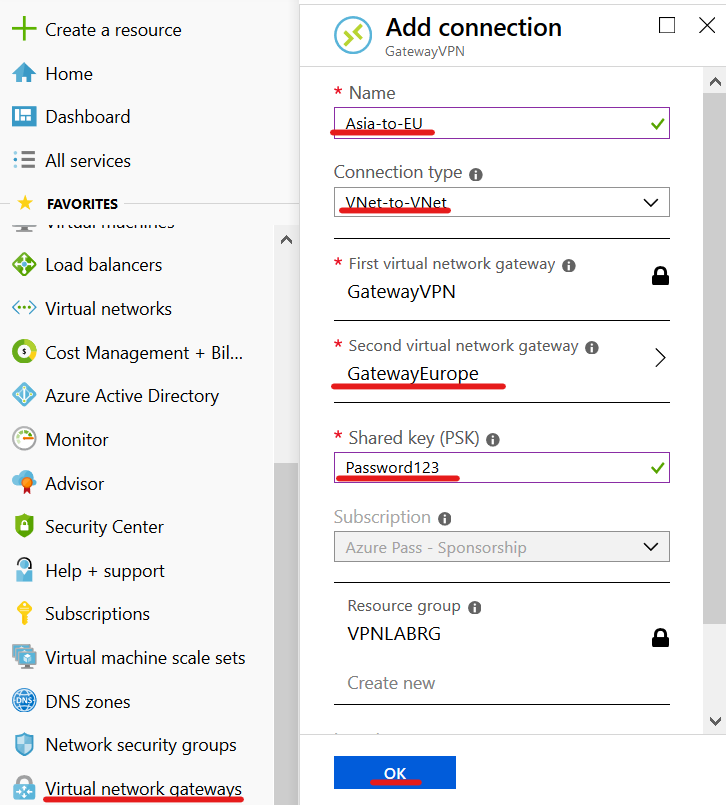
1. Tại Virtual network gateway, chọn GatewayVPN ở Southeast Asia
2. Màn hình GatewayVPN, bên trái chọn Connections, và chọn Add
3. Màn hình Add connection nhập các thông tin sau ấn OK
- Name: Asia-to-EU
- Connection type: Vnet-to-Vnet
- Trong phần Second virtual network gateway chọn GatewayEurope
- Shared key (PSK): Password123
4. Tạo xong kết nối Asia-to-EU.
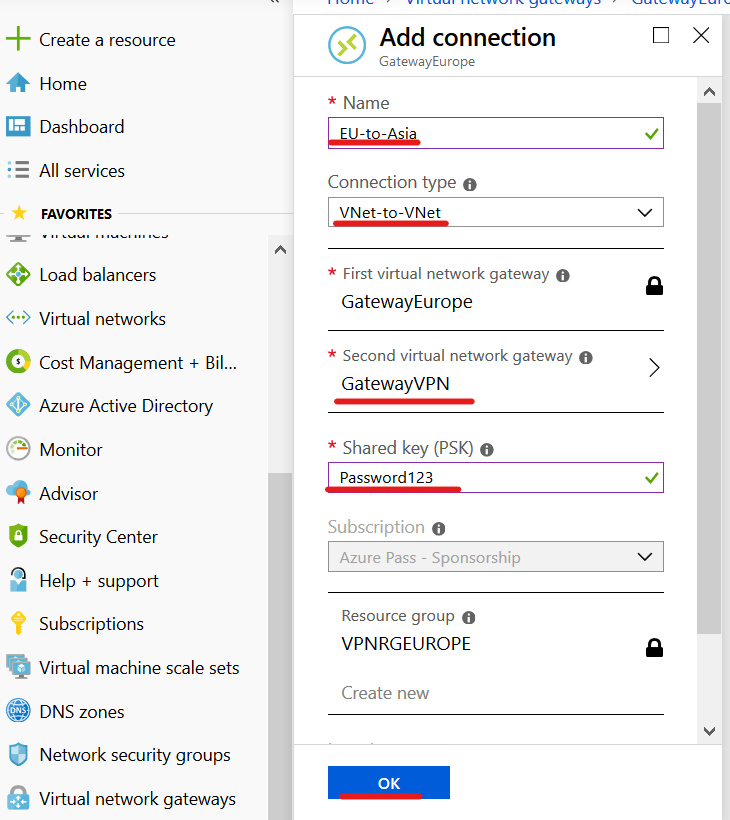
1. Tại Virtual network gateway, chọn GatewayEurope ở West Europe
2. Màn hình GatewayEurope, bên trái chọn Connections, và chọn Add
3. Màn hình Add connection nhập các thông tin sau ấn OK
- Name: EU-to-Asia
- Connection type: Vnet-to-Vnet
- Trong phần Second virtual network gateway chọn GatewayVPN
- Shared key (PSK): Password123
4. Tạo xong kết nối EU-to-Asia.
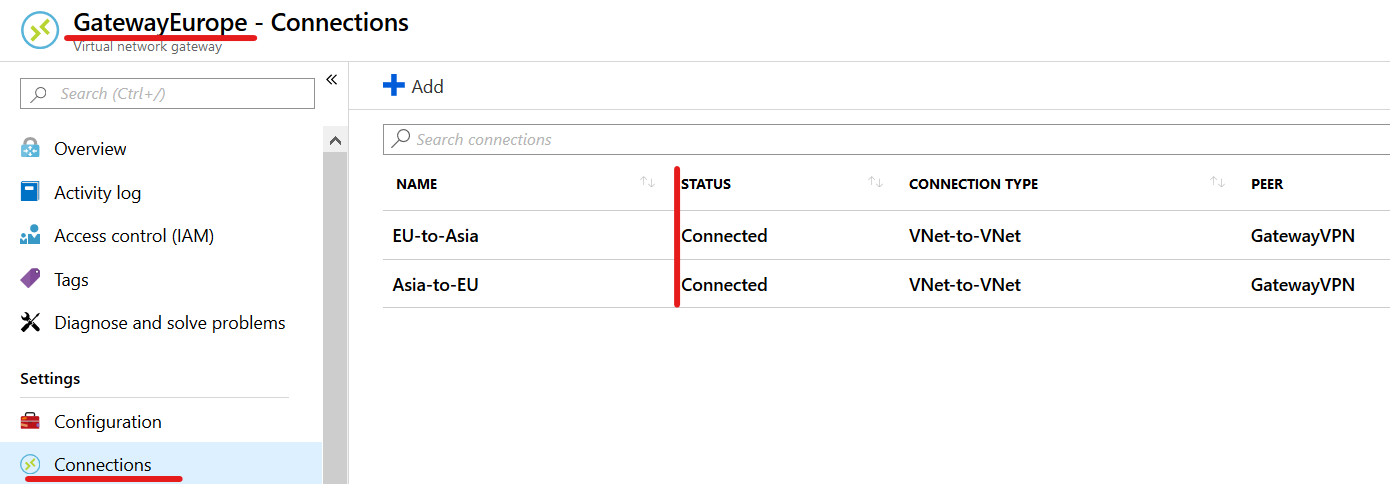
5. Chờ vài phút và refresh nhiều lần cho đến khi Status là Connected
1. Tạo một máy ảo dùng Virtual network là VPNNetwork ở Southeast Asia, và một máy ảo dùng Virtual network là NetworkEurope ở West Europe.
2. Thực hiện lệnh ping giữa 2 máy ảo.
3. Tạo folder share truy cập tài nguyên 2 máy.
4. Xóa 2 Resource Group đã tạo ở Task 1
Exercise 2. Thiết Lập VNet Peering
Trong phần này bạn sẽ tạo 2 Virtual network ở hai region khác nhau.
- Vnet1 ở Southeast Asia.
- Vnet2 ở West Europe
1. Tạo Vnet1 ở Southeast Asia. Tại Azure Portal, menu trái chọn Virtual Networks và chọn +Add
2. Màn hình Create virtual network nhập các thông tin sau và ấn Create.
- Subscription: chọn subscription của bạn.
- Resource Group: Ấn Create new nhập vào RGLab05-Asia.
- Name: VNet1
- Region: Southeast Asia
- Ấn Next: Ip Addresses
- IPv4 address space xóa dãy ip có sẳn, nhập vào: 192.168.1.0/24
- Ấn Add Subnet
- Subnet name: subnet1
- Subnet Address range: 192.168.1.0/24
- Ấn Add
- Ấn Review + Create
- Ấn Create
3. Tạo Vnet2 ở West Europe. Tại Azure Portal, menu trái chọn Virtual Networks và chọn +Add
4. Màn hình Create virtual network nhập các thông tin sau và ấn Create.
- Subscription: chọn subscription của bạn.
- Resource Group: Ấn Create new nhập vào RGLab05-Eu.
- Name: VNet2
- Region: West Europe
- Ấn Next: Ip Addresses
- IPv4 address space xóa dãy ip có sẳn, nhập vào: 172.17.0.0/16
- Ấn Add Subnet
- Subnet name: subnet1
- Subnet Address range: 172.17.1.0/24
- Ấn Add
- Ấn Review + Create
- Ấn Create
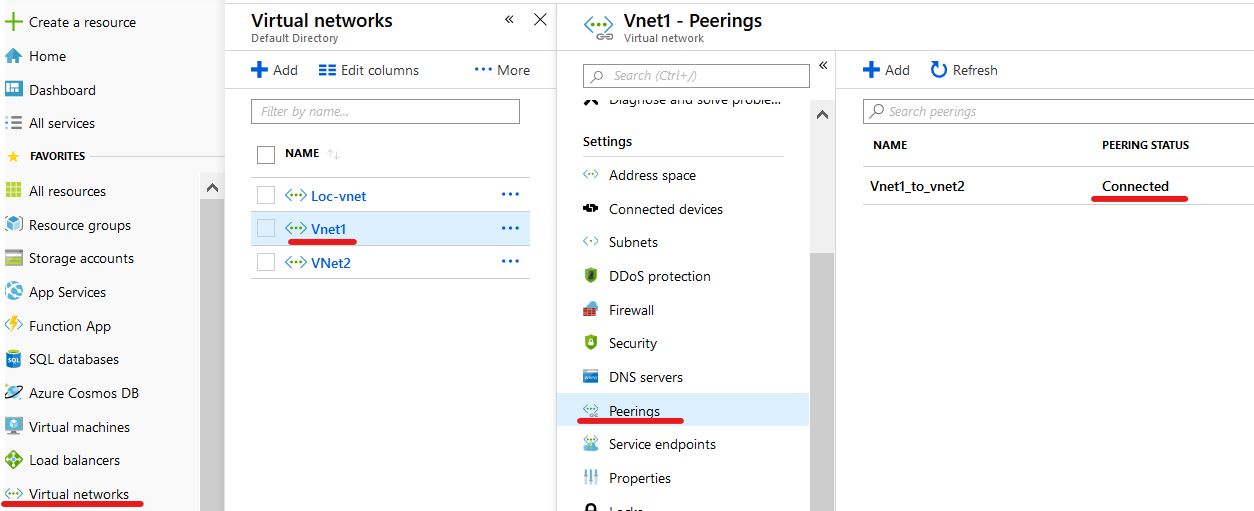
Tại Azure Portal, menu trái chọn Virtual Networks, chọn VNet1 vừa tạo.
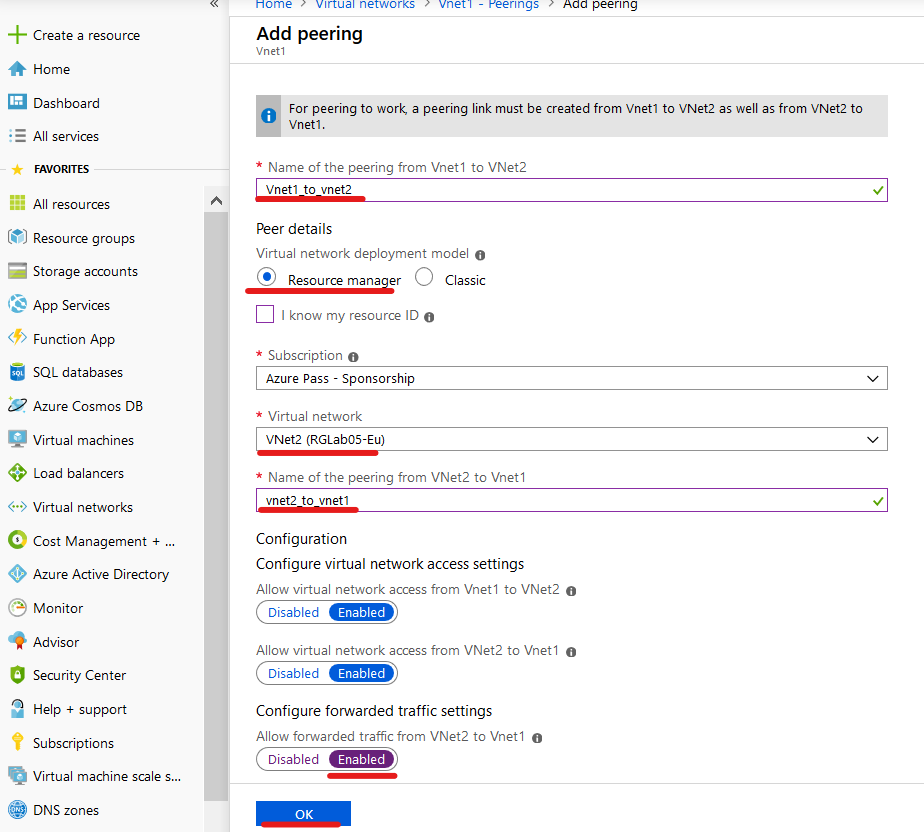
Màn hình Vnet1, menu trái chọn Peerings, và ấn + Add.
Màn hình Add Peering nhập các thông tin sau vầ ấn OK.
- Name of peering from: vnet1_to_vnet2 (chỉ dùng chữ, số, và dấu gạch dưới)
- Virtual network deployment model: Chọn option Resource manager
- Subcription: chọn Subcription của bạn.
- Virtual network: chọn Vnet2.
- Name of peering from: vnet2_to_vnet1 (sẽ tự tạo cho Vnet2)
- Allow forwarded traffic from Vnet2 to Vnet1: Enable
- Allow forwarded traffic from Vnet1 to Vnet2: Enable
4. Chờ vài phút, cho cột peering status có trạng thái là Connected.
5. Tương tự qua Vnet2 kiểm tra cột peering status cũng có trạng thái là Connected
1. Tạo một máy ảo dùng Virtual network là Vnet1 ở Southeast Asia, và một máy ảo dùng Virtual network là Vnet2 ở West Europe.
2. Thực hiện lệnh ping giữa 2 máy ảo. (nhớ off firewall)
3. Tạo folder share truy cập tài nguyên 2 máy.
4. Xóa 2 Resource Group đã tạo.
Mr CTL

