CTL.EDU.VN cùng bạn tìm hiểu Intune device profiles. Bạn sẽ tìm hiểu và làm quen với các device profiles và tìm hiểu cách tạo và quản lý chúng cho Windows, Android và iOS.
Microsoft Intune bao gồm các cài đặt và tính năng mà bạn có thể enable hoặc disable trên các thiết bị khác nhau trong tổ chức của mình. Bài lab hướng dẫn bạn sử dụng Azure Active Directory (Azure AD) và Intune để quản lý user cũng như thiết bị trong tổ chức của bạn. Qua bài lab giúp bạn đánh giá các giải pháp cho phép người dùng làm việc hiệu quả và an toàn trên các thiết bị Windows 10 và Windows 11
A. Tạo và Triển Khai Device Profile
Task 1: Kiểm Tra Các Cài Đặt Trên Thiết Bị Trước Khi Join Vào Azure AD
- Tại máy windows 10 chưa join vào Azure AD, vào Start và chọn Settings.
- Màn hình Settings kiểm tra bạn có thể nhìn thấy Gaming.
- Màn hình Settings chọn Privacy bạn có thể nhìn thấy và thay đổi các options trong Privacy.
- Trở lại màn hình Settings chọn Personalization và chọn Start quan sát các app đang set là ON.
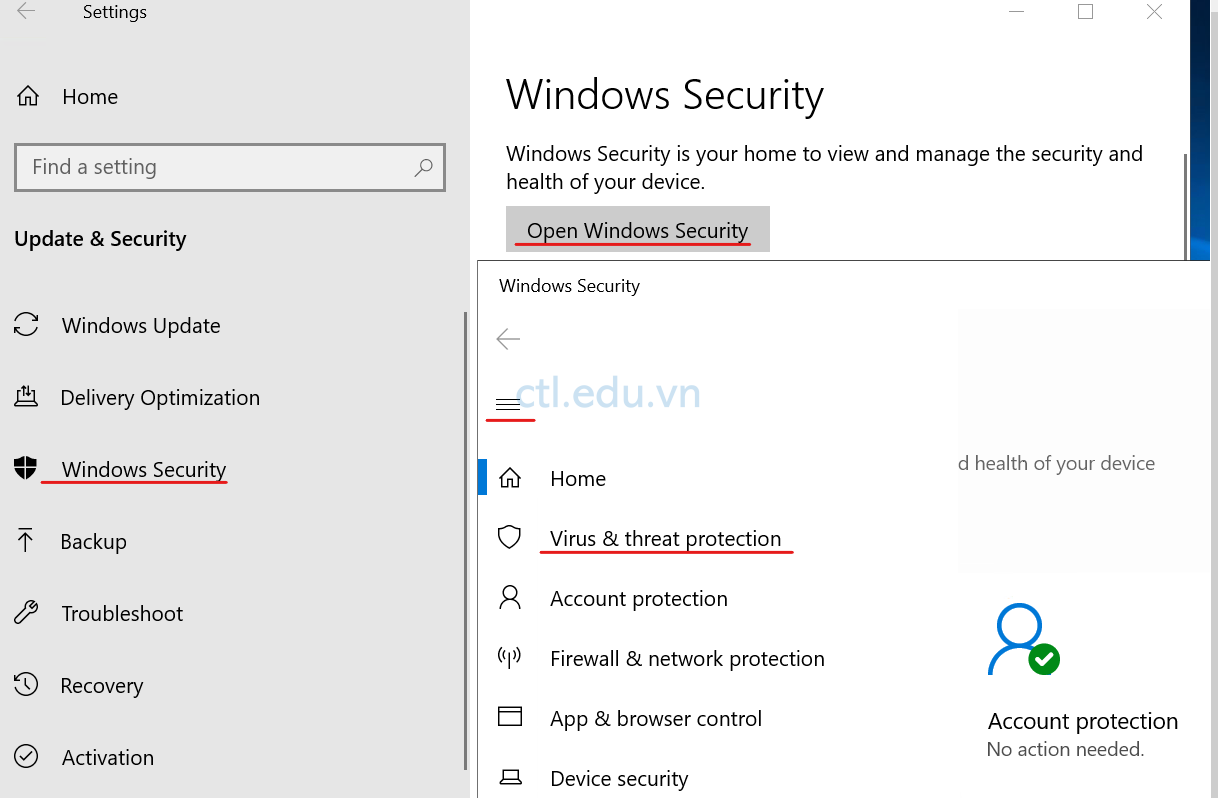
- Trở lại màn hình Settings chọn Update and Security.
- Màn hình Update & Security chọn Windows Security và chọn Open Windows Security.
- Màn hình Windows Security vào menu trái và chọn Virus & threat protection.
- Màn hình Virus & threat protection trong phần Virus & threat protection settings chọn Manage settings. kéo thanh trượt đến phần Exclusions chọn Add or remove exclusions.
- Màn hình Exclusion quan sát không có exclusions nào đã cấu hình.
- Đóng Exclusions và đóng Windows Security.
Task 2: Join Máy Windows 10 vào Azure AD và Microsoft Intune Dùng Settings App
- Tại máy Windows 10 chưa join vào Azure AD , vào Start chọn the Settings App.
- Tại Settings app, chọn Accounts.
- Chọn tiếp Access work or school và ấn Connect.
- Cửa sổ Microsoft account chọn Join this device to Azure Active Directory.
- Cửa sổ Let’s get you signed in nhập vào user2@customdomain ấn Next.
- Cửa sổ Enter password nhập password của user1, ấn Sign in.
- Chờ vài giây xuất hiện cửa sổ Make sure this is your organization ấn Join.
- Cửa sổ You’re all set! ấn Done.
- Trở lại cửa sổ Settings app, trong phần Access work or school kiểm tra thấy đã join vào Azure AD, đóng Settings app.
- Sign out và sign in lại bằng user2@customdomain.

Task 3: Tạo Device Profile Theo Kịch Bản
- Tại máy vừa join Azure AD, mở Microsoft Edge, truy cập vào trang https://endpoint.microsoft.com sẽ tự động sign in vào user2@customdomain.
- Ở gốc trên bên phải chọn vào tên User2 và chọn Sign in with a different account.
- Sign in bằng têncủabạn@customdomain .
- Màn hình Microsoft Intune admin center, menu trái chọn Devices, Màn hình Devices | Overview chọn Configuration Profiles.
- Màn hình Devices | Configuration profiles chọn Create profile.
- Màn hình Create a profile chọn các option sau, và ấn Create:
- Platform:chọn Windows 10 and later
- Profile type: chọn Template
- Template name: tìm và chọn Device restrictions

7. Xuất hiện cửa sổ Device restrictions, tại tab Basics nhập các thông tin sau ấn Next:
- Name: Tấn Lộc Developer – standard
- Description: Basic restrictions and configuration for Developer in Tấn Lộc.
8. Cửa sổ Device restrictions, tab Configurations settings chọn Control Panel and Settings. trong phần Gaming và Privacy chọn Block

9. Cũng tại tab Configurations settings tìm và chọn Start. trong phần Most used apps và Recently added apps chọn Block
10. Cũng tại tab Configurations settings tìm và chọn Microsoft Defender Antivirus. Trong phần Microsoft Defender Antivirus, tìm và chọn Microsoft Defender Antivirus Exclusions.
11. Trong phần Microsoft Defender Antivirus Exclusions nhập C:\DevProjects vào Files and folders.
12. Trong phần Processes nhập DevBuild.exe.
13. Ấn Next 3 lần và ấn Create.

Task 4: Tạo Device Group
- Tại Microsoft Endpoint Manager admin center, menu trái chọn Groups.
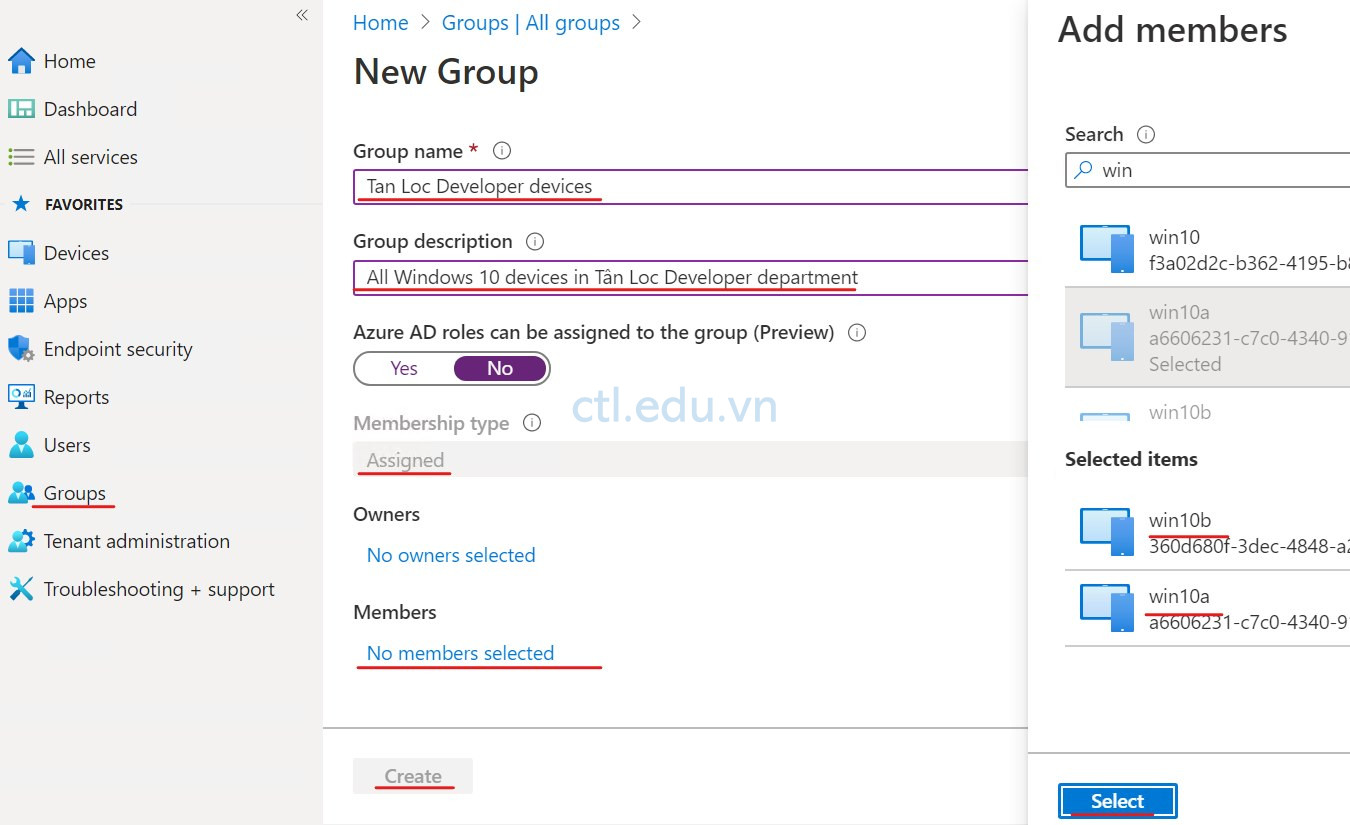
- Cửa sổ Groups | All groups ấn New group.
- Cửa sổ New Group nhập các thông tin sau:
- Group type: Security
- Group name: Tan Loc Developer devices
- Group description: All Windows 10 devices in Tân Loc Developer department
- Membership type: Assigned
- Trong phần Members, chọn No members selected. trong phần Add members tìm và chọn các máy đã join vào Azure AD ấn Select.
- Ấn Create và kiểm tra đã có Group Tan Loc Developer devices vừa tạo
Task 5: Tạo Dynamic Azure AD Device group
- Cũng tại Groups | All Groups ấn New group.
- Cửa sổ New Group nhập các thông tin sau:
- Group type: Security
- Group name: Windows Devices
- Membership type: Dynamic Device
3. Trong phần Device Members chọn Add dynamic query.
4. Cửa sổ Dynamic membership rules trong phần Rule syntax ấn Edit. 5. Cửa sổ Edit rule syntax nhập device.deviceOSType -contains “Windows” ấn Ok, ấn Save và Create.

Task 6: Triển Khai Device Profile Cho Windows 10 Device
- Tại Microsoft Endpoint Manager admin center, menu trái chọn Devices. và chọn Configuration profiles.
- Cửa sổ Devices | Configuration profiles chọn Tấn Lộc Developer – standard profile mà bạn đã tạo.
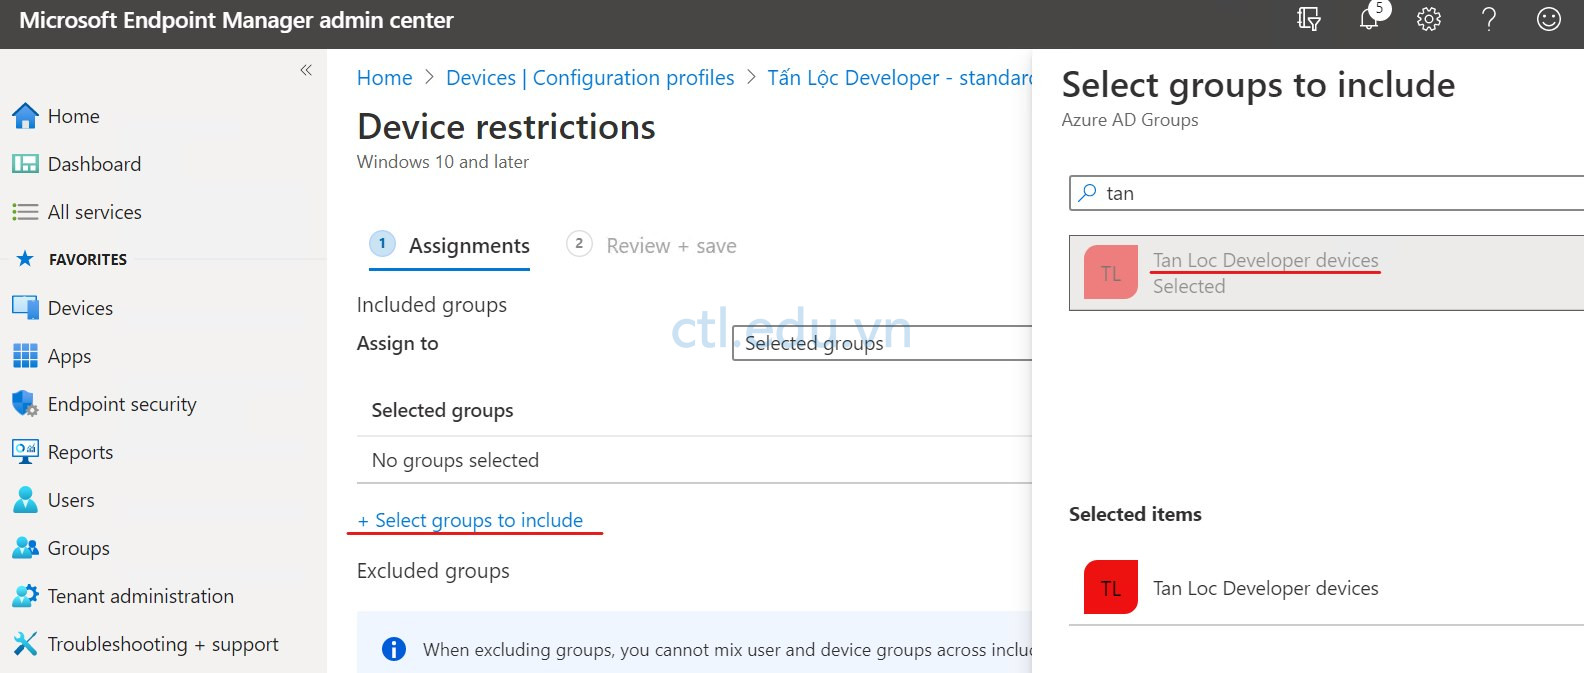
- Tại cửa sổ Tấn Lộc Developer – standard chọn Properties. kéo thanh trượt đến phần Assignments ấn Edit.
- Cửa sổ Assignments chọn Select groups to include.
- Cửa sổ Select groups to include tìm và chọn Tan Loc Developer devices ấn Select.
- Ấn Review + Save, và Save.
Task 7: Kiểm Tra Device Profile Đã Áp Đặt Cho Device?
- Tại máy windows 10 đã join vào Azure AD, vào Start và chọn Settings.
- Cửa sổ Settings chọn Accounts và chọn Access work or school.
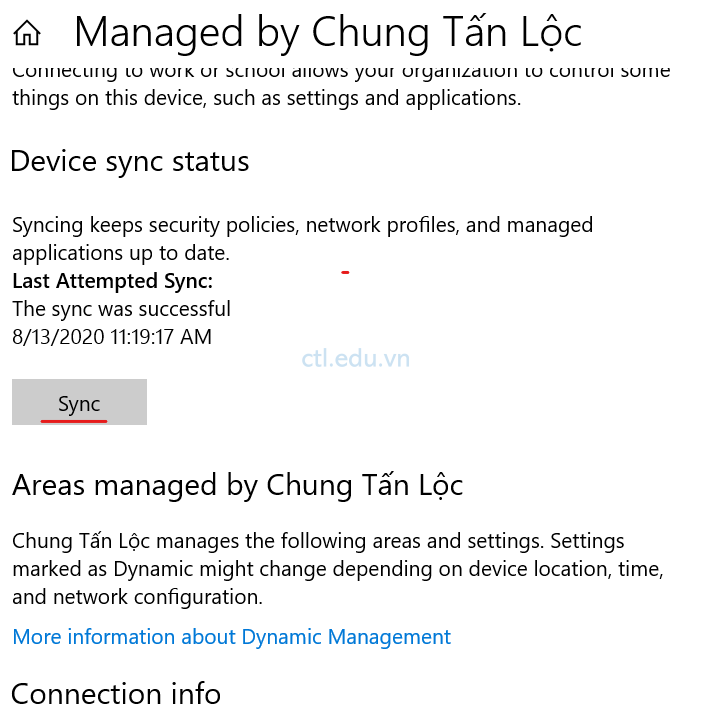
- Trong phần Access work or school chọn Connected to Tan Loc’s Azure AD và ấn Info và ấn Sync
- Thời gian Sync chỉ mất vài giây nhưng có thể đến 15 phút device profile mới đươc áp đặt.
5. Vào Start và chọn lại Settings kiểm tra không còn Gaming and Privacy 6. Tại Settings chọn Personalization và chọn Start, kiểm tra Show recently used apps và Show most used apps đã bị mờ.

7. Trở lại Settings chọn Update and Security.
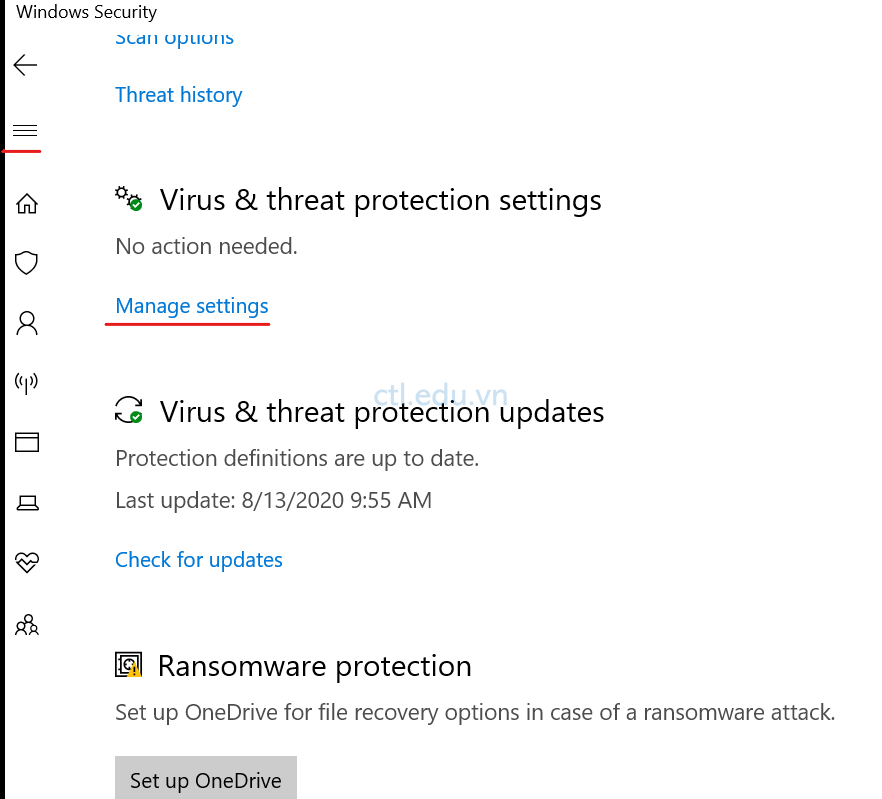
8. Cửa sổ Update & Security chọn Windows Security và chọn Open Windows Security.
9. Cửa sổ Windows Security menu trái Virus & threat protection.
10. Cửa sổ Virus & threat protection trong phần Virus & threat protection settings chọn Manage settings, kéo thanh trượt đến phần Exclusions và chọn Add or remove exclusions.
11. Kiểm tra thấy có thông tin C:\DevProjects và DevBuild.exe đóng Setting
B. Thay Đổi Device Policy
Task 1: Thay Đổi Cấu Hình Profile
- Trở lại Microsoft Endpoint Manager admin center, menu trái chọn Devices và chọn Configuration profiles
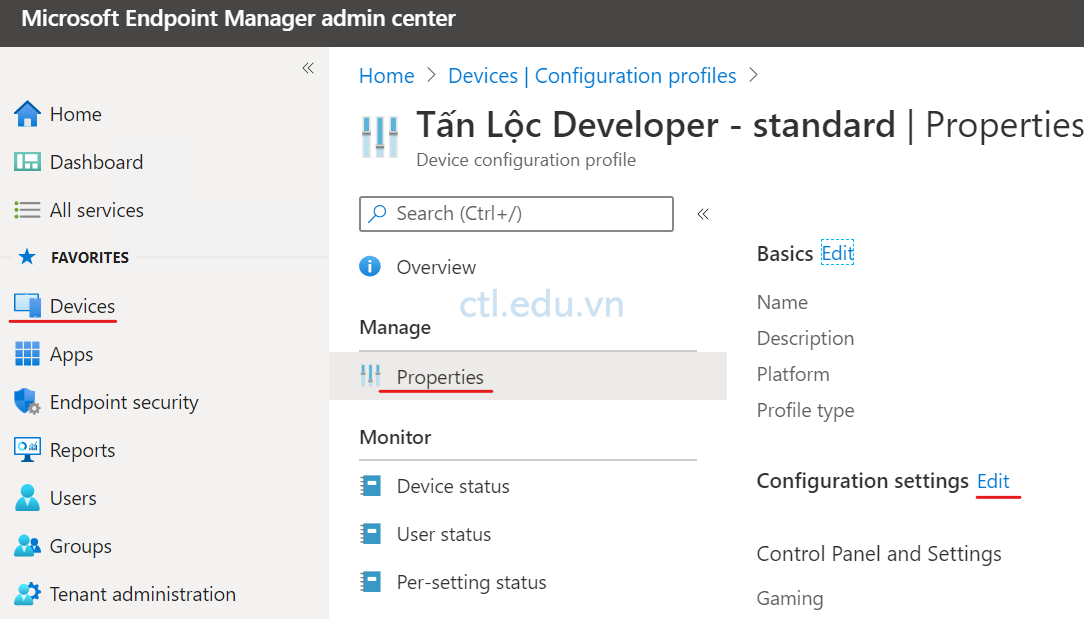
- Màn hình Devices | Configuration profiles chọn Tấn Lộc Developer – standard.
- Màn hình Tấn Lộc Developer – standard menu trái chọn Properties, trong phần Configuration settings ấn Edit.
- Màn hình Configuration settings chọn Control Panel and Settings. trong phần Privacy chọn Not configured.
- Ấn Review + save, và Save.
Task 2: Force Đồng Bộ Policy Từ Intune
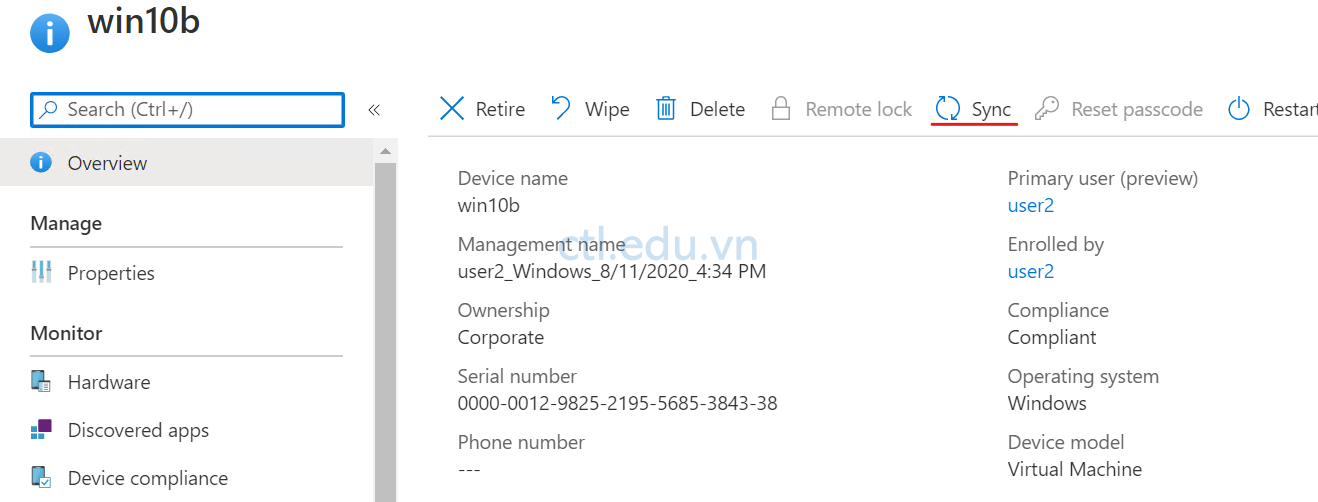
- Tại Microsoft Endpoint Manager admin center, Menu trái chọn Devices và chọn All devices.
- Chọn vào máy windows 10 chọn Sync vầ ấn Yes (Intune sẽ đồng bộ các policy, quá trình này có thể mất đến 5 phút)
Task 3: Kiểm Tra Profile Đã Thay Đổi
- Tại máy windows 10 đã join vào Azure AD, vào Start và chọn Settings.
- Cửa sổ Settings và chọn Privacy kiểm tra các options đã có thể chỉnh sửa.
C. Cấu Hình Roaming User Profiles Và Folder Redirection
Task 1: Tạo Folder Cho Roaming Profiles Và Redirection
- Trên máy domain controller, tạo 2 folder Profiles và Redirected trên C:\
- Share 2 folder này cho group domain users có quyền Read/write
Task 2: Cấu Hình Roaming User Profiles
- Tại máy domain controller, vào run thực hiện lệnh DSA.MSC
- Tại Active Directory Users and Computers, phải chuột vào ADUser1 chọn Properties.
- Cửa sổ AdUser1 Properties chọn tab Profile trong phần Profile path nhập vào \\pcnamedomaincontroller\Profiles\%username%, ấn OK.
- Thực hiện lại bước 2 và 3 cho AdUser2
- Minimize cửa sổ Active Directory Users and Computers.

Task 3: Cấu Hình Folder Redirection
- Tại máy domain controller vào Run thực hiện lệnh DSA.MSC
- Tạo thêm OU Sales và 2 user là aduser3 và aduder4 trong OU sales
- Tại máy domain controller vào Run thực hiện lệnh GPMC.MSC.
- Cửa sổ Group Policy Management console (GPMC), bên trái chọn Forest: tên domain của bạn, chọn Domains, và chọn tên domain của bạn.
- Phải chuột vào OU Sales chọn Create a GPO in this domain, and Link it here, Trong phần Name nhập vào Folder Redirection Policy ấn Ok
- Phải chuột vào Folder Redirection Policy vừa tạo chọn Edit
- Cửa sổ Group Policy Management Editor, chọn User Configuration, chọn Policies, chọn Windows Settings, và chọn Folder Redirection.
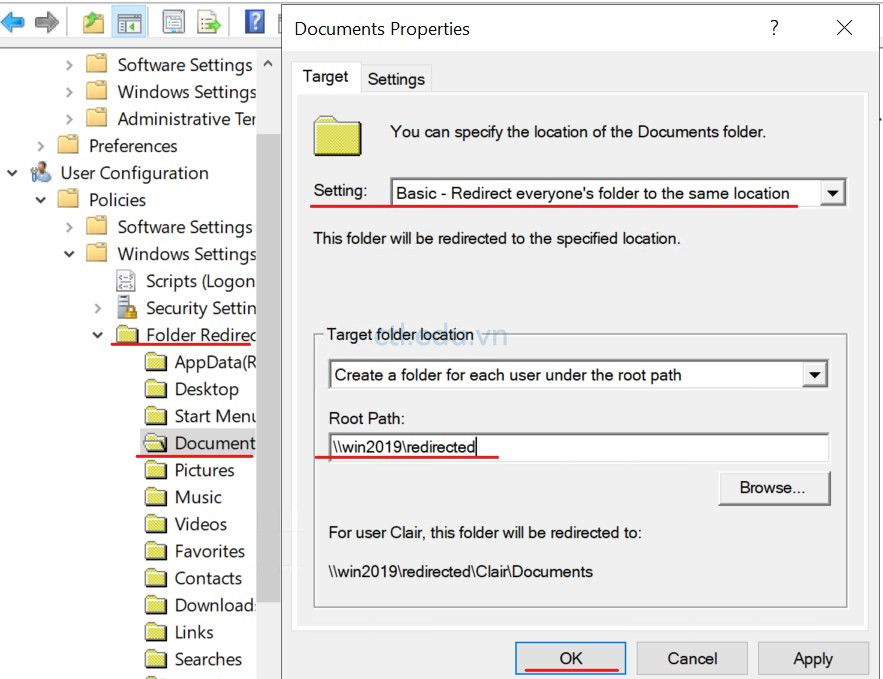
- Trong phần Folder Redirection, phải chuột vào Documents, chọn Properties.
- Cửa sổ Documents Properties trong phần Setting chọn Basic – Redirect everyone’s folder to the same location, Trong phần Target folder location nhập nội dung cho Root Path: \\pcnamemáydomaincontroller\Redirected, ấn OK.
- Cửa sổ Warning ấn Yes
- Đóng Cửa sổ Group Policy Management console (GPMC)
Task 4: Kiểm Tra Roaming User Profiles Và Folder Redirection
- Tại máy Windows 10 đã join domain local, logon vào user aduser1 (đã cấu hình user profile)
- Thực hiện thay đổi hình nền desktop, tạo folder trên desktop và tạo file có nội dung trong folder này.
- Sign out aduser1
- Tại máy Windows 10 đã join domain local khác, logon vào aduser1, quan sát thấy hình nền desktop và folder trên desktop giống như trên máy windows 10 aduser1 đã logon ở bước 1. (Roaming profile: profile di chuyển từ PC này sang PC khác tương ứng với từng user)
- Sign out aduser1
- Tại máy Windows 10 đã join domain local, logon vào user aduser3 (user trong OU sales đã cấu hình folder redirection)
- Thực hiện tạo folder và file có nội dung trong Documents, thay đổi hình nền desktop và tạo folder trên desktop, Sign out aduser3
- Tại máy Windows 10 đã join domain local khác, logon vào aduser3, quan sát thấy nội dung trong Documents giống như máy aduser3 đã logon ở bước 6 (chỉ có nội dung trong document di chuyển theo user)
D: Cấu Hình Enterprise State Roaming
Task 1: Enable Enterprise State Roaming
- Tại máy Windows 10, truy cập vào portal.azure.com bằng user têncủabạn@customdomain
- Tại Azure Portal, menu trái chọn Azure Active Directory.
- Màn hình Azure Active Directory menu trái chọn Devices, và chọn Enterprise State Roaming.
- Màn hình Devices – Enterprise State Roaming trong phần Users may sync settings and app data across devices chọn Selected.
- Chọn Selected No member selected, ấn Add tìm và chọn user3@customdomain ấn select và ấn Ok, ấn Save
- Đóng cửa sổ Devices | Enterprise State Roaming.
(Bạn vừa Enable Enterprise State Roaming cho user3)

7. Tại Azure Portal, menu trái chọn Azure Active Directory.
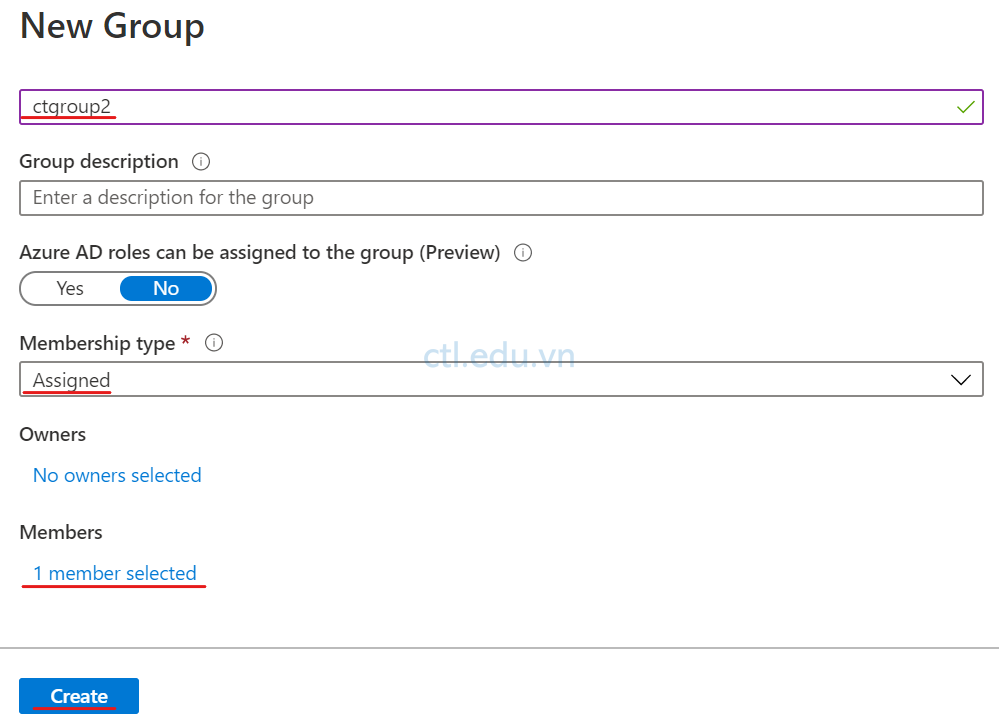
8. Màn hình Azure Active Directory menu trái chọn Groups, chọn New Group.
9. Tạo Group với các thông tin sau:
- Group type: chọn Security
- Group Name: CTLGroup2
- Membership type: chọn Assigned,
- Trong phần Members chọn No members selected, tìm và chọn user3 ấn Select
- Ấn Create.
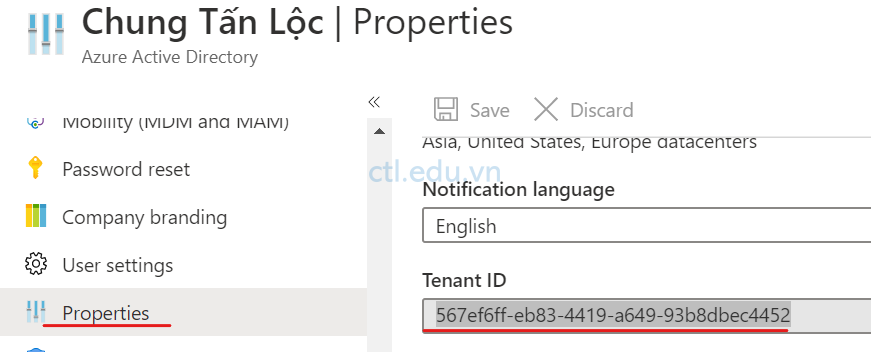
10. Tại Azure Portal, menu trái chọn Azure Active Directory.
11. Màn hình Azure Active Directory menu trái chọn Properties, tìm và ghi nhớ lại Tenant ID dùng cho phần lab tiếp theo.
Task 2: Enable OneDrive Known Folder Move
- Tại máy windows 10 truy cập trang https://endpoint.microsoft.com bằng user têncủabạn@customdomain
- Màn hình Microsoft Intune admin center, menu trái chọn Devices và chọn Configuration Profiles.
- Màn hình Devices | Configuration profiles chọn Create profile.
- Màn hình Create a profile chọn các thông tin sau và ấn Create:
- Platform: Windows 10 and later
- Profile type: chọn Template
- Template name: tìm và chọn Administrative Templates

5. Tại tab Basics nhập các thông tin sau ấn Next:
- Name: Chung Tan Loc Known Folder Move
- Description: Cấu hình OneDrive Known Folder Move
6. Tại tab Configurations settings chọn All Settings, trong phần Search to filter items nhập vào OneDrive.
7. Trong phần Setting Name chọn Silently move Windows known folders to OneDrive (2.0).
8. Xuất hiện cửa sổ Silenty move Windows known folders to OneDrive, chọn option Enabled, paste Tenannt ID mà bạn đã copy ở bước 11 task 1 vào phần Tenannt ID, Ấn OK

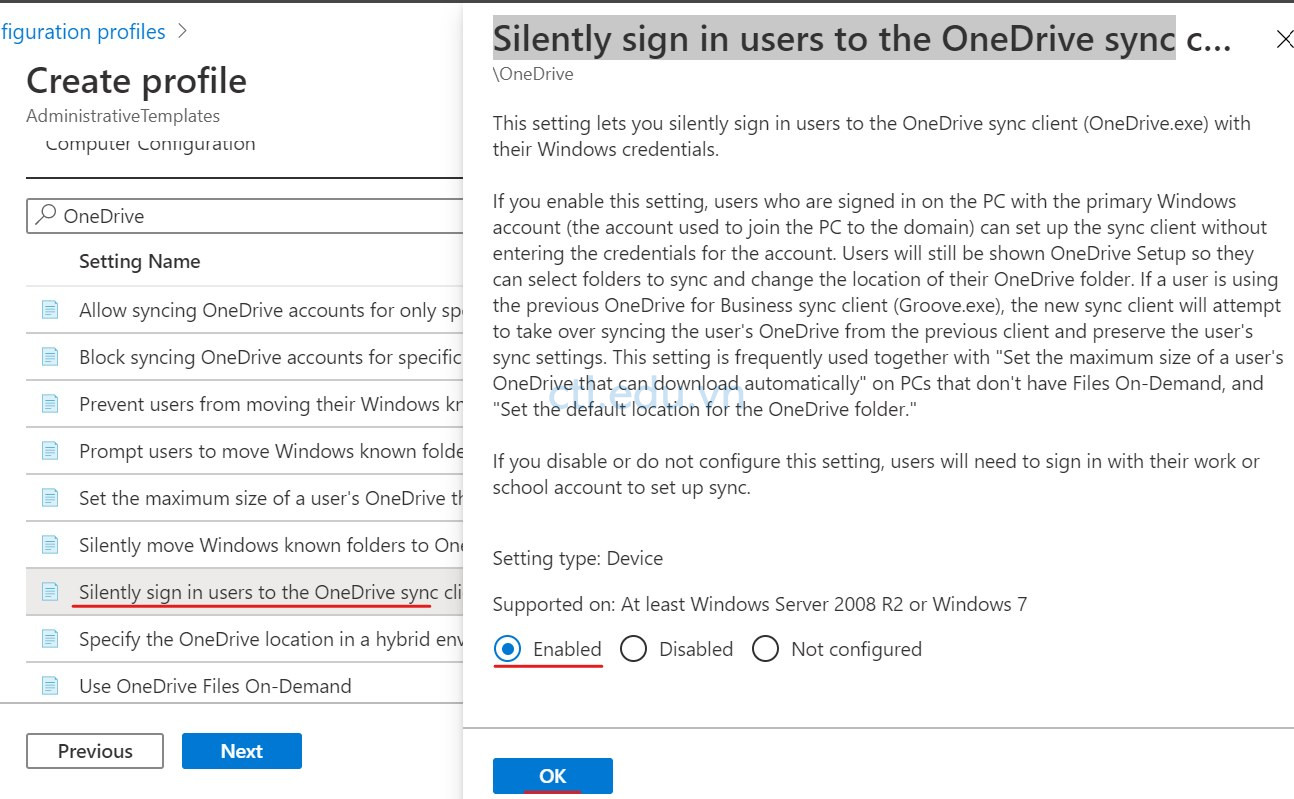
9. Trong phần Setting Name chọn Silently sign in users to the OneDrive sync app with their Windows credentials,
10. Xuất hiện cửa sổ Silently sign in users to the OneDrive sync app with their Windows credentials chọn option Enabled, và ấn OK.
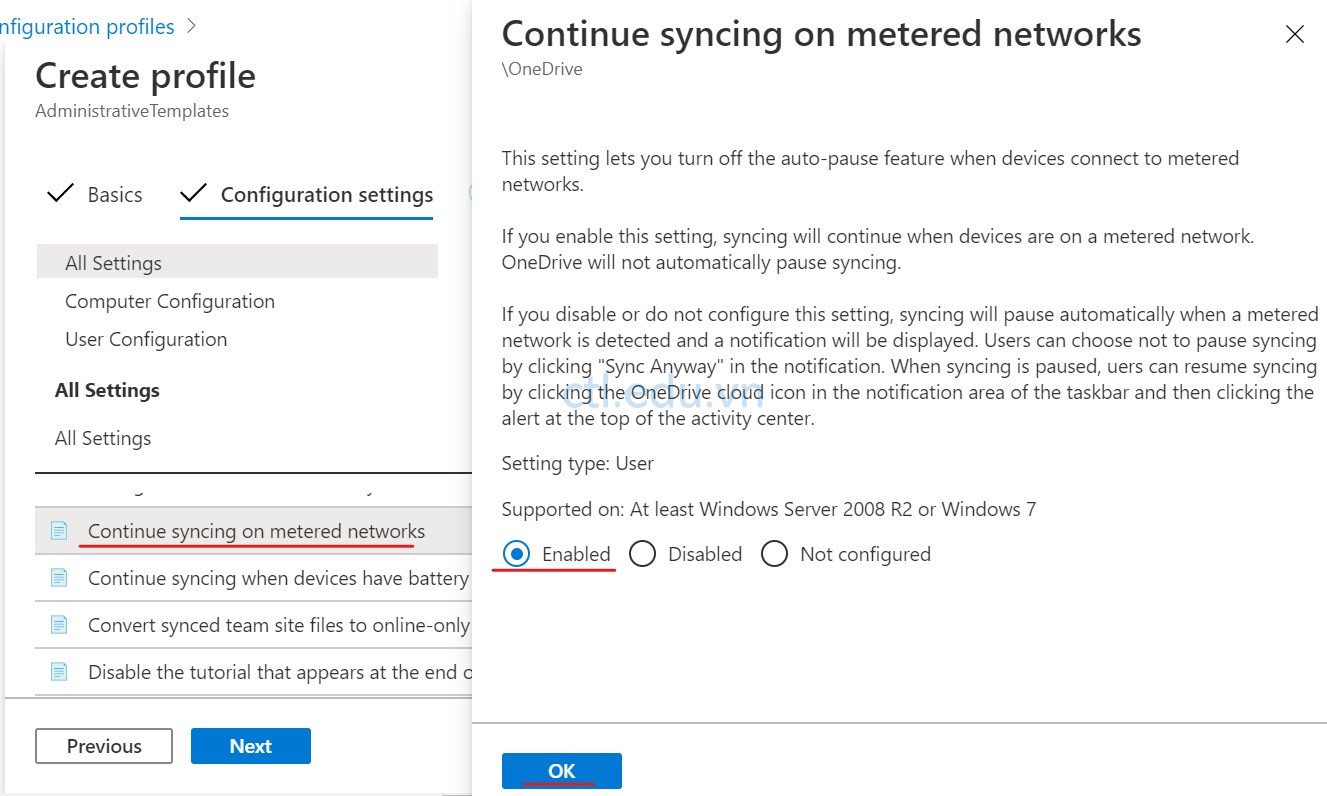
11. Trong phần Setting Name chọn Continue syncing on metered networks,
12. Cửa sổ Continue syncing on metered networks chọn Enabled. ấn OK.
13. Trở lại cửa sổ Create profile ấn Next 2 lần đến tab Assignments, trong phần Assign to chọn Select groups trong phần Select groups chọn Select groups to include tìm và chọn CTLGroup2 mà bạn đã tạo ở bước 9 task 1, ấn Select.
14. Ấn Next và ấn Create.

Task 3: Kiểm Tra Sync đã Enabled
- Tại máy windows 10 đã join Azure AD logon vào bằng user3@customdomain
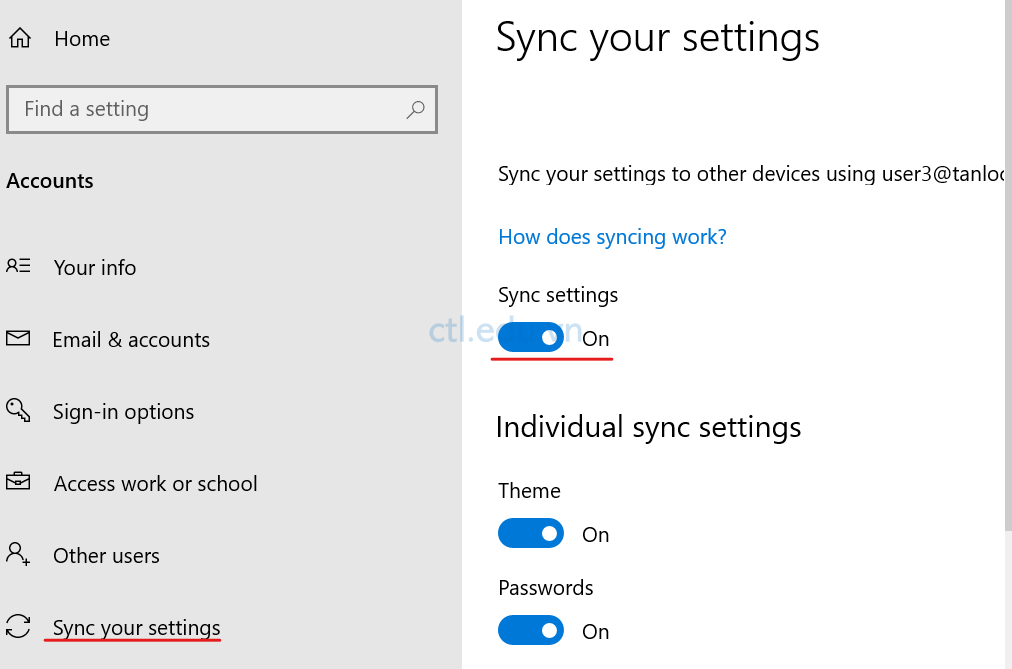
- Vào Start chọn Settings, chọn Accounts, chọn Sync your settings
- Cửa sổ Sync your settings trong phần Sync settings đang chọn On.
(Nếu Sync settings đang là Off, bạn cần disjoin Azure AD sau đó join Azure Ad lại)
Task 4: Kiểm Tra Enterprise State Roaming and Known Folder Move
- Tại máy windows 10 đã join Azure AD logon vào bằng user3@customdomain
- Tại máy windows 10 vừa logon, Vào Microsoft Edge truy cập trang www.microsoft.com/learn, sau khi load trang xong, chọn ngôi sao ở cuối address (hay ấn CTRL+D). xuất hiện của sổ Favorites pop-up, ấn Add.
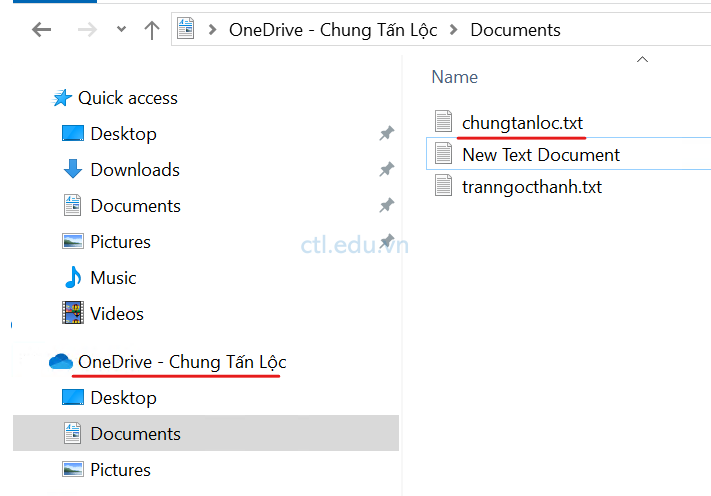
- Cũng tại tại máy windows 10 vừa logon, vào notepad tạo file chungtanloc.txt có nội dung tùy ý và lưu vào Documents.
- Sign out user3@customdomain
- Qua máy windows 10 khác đã join Azure AD logon vào bằng user3@customdomain
- Vào Start chọn Settings, chọn Accounts, chọn Sync your settings
- Cửa sổ Sync your settings trong phần Sync settings đang chọn On.(Nếu Sync settings đang là Off, bạn cần disjoin Azure AD sau đó join Azure Ad lại)
- Vào Microsoft Edge, ấn CTRL+I (nếu là phiên bản mới ấn CTRL+SHIFT+O) để xem lại favorites quan sát thấy có Microsoft Learn favorites đã lưu từ máy trước đó. (lưu ý Microsoft Edge trên 2 phải cùng phiên bản)
- Vào Documents trong phần OneDrive quan sát thấy có file chungtanloc.txt đã lưu từ máy trước đó. (nếu không thấy kết quả hãy chờ 5 – 10 phút cho Intune cập nhật, sau đó kiểm tra lại)
E. Giám Sát Hoạt Động Của Thiết Bị Và Người Dùng Bằng Intune
Task 1: Giám Sát Hoạt Động Của User
- Vào Trình Duyệt truy cập trang https://endpoint.microsoft.com. bằng user têncủabạn@customdomain
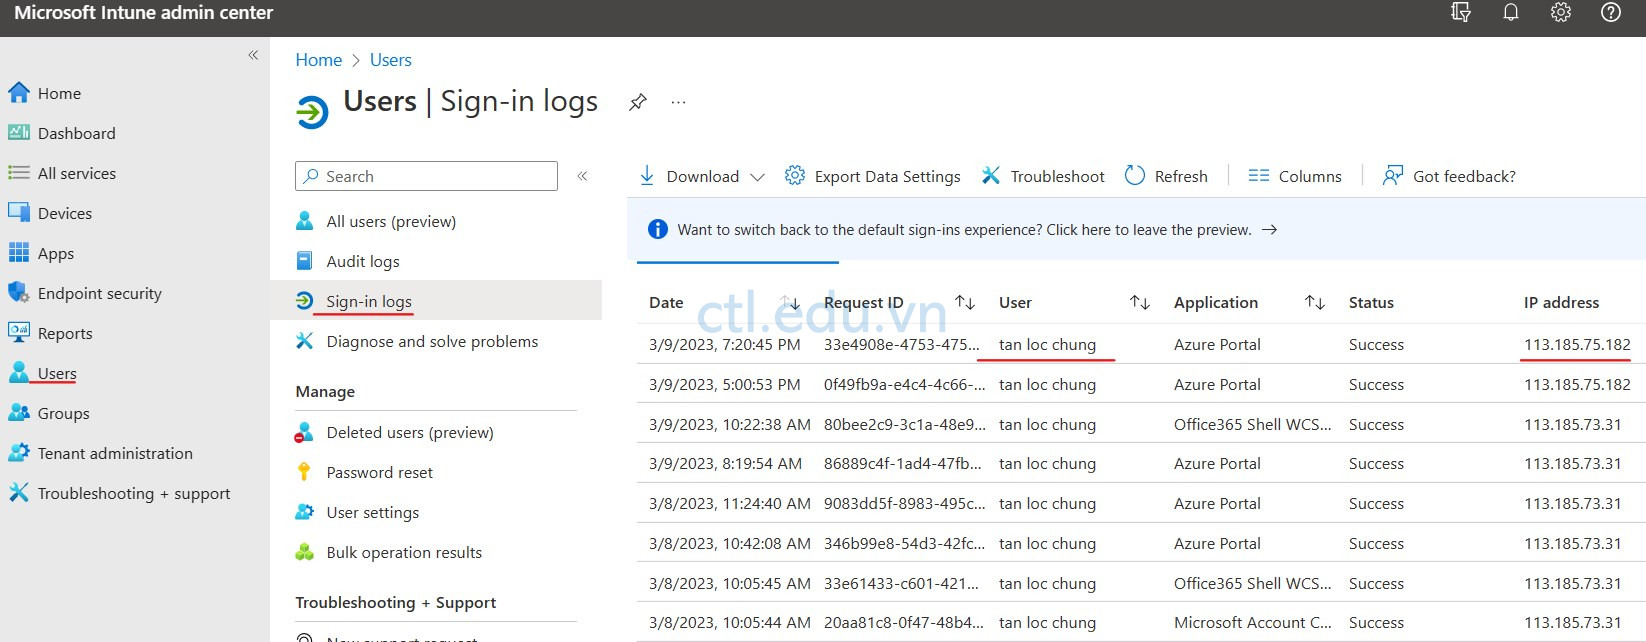
- Tại màn hình Microsoft Intune admin center chọn Users
- Màn hình user chọn Sign-in logs quan sát user3 đã login trên máy IP là bao nhiêu, sử dụng App gì…
- Bạn có thể Click vào User3 để xem thông tin chi tiết.
Task 2: Giám Sát Hoạt Động Của Thiết Bị
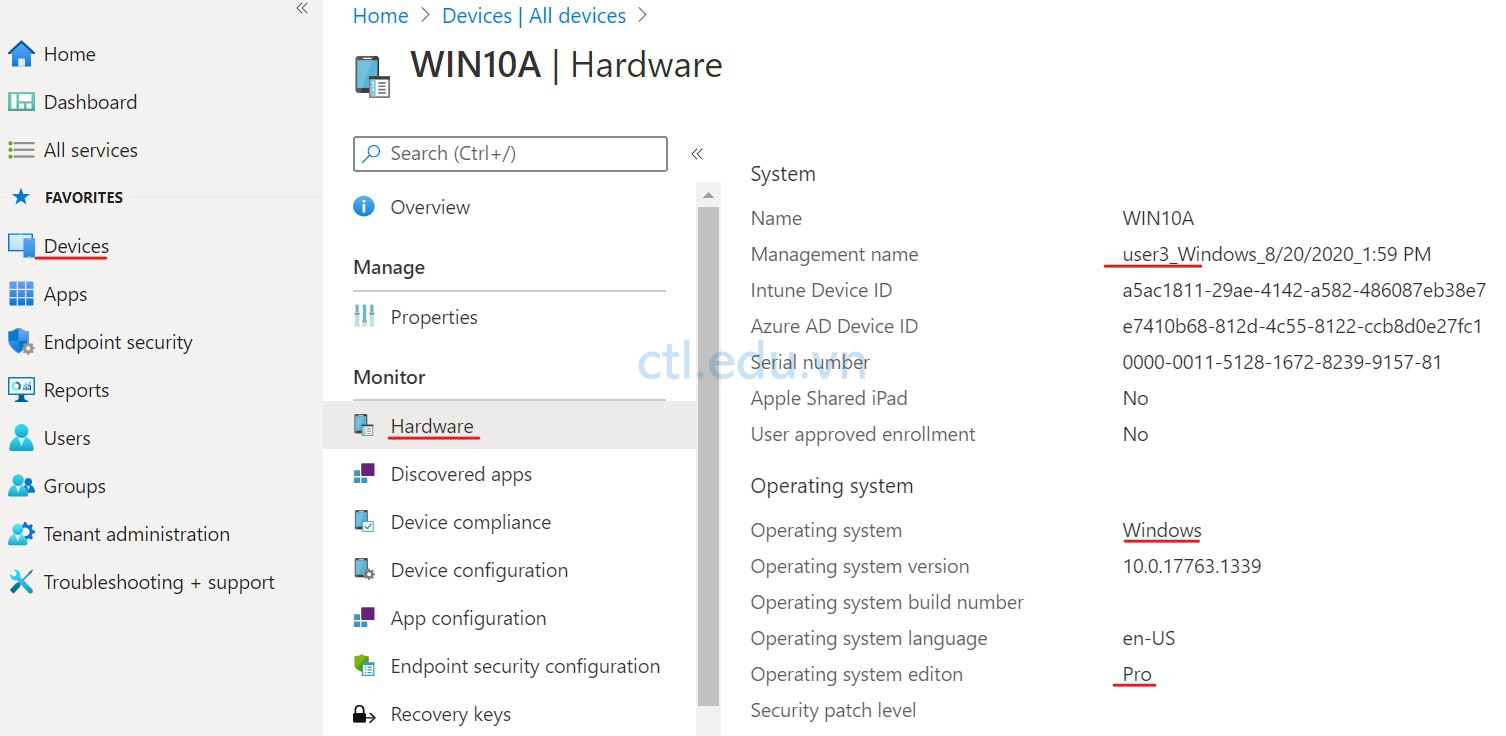
- Tại màn hình Microsoft Intune admin center chọn Device
- Tại màn hình Device, chọn All Device quan sát thấy các máy đã đăng ký trong Intune.
- Chọn một máy, quan sát các thông tin như: hệ điều hành, user, …
- Chọn Hardware và xem thông tin về phần cứng.
- Chọn Device configuration quan sát các profile đã triển khai đến thiết bị thành công.
- Bạn cũng có thể chọn vào một profile để xem
Hoàn Tất Bài Lab
Mr-CTL