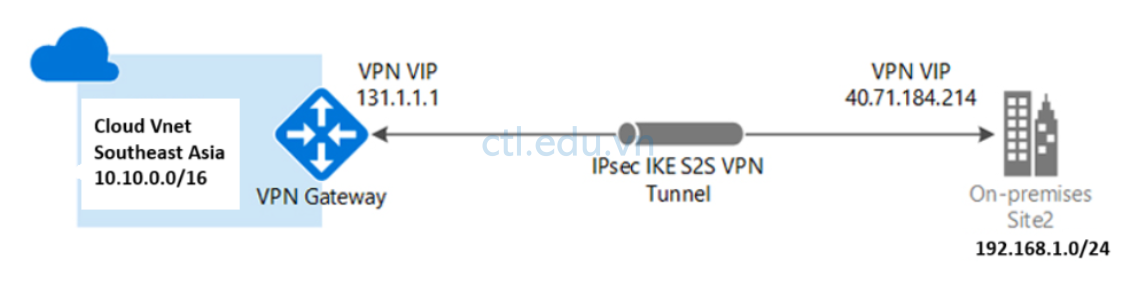
Bài Lab này CTL.edu.vn hướng dẫn bạn dùng Azure portal tạo kết nối VPN site-to-site (S2S) VPN gateway với on-premises network dùng Routing and Remote Access Sevices (RRAS).
Bài lab hướng dẫn dùng pre-shared key cho kết nối giữa Azure VPN gateway và on-premises RRAS.
Bài Lab thực hiện qua các bước:
- Task 1. Cấu hình Cloud VPN
- Task 1.1 Tạo Virtual Network (Cloud Vnet)
- Task 1.2 Tạo Subnet Gateway
- Task 1.3 Tạo Virtual Network Gateways (VPN Gateway)
- Task 1.4 Tạo Cloud Virtual Machines (Use Test)
- Task 2 Tạo và Cài On-Premises RRAS
- Task 2.1 Tạo On-premises Vnet
- Task 2.2 Tạo On-premises Virtual Machines
- Task 2.3 Cài RRAS Trên On-premises Virtual Machines
- Task 3 Cấu Hình VPN Site to Site
- Task 3.1 Tạo Local Network Gateway
- Task 3.2 Cấu hình Virtual Network Gateways (VPN Gateway)
- Task 3.3 Cấu hình RRAS

Task 1. Cấu hình Cloud VPN
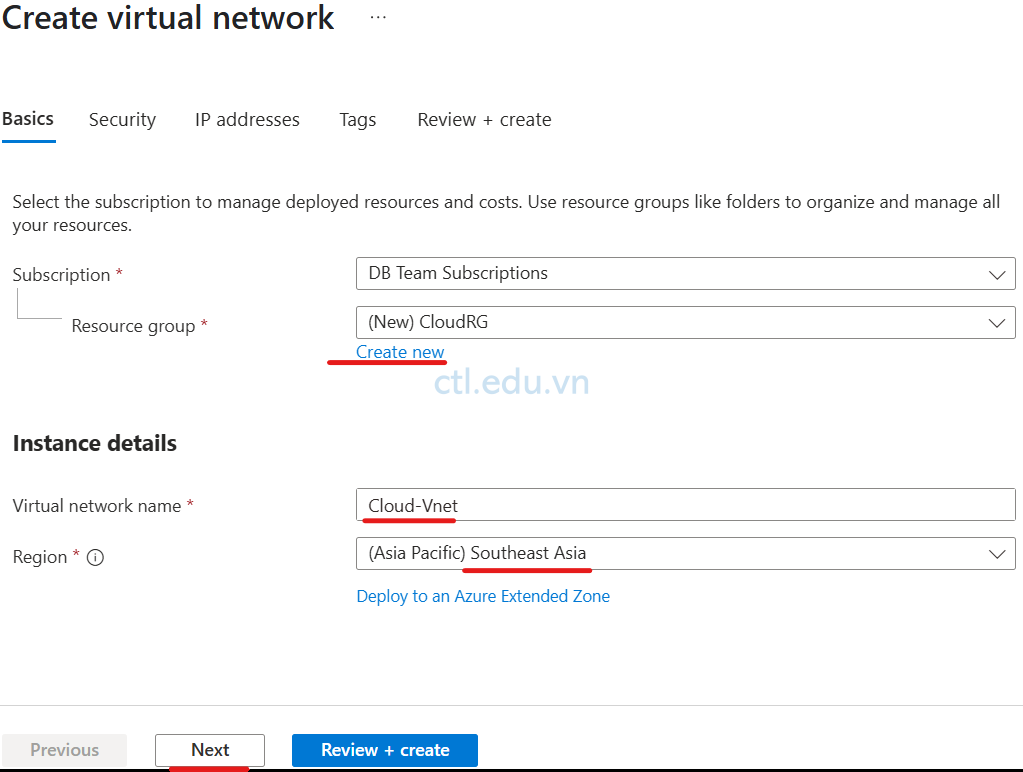
Task 1.1 Tạo Virtual Network (Cloud Vnet)
- Tại Azure portal, vào menu trái cho Virtual networks.
- Tại màn hình Virtual Networks, chọn Create.
- Màn hình Create virtual network, tại tab Basic nhập các thông tin sau:
- Subscription: chọn Subscription của bạn,
- Resource group: ấn Create new, nhập vào CloudRG, ấn Ok
- Virtual network name: nhập vào Cloud-Vnet
- Region: Chọn Southeast Asia
- Ấn Next, và Next
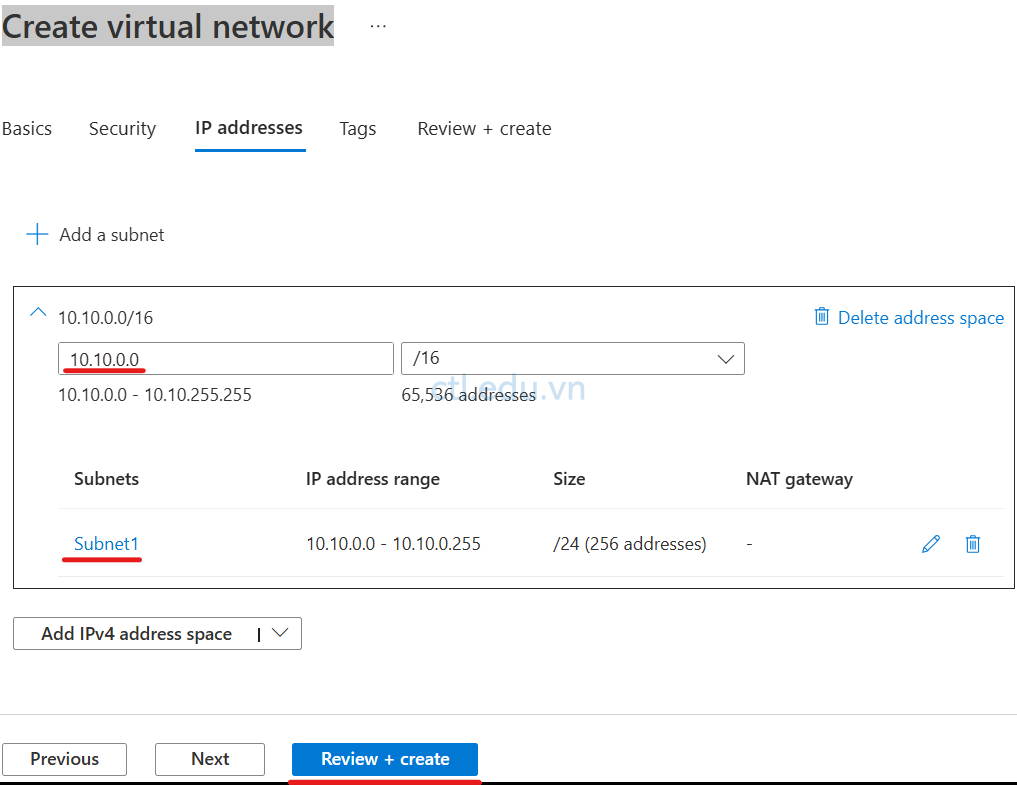
Tại Tab IP Address nhập các thông tin sau:
- Range Ip: 10.10.0.0/16
- Subnet1: 10.10.0.0/24
- Ấn Review + Create
- và ấn Create
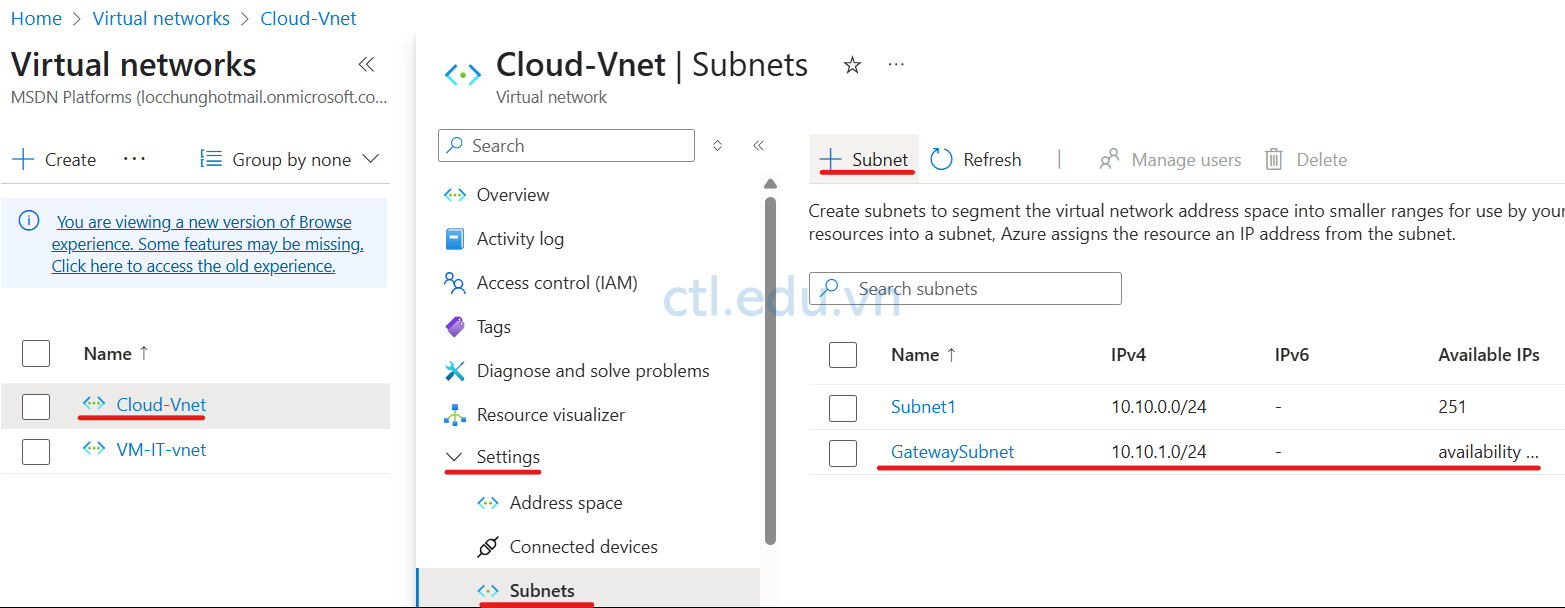
Task 1.2 Tạo Subnet Gateway
- Tại Azure portal, vào menu trái cho Virtual networks.
- Tại màn hình Virtual Networks, chọn Cloud-Vnet vừa tạo .
- Tại màn hình Cloud-Vnet, menu trái chọn Settings\Subnets, ấn + Subnet
- Cửa sổ Add a subnet chọn các thông tin sau:
- Subnet purpose: chọn Virtual Network GateWay
- Name: GatewaySubnet
- Ấn Add
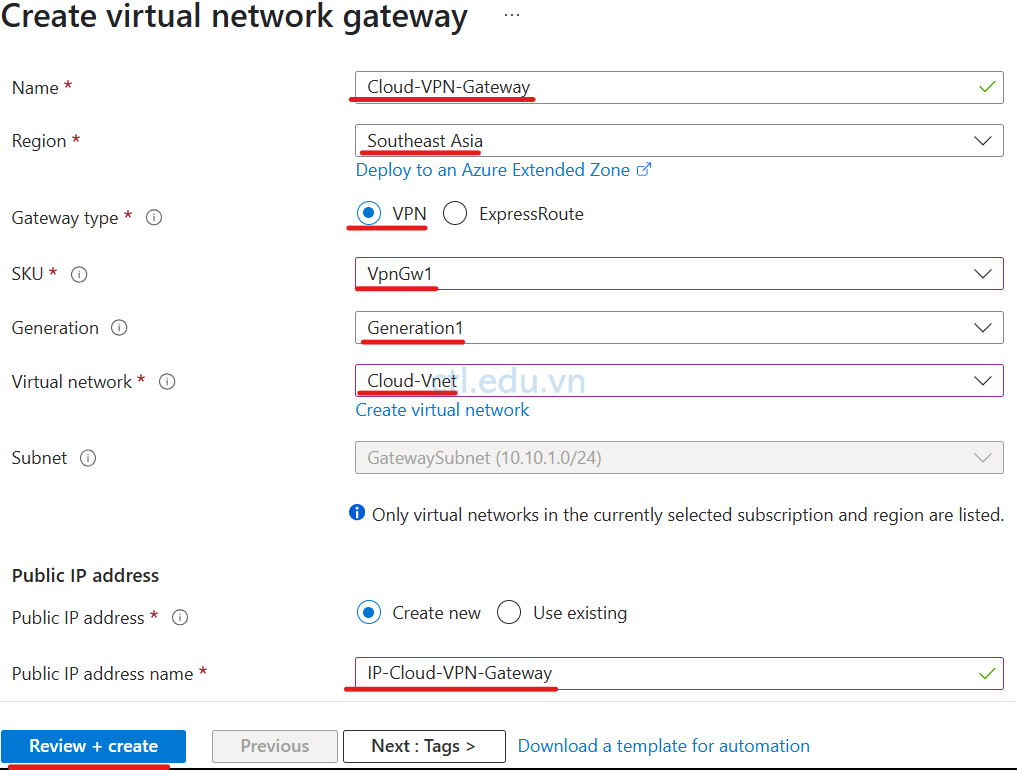
Task 1.3 Tạo Virtual Network Gateways (VPN Gateway)
- Tại Azure portal, Trên thanh Search, tìm Virtual network gateways
- Màn hình Virtual network gateways, ấn Create
- Màn hình Create virtual network gateway nhập các thông tin sau:
- Subscription: Chọn Subscription của bạn.
- Name: nhập vào Cloud-VPN-Gateway
- Region: Chọn Southeast Asia
- Gateway type: Chọn VPN
- SKU: chọn VpnGw1
- Generation: Generation1
- Virtual network: Chọn Cloud-Vnet
- Subnet: tự động chọn GatewaySubnet
- Public IP address: chọn option Create new
- Public IP address name: nhập vào IP-Cloud-VPN-Gateway
- Enable active-active mode: chọn option Disable
- Ấn Review + Create
- Ấn Create ( chờ tạo VPN Gateway xong, hơn 15 phút, trong lúc chờ hoàn tất bạn có thể thực hiện trước task 1.4)
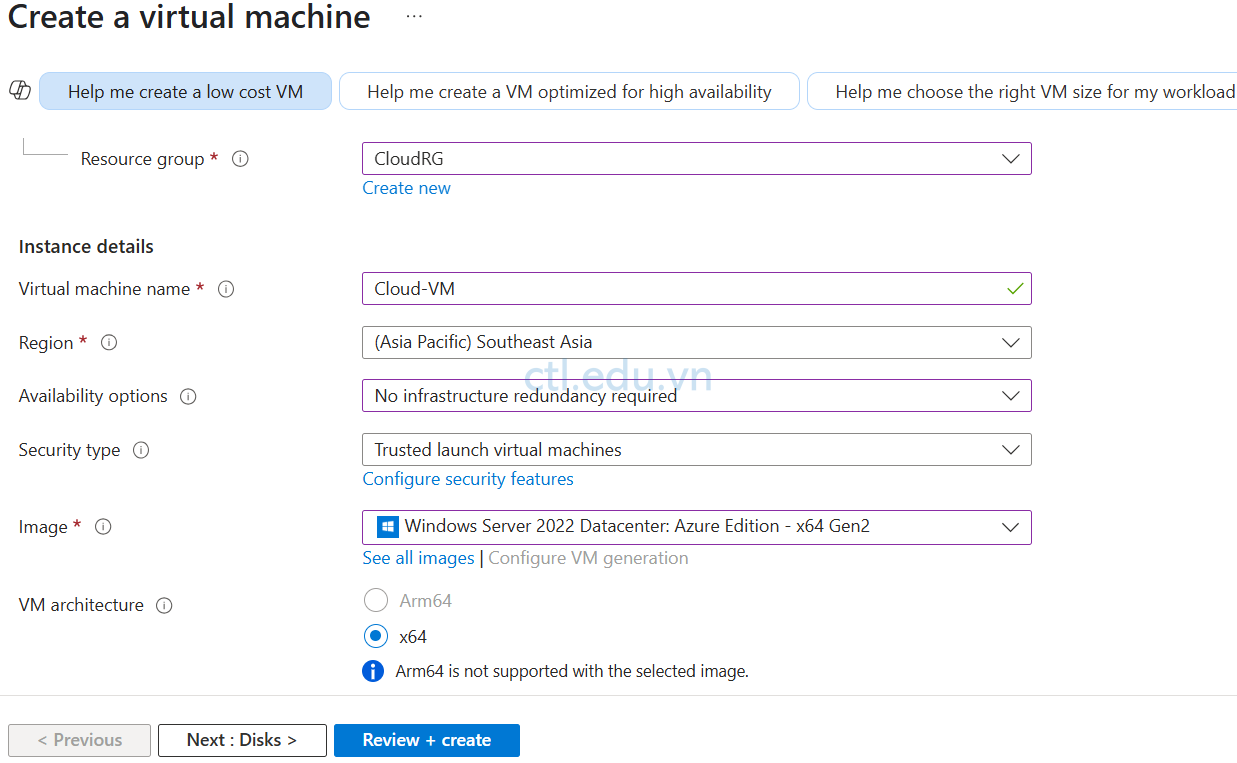
Task 1.4 Tạo Cloud Virtual Machines (Use Test)
- Tại Azure portal, vào menu trái cho Virtual machines.
- Màn hình Compute infrastructure | Virtual machines, chọn Create và chọn Azure Virtual machines.
- Màn hình Create a virtual machine nhập các thông tin sau:
- Subscription: Chọn Subscription của bạn
- Resource group: chọn CloudRg
- Virtual machine name: nhập Cloud-VM
- Region: Southeast Asia
- Availability options: chọn No infrastructure redundancy required
- Image: Chọn Windows Server 2022 Datacenter
- Size: Standard_D4s_v5 – 4 vcpus, 16 GiB memory
- Username: Admin-Cloud
- Password: 1234567890?aA
- Confirm password: 1234567890?aA
- Public inbound ports: chọn option Allow selected ports
- Select inbound ports: RDP 3389
- Ấn Next: Disks
- Ấn Next: Networking
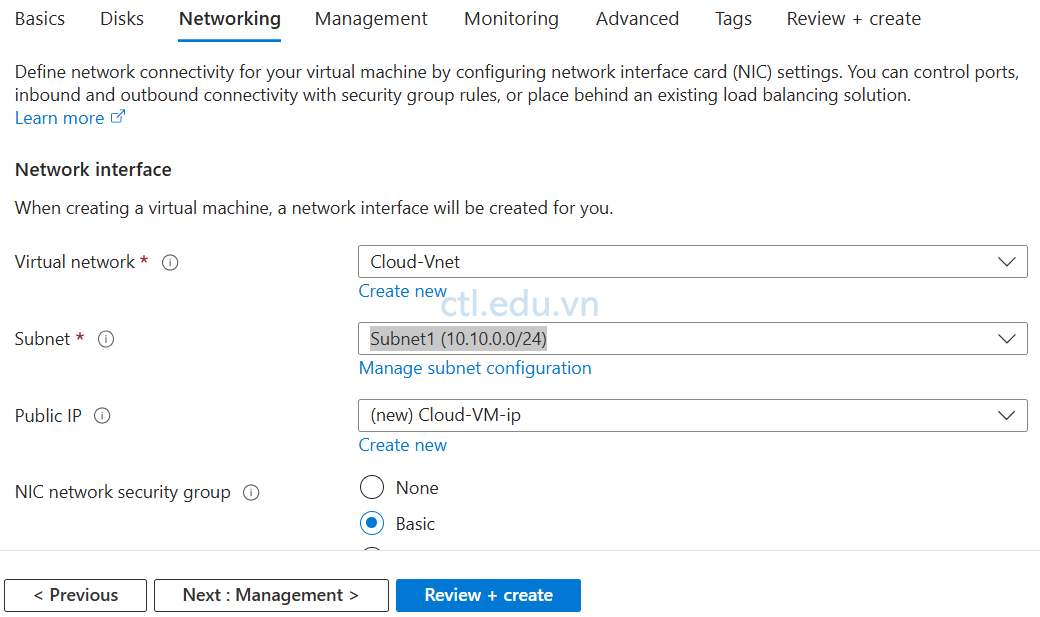
4. Tại tab Networking nhập các thông tin sau:
- Virtual network: chọn Cloud-Vnet
- Subnet: chọn Subnet1 (10.10.0.0/24)
- Public IP: (new) Cloud-VM-ip
- Ấn Review + Create
- Ấn Create
Task 2 Tạo và Cài On-Premises RRAS
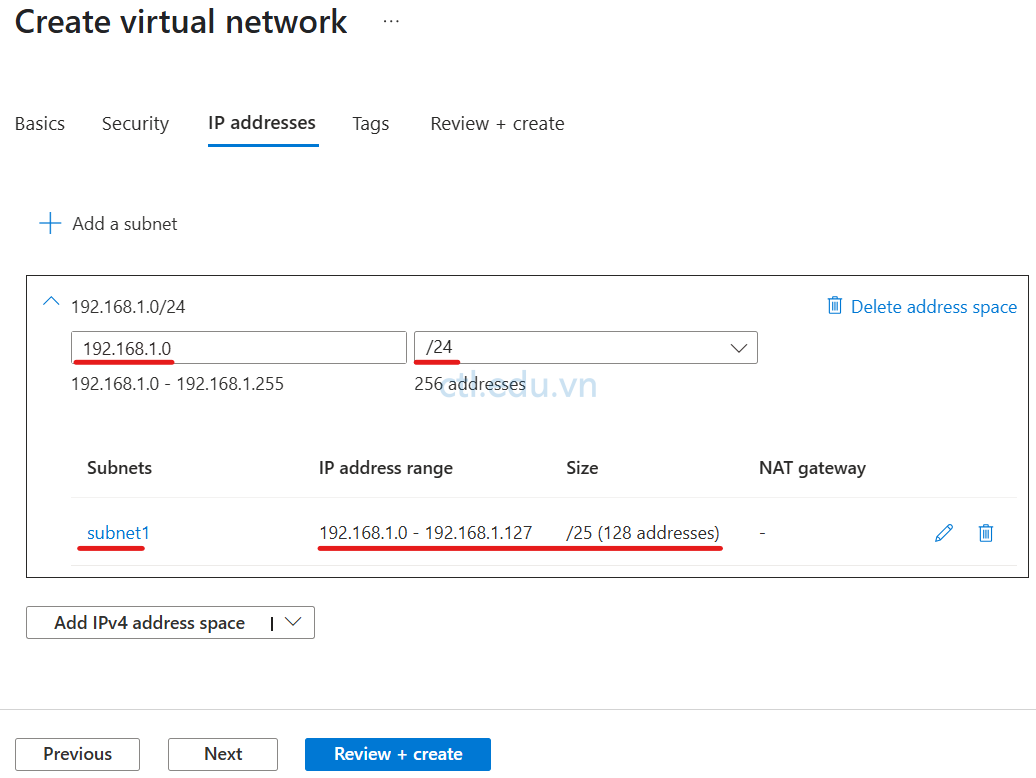
Task 2.1 Tạo On-premises Vnet
- Tại Azure portal, vào menu trái cho Virtual networks.
- Tại màn hình Virtual Networks, chọn Create.
- Màn hình Create virtual network, tại tab Basic nhập các thông tin sau:
- Subscription: chọn Subscription của bạn,
- Resource group: ấn Create new, nhập vào On-premiseRG, ấn Ok
- Virtual network name: nhập vào On-premise-Vnet
- Region: Chọn East Asia
- Ấn Next, và Next

Tại Tab IP Address nhập các thông tin sau:
- Range Ip: 192.168.1.0/24
- Subnet1: 192.168.1.0/25
- Ấn Review + Create
- và ấn Create
Task 2.2 Tạo On-premises Virtual Machines
- Tại Azure portal, vào menu trái cho Virtual machines.
- Màn hình Compute infrastructure | Virtual machines, chọn Create và chọn Azure Virtual machines.
- Màn hình Create a virtual machine nhập các thông tin sau:
- Subscription: Chọn Subscription của bạn
- Resource group: chọn On-premiseRg
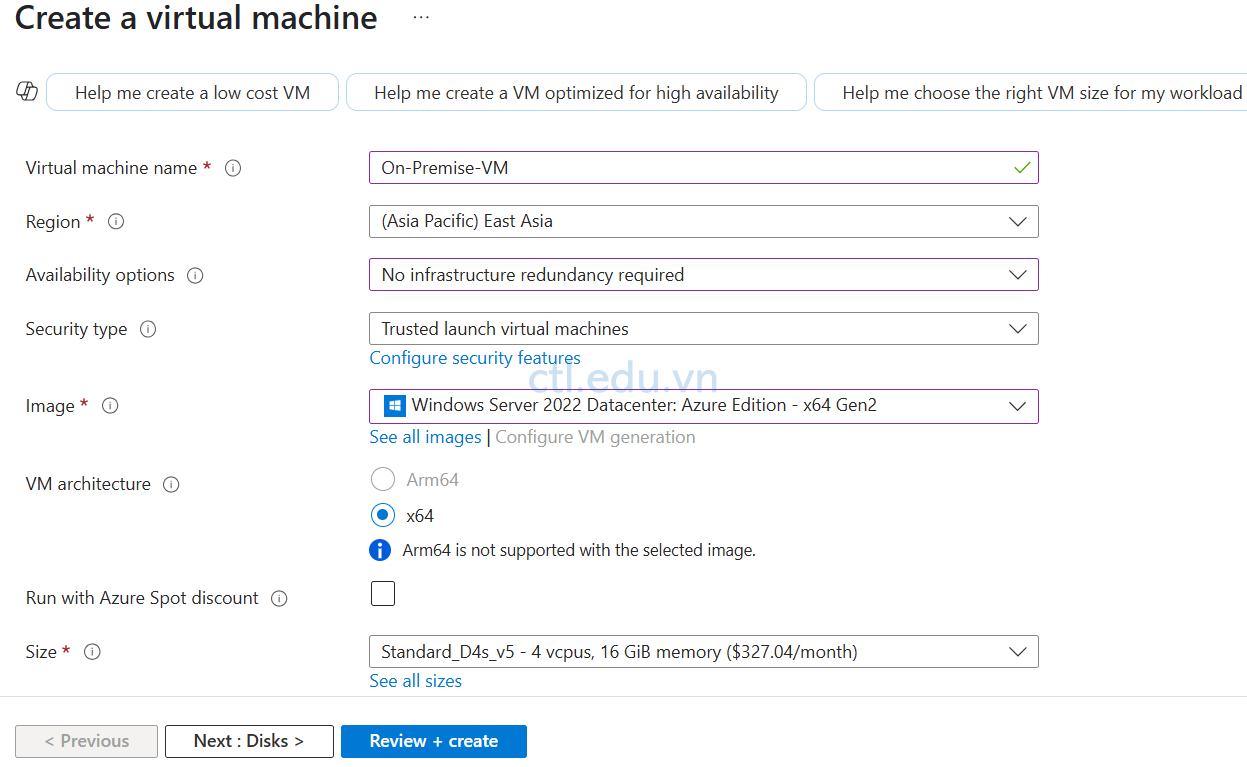
- Virtual machine name: nhập On-Premise-VM
- Region: East Asia
- Availability options: chọn No infrastructure redundancy required
- Image: Chọn Windows Server 2022 Datacenter
- Size: Standard_D4s_v5 – 4 vcpus, 16 GiB memory
- Username: Admin-On-premise
- Password: 1234567890?aA
- Confirm password: 1234567890?aA
- Public inbound ports: chọn option Allow selected ports
- Select inbound ports: RDP 3389
- Ấn Next: Disks
- Ấn Next: Networking
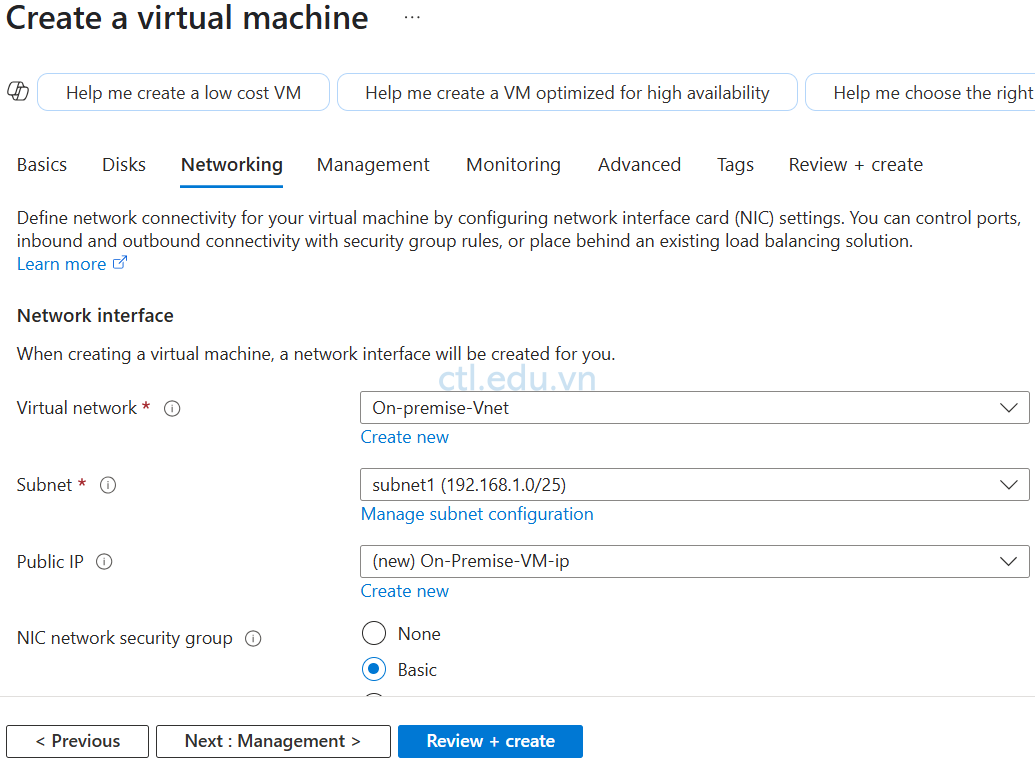
4. Tại tab Networking nhập các thông tin sau:
- Virtual network: chọn On-premise-Vnet
- Subnet: chọn subnet1 (192.168.1.0/25)
- Public IP: (new) On-Premise-VM-ip
- Ấn Review + Create
- Ấn Create
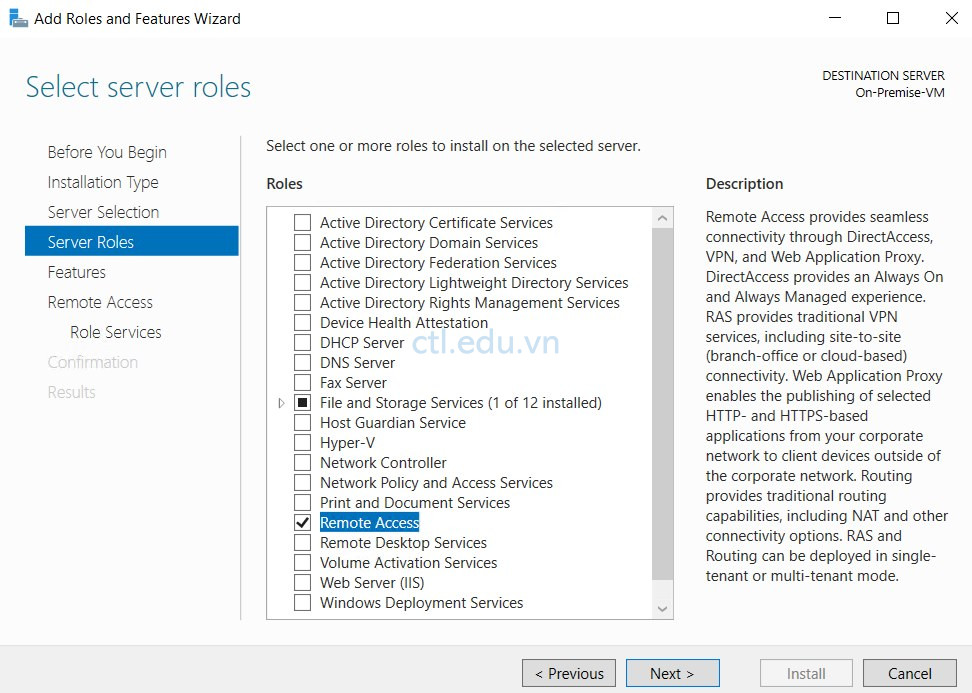
Task 2.3 Cài RRAS Trên On-premises Virtual Machines
- Thực hiện Remote desktop vào máy On-premises-VM
- Tại máy On-premises-VM, vào Server Manager
- Tại Server Manager, chọn 2 Add Roles and Features
- Cửa sổ Before you begin, ấn Next
- Cửa sổ Select Installation type, ấn Next
- Cửa sổ Select Destination Server, ấn Next
- Cửa sổ Select Server Roles: check chọn Remote Access, ấn Next
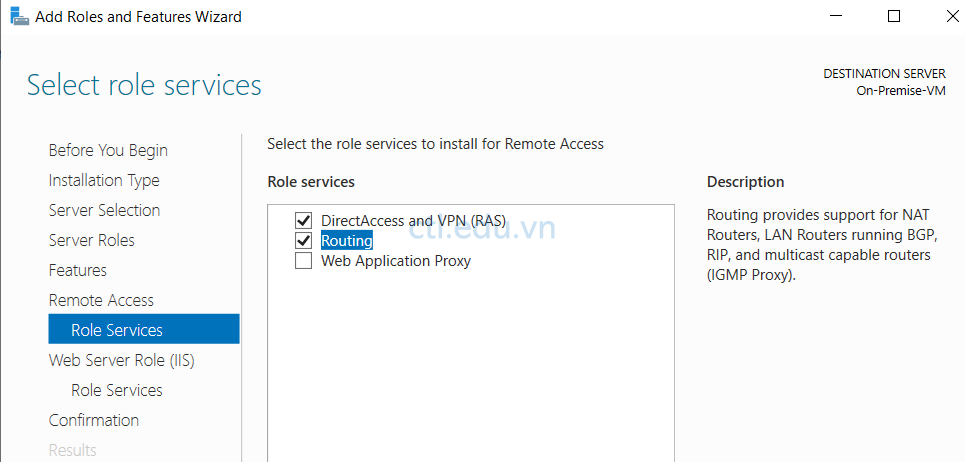
8. Cửa sổ Select Features, ấn Next
9. Cửa Sổ Remote Access, ấn Next
10. Cửa sổ Select Role Services, check chọn Routing, ấn Next
11. Ấn Next, Next và Install
Chờ cài RRAS xong, ấn Close
Task 3 Cấu Hình VPN Site to Site
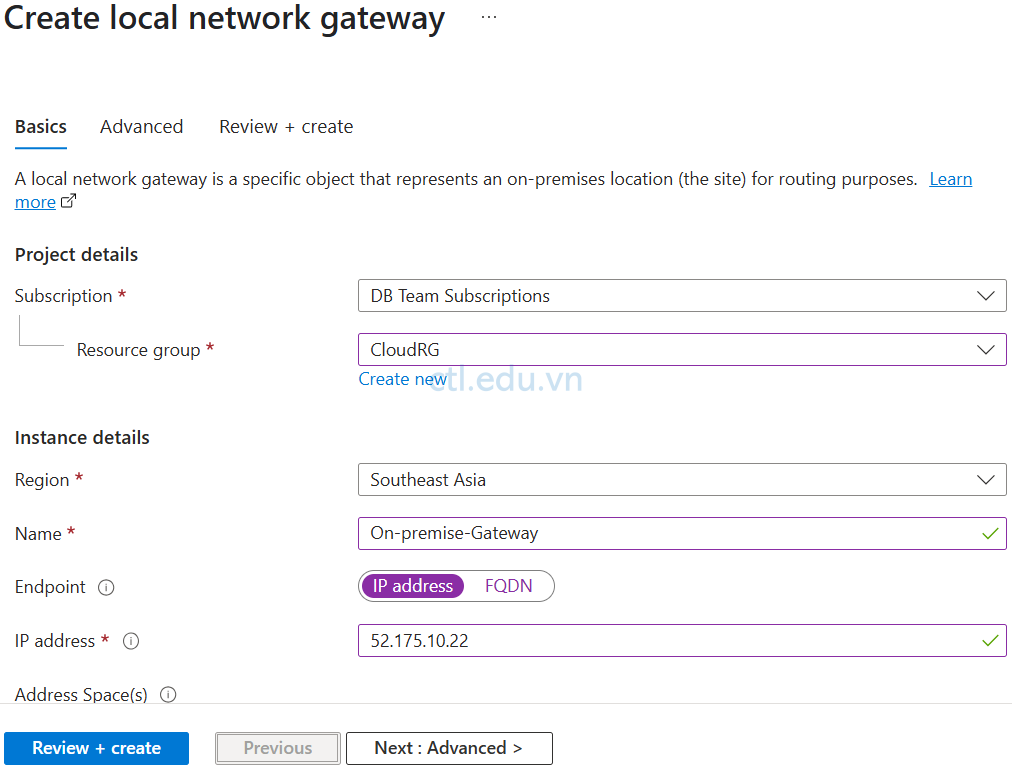
Task 3.1 Tạo Local Network Gateway
Trước khi thực hiện task này, bạn phải ghi nhớ lại IP public của On-premise-VM
- Tại Azure portal, Trên thanh Search, tìm và chọn Local Network Gateways
- Màn hình Local network gateways, ấn Create
- Màn hình Create local network gateway, nhập các thông tin sau:
- Subscription: Chọn Subscription của bạn.
- Resource group: Chọn CloudRG
- Region: Southeast Asia
- Name: nhập vào On-premise-Gateway
- Endpoint: Ip Address
- IP address: nhập vào IP public của On-premise-VM
- Address Space(s): nhập dải IP của On-premise-Vnet
- Ấn Review + Create
- Ấn Create
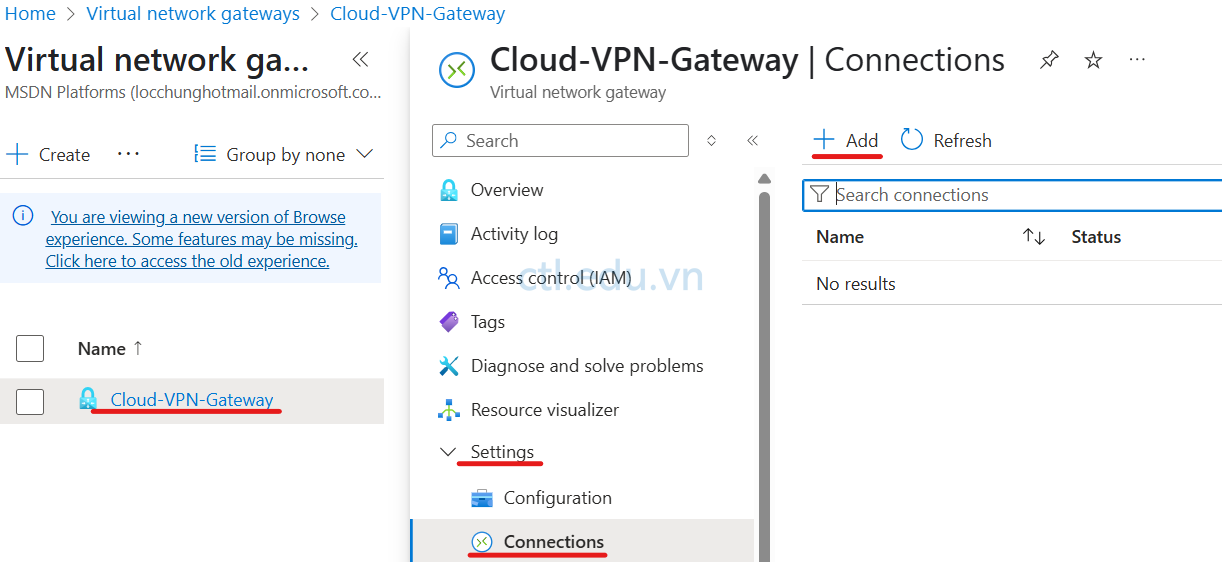
Task 3.2 Cấu hình Virtual Network Gateways (VPN Gateway)
- Tại Azure portal, Trên thanh Search, tìm và chọn Virtual network gateways
- Màn hình Virtual network gateways, click vào Cloud-VPN-Gateway mà bạn đã tạo
- Màn hình Cloud-VPN-Gateway, menu trái chọn Settings\Connections, và ấn Add
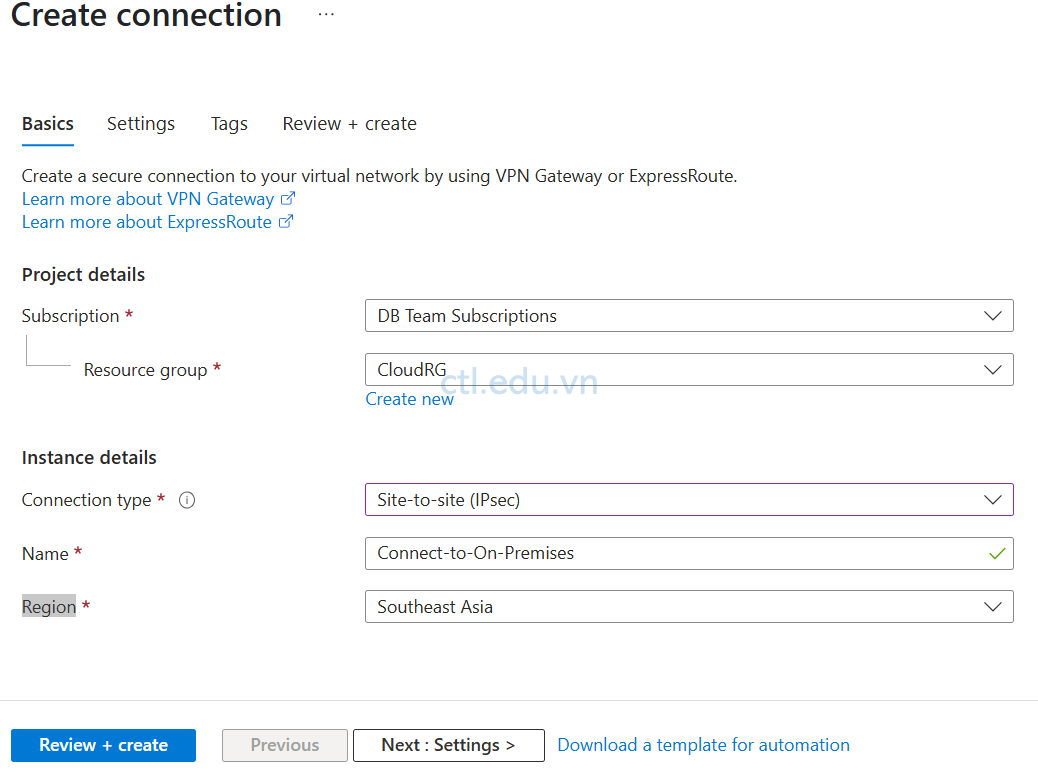
4. Màn hình Create connection, nhập các thông tin sau:
- Subscription: chọn Subscription của bạn
- Resource group: Chọn CloudRG
- Connection type: chọn Site-to-Site (IPSec)
- Name: nhập vào Connect-to-On-Premises
- Region: Southeast Asia
- Ấn Next: Settings
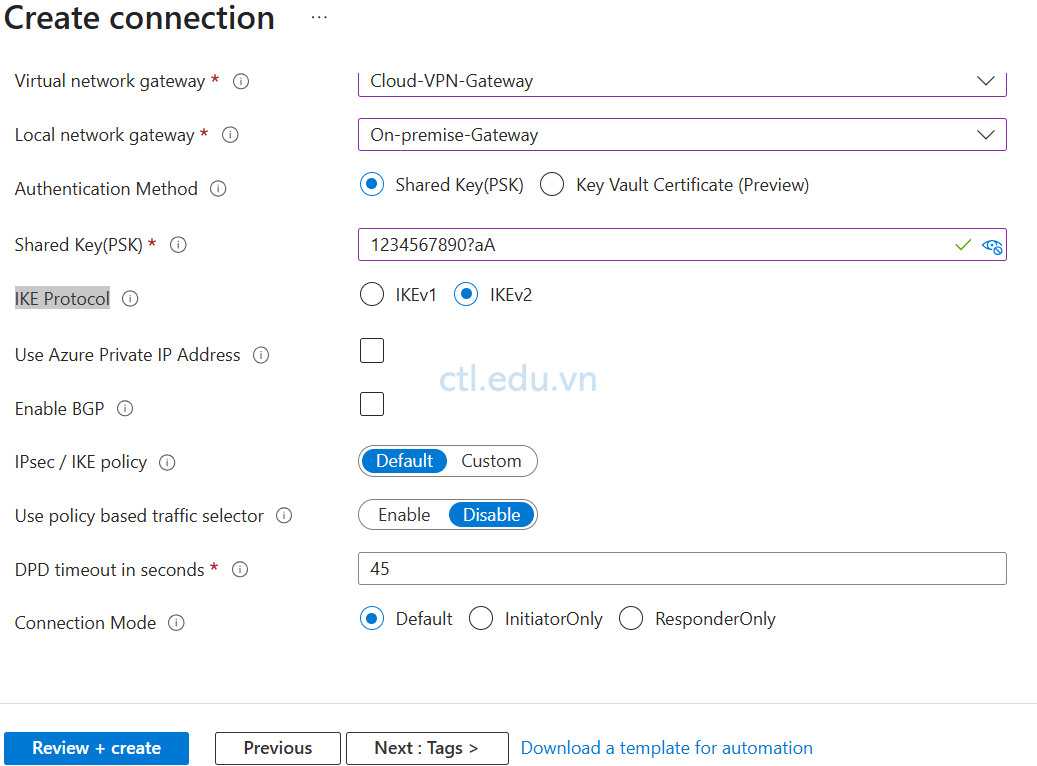
5. Tại Tab Settings nhập vào các thông tin sau:
- Virtual network gateway: Chọn Cloud-VPN-Gateway
- Local network gateway: Chọn On-premise-Gateway
- Authentication Method: Chọn option Shared Key(PSK)
- Shared Key(PSK): nhập vào 1234567890?aA (Ghi nhớ lại key này)
- IKE Protocol: IKEV2
- Các thông số còn lại để mặc định
- Ấn Review + Create
- Ấn Create
Task 3.3 Cấu hình RRAS
Bạn phải chờ quá trình tạo Virtual Network Gateways (VPN Gateway), ghi nhận lại IP public của Virtual Network Gateways (VPN Gateway), mới thực hiện tiếp các bước sau
- Tại máy On-premises-VM, vào Server Manager
- Tại màn hình Server manager, chọn Tools\Routing and Remote Access
- Cửa sổ Routing and Remote Access, phải chuột vào On-premise-VM (local) chọn Configure and Enable Routing and Remote access
- Cửa sổ Welcome …, ấn Next.
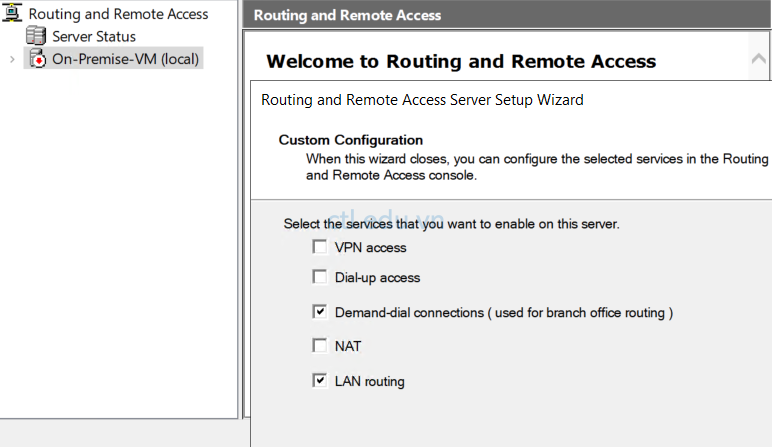
- Cửa sổ Configuration, chọn option Custom Configuration, ấn Next
- Cửa sổ Custom Configuration, check chọn Demand-Dial Connection và Lan Routing, ấn Next, và Finish, ấn Ok, ấn Start Service.
7. Tại Cửa sổ Routing and Remote Access, phải chuột vào Network Interfaces, chọn New Demand Dial Interface
8. Cửa sổ Welcome to the demand dial interface Wizard, ấn Next
9. Cửa sổ Interface Name nhập vào Connect to Cloud Vnet, ấn Next
10. Cửa sổ Connection type, chọn option Connect using virtual private networking (VPN), ấn Next.
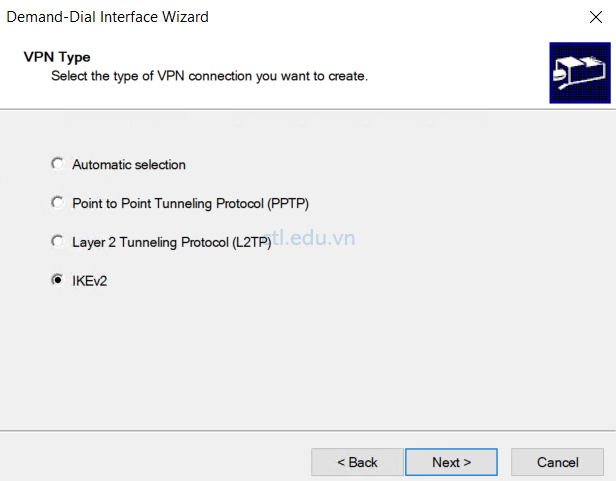
11. Cửa sổ VPN type, chọn option IKEv2, ấn Next
12. Cửa sổ Destination Address, nhập vào IP public của Virtual Network Gateways (VPN Gateway)
13. Cửa sổ Protocols and Security, để mặc định, ấn Next
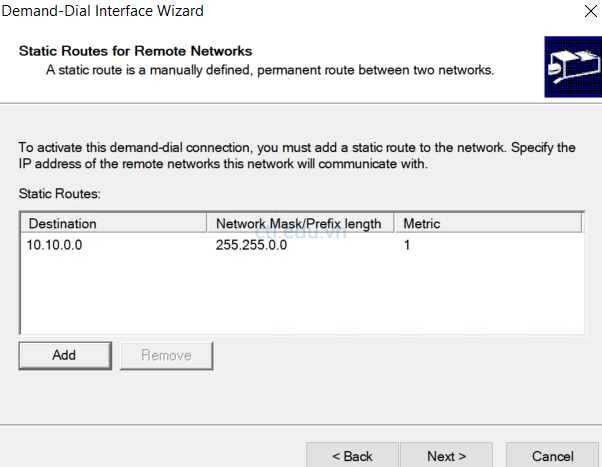
14. Cửa sổ Static routes for remote networks, ấn Add
15. Cửa sổ Static Route nhập các thông tin sau:
- Destination: 10.10.0.0/16 (dải IP của Cloud Vnet)
- Network mask: 255.255.0.0
- Metric: 1
- Ấn Ok và ấn Next
16. Cửa sổ Dial-out Credential (để trống), ấn Next, và Finish
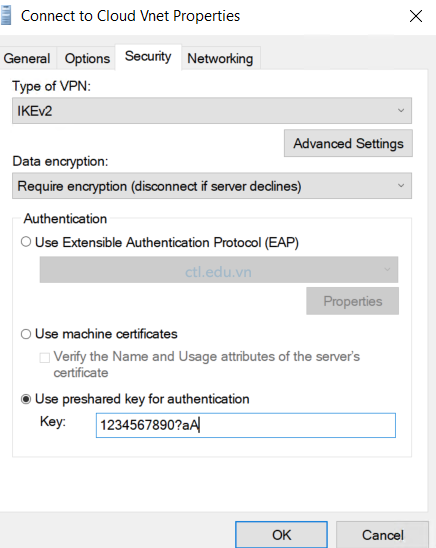
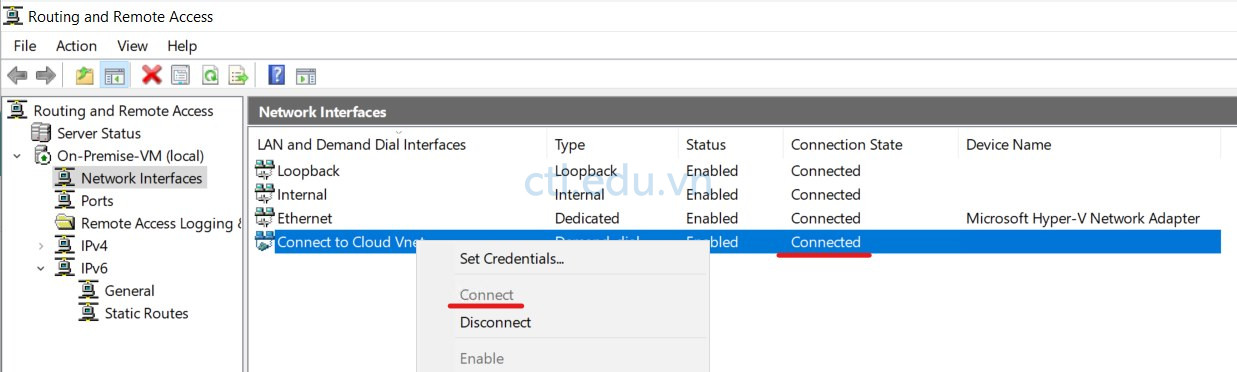
17. Phải chuột vào Connect to Cloud Vnet vừa tạo chọn Properties
18. Cửa sổ Connect to Cloud Vnet properties, chọn tab Security, và chọn option Use preshared key for authentication, nhập vào 1234567890?aA (đã ghi nhớ ở bước 5, task 3.2), ấn Ok
19. Phải chuột vào Connect to Cloud Vnet vừa tạo chọn Connect, chờ 4 giây để thực hiện kế nối.
20. Quan sát cột Connection State có giá trị là Connected (kết nối thành công)
21. Tại máy On-Premise-VM bạn thực hiện Remote desktop dùng IP private của máy Cloud-VM để kiểm tra kết nối thành công
Hoàn tất bài Lab