CTL.edu.vn Hướng dẫn bạn cấu hình point-to-site (P2S) VPN gateway xác thực bằng Microsoft Entra ID và client dùng Azure VPN Client App để kết nối VPN.
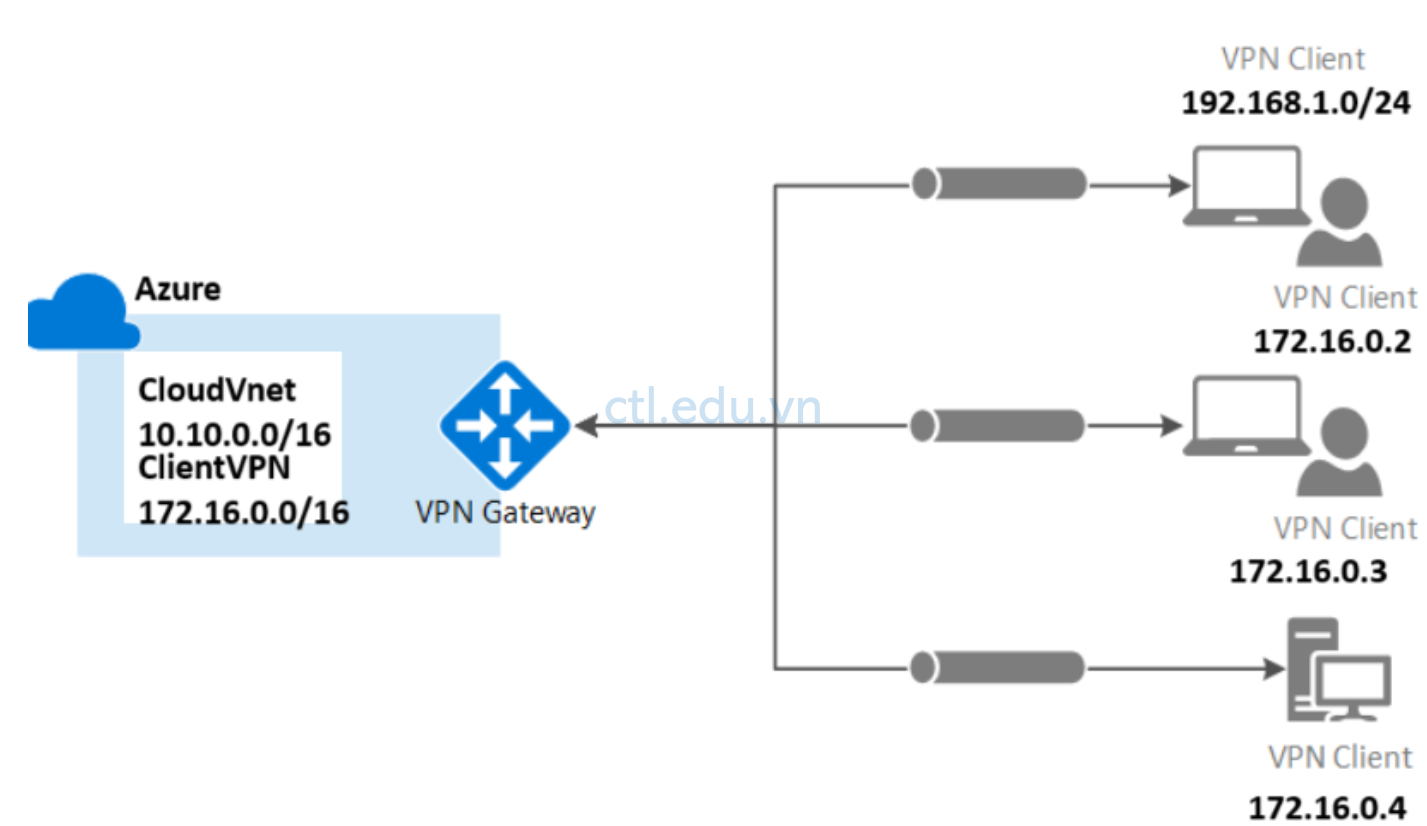
VPN Point-to-Site (P2S) cho phép bạn tạo kết nối an toàn được thực hiện qua cácđến Azure virtual network từ Client computer. Giải pháp này hữu ích cho những nhân viên làm việc từ xa muốn kết nối đến Azure virtual network từ bất kỳ nơi nào có internet.
Bài lab được thực hiện qua các task:
- Task 1, Tạo VPN Gateway
- Task 1.1 Tạo Virtual Network (Cloud Vnet)
- Task 1.2 Tạo Subnet Gateway
- Task 1.3 Tạo Virtual Network Gateways (VPN Gateway)
- Task 1.4 Tạo Cloud Virtual Machines (Use Test)
- Task 2. Tạo VPN Point to Site
- Task 3 Tạo On-Premises VPN Client
- Task 2.1 Tạo On-premises Vnet
- Task 2.2 Tạo On-premises Client (Giả lập VPN Client)
- Task 2.3 Tạo VPN Client Connection

Task 1. Tạo VPN Gateway
Task 1.1 Tạo Virtual Network (Cloud Vnet)
- Tại Azure portal, vào menu trái chọn Virtual networks.
- Tại màn hình Virtual Networks, chọn Create.
- Màn hình Create virtual network, tại tab Basic nhập các thông tin sau:
- Subscription: chọn Subscription của bạn,
- Resource group: ấn Create new, nhập vào CloudRG, ấn Ok
- Virtual network name: nhập vào Cloud-Vnet
- Region: Chọn Southeast Asia
- Ấn Next, và Next

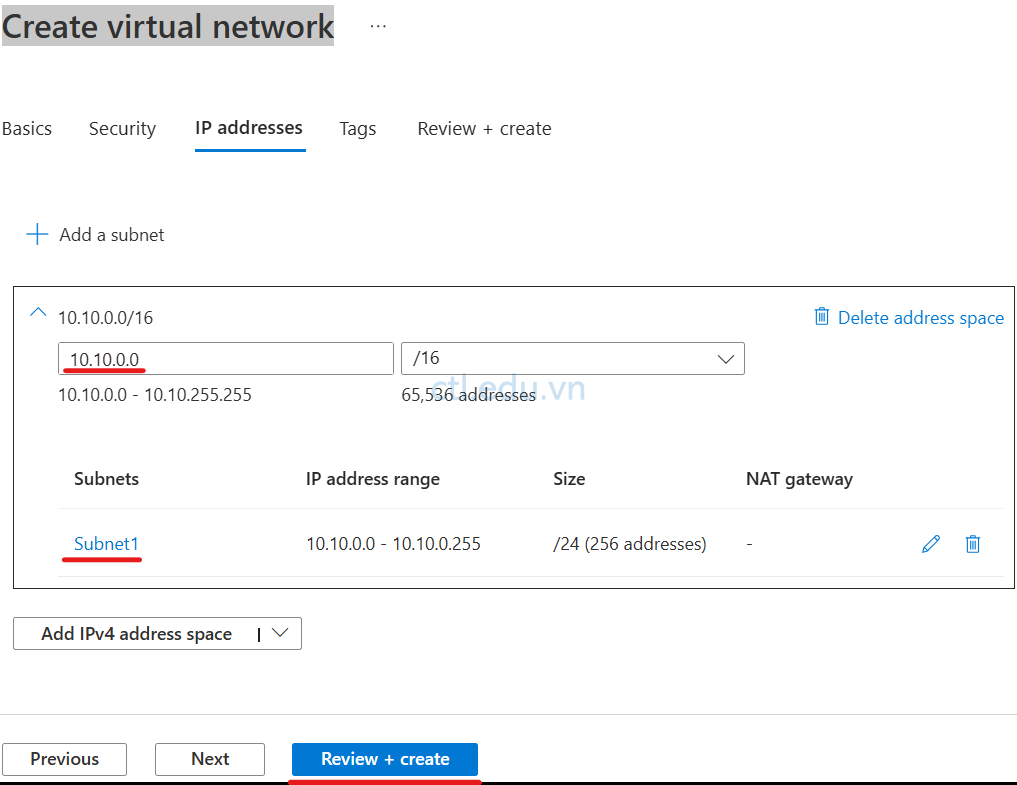
Tại Tab IP Address nhập các thông tin sau:
- Range Ip: 10.10.0.0/16
- Subnet1: 10.10.0.0/24
- Ấn Review + Create
- và ấn Create
Task 1.2 Tạo Subnet Gateway
- Tại Azure portal, vào menu trái chọn Virtual networks.
- Tại màn hình Virtual Networks, chọn Cloud-Vnet vừa tạo .
- Tại màn hình Cloud-Vnet, menu trái chọn Settings\Subnets, ấn + Subnet
- Cửa sổ Add a subnet chọn các thông tin sau:
- Subnet purpose: chọn Virtual Network GateWay
- Name: GatewaySubnet
- Ấn Add

Task 1.3 Tạo Virtual Network Gateways (VPN Gateway)
- Tại Azure portal, Trên thanh Search, tìm và chọn Virtual network gateways
- Màn hình Virtual network gateways, ấn Create
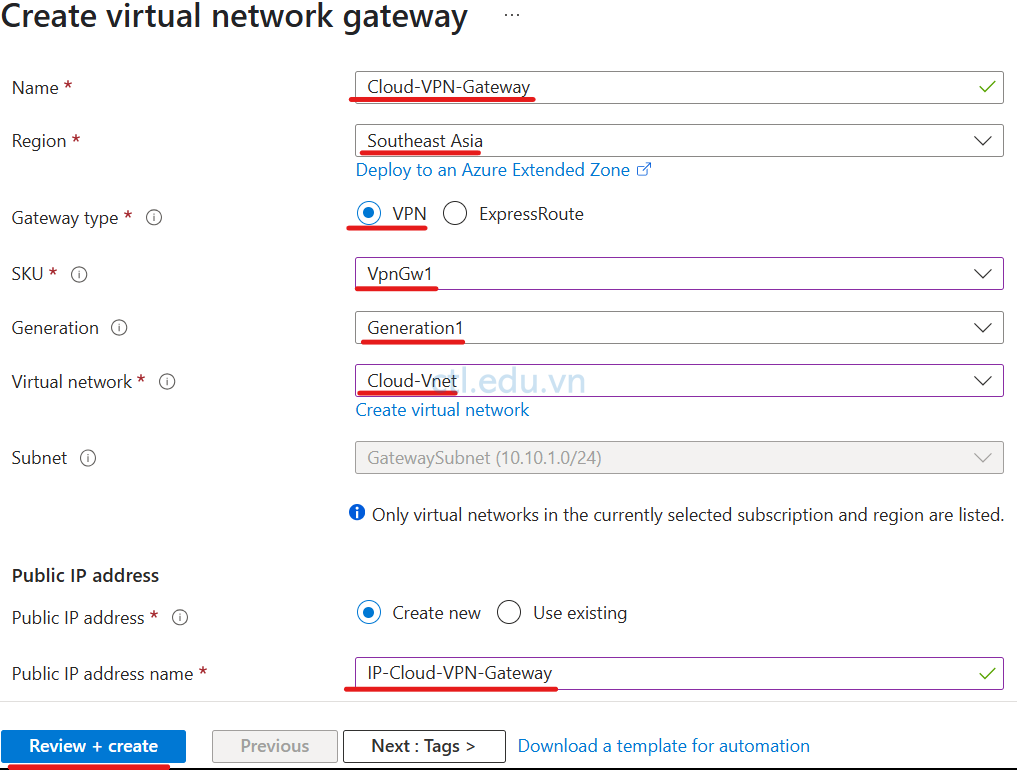
- Màn hình Create virtual network gateway nhập các thông tin sau:
- Subscription: Chọn Subscription của bạn.
- Name: nhập vào Cloud-VPN-Gateway
- Region: Chọn Southeast Asia
- Gateway type: Chọn VPN
- SKU: chọn VpnGw1
- Generation: Generation1
- Virtual network: Chọn Cloud-Vnet
- Subnet: tự động chọn GatewaySubnet
- Public IP address: chọn option Create new
- Public IP address name: nhập vào IP-Cloud-VPN-Gateway
- Enable active-active mode: chọn option Disable
- Ấn Review + Create
- Ấn Create ( chờ tạo VPN Gateway xong, hơn 15 phút, trong lúc chờ hoàn tất bạn có thể thực hiện trước task 1.4)
Task 1.4 Tạo Cloud Virtual Machines (Use Test)
- Tại Azure portal, vào menu trái chọn Virtual machines.
- Màn hình Compute infrastructure | Virtual machines, chọn Create và chọn Azure Virtual machines.
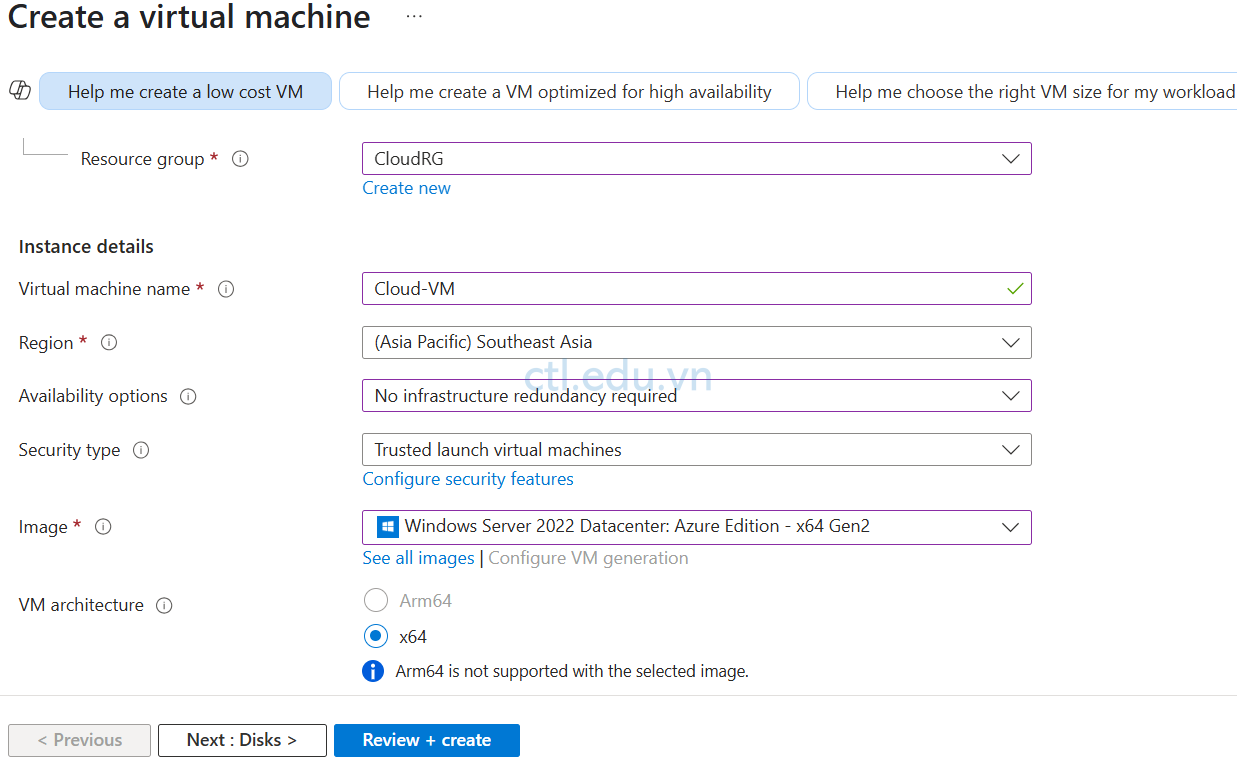
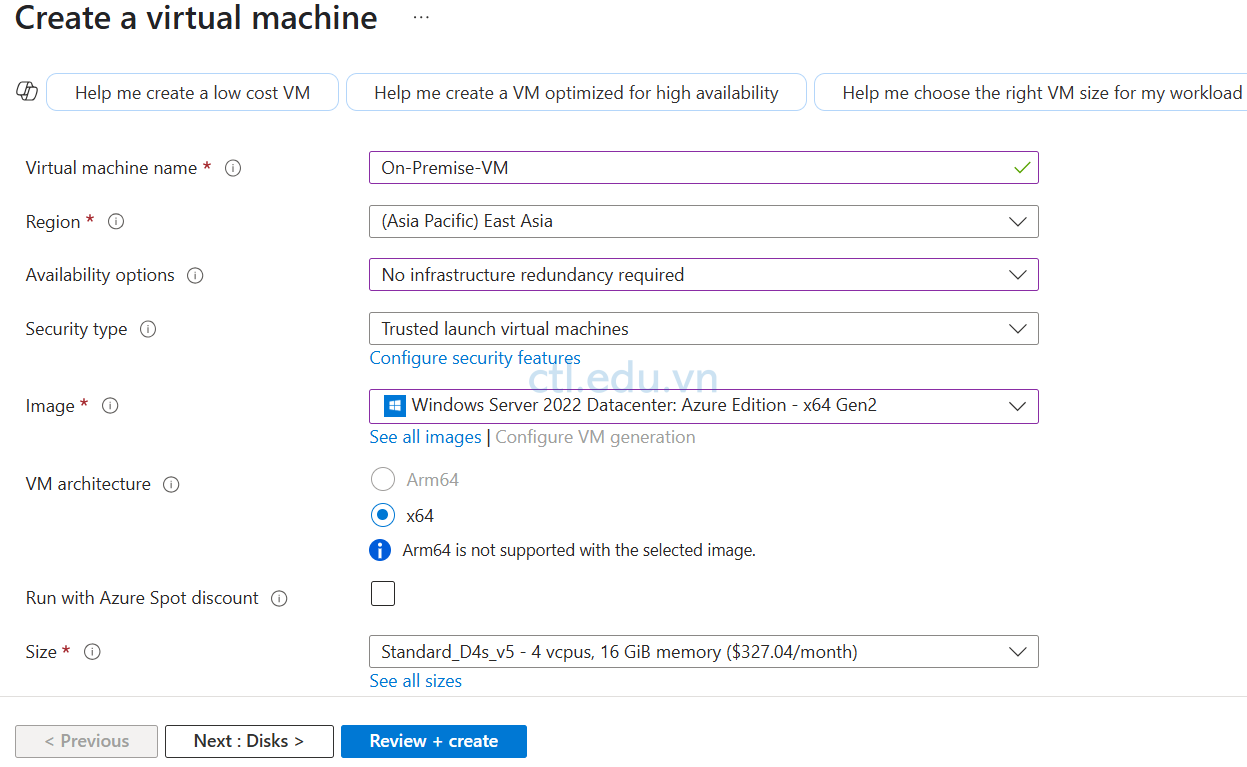
- Màn hình Create a virtual machine nhập các thông tin sau:
- Subscription: Chọn Subscription của bạn
- Resource group: chọn CloudRg
- Virtual machine name: nhập Cloud-VM
- Region: Southeast Asia
- Availability options: chọn No infrastructure redundancy required
- Image: Chọn Windows Server 2022 Datacenter
- Size: Standard_D4s_v5 – 4 vcpus, 16 GiB memory
- Username: Admin-Cloud
- Password: 1234567890?aA
- Confirm password: 1234567890?aA
- Public inbound ports: chọn option Allow selected ports
- Select inbound ports: RDP 3389
- Ấn Next: Disks
- Ấn Next: Networking
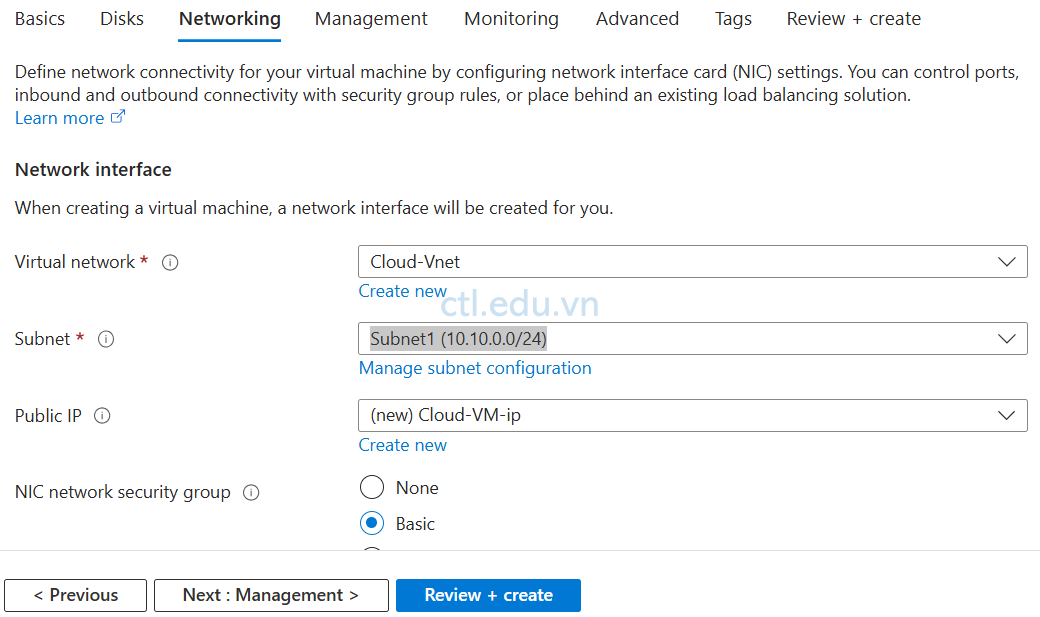
4. Tại tab Networking nhập các thông tin sau:
- Virtual network: chọn Cloud-Vnet
- Subnet: chọn Subnet1 (10.10.0.0/24)
- Public IP: (new) Cloud-VM-ip
- Ấn Review + Create
- Ấn Create
Task 2. Tạo VPN Point to Site
Task 2.1 Tạo VPN Point to Site
- Tại Azure portal, Trên thanh Search, tìm và chọn Virtual network gateways.
- Màn hình Virtual network gateways, chọn Cloud-VPN-Gateway mà bạn đã tạo.
- Màn hình Cloud-VPN-Gateway, Chọn Settings\Point-to-site configuration, và chọn Configure now

4. Cửa sổ Point-to-site configuration nhập các thông tin sau:
- Address pool: 172.16.0.0/16 (khai báo dải IP sẽ cấp cho VPN client khi kết nối thành công)
- Tunnel type: OpenVPN (SSL)
- Authentication type: check chọn Azure Active Directory
- Tenant: nhập vào https://login.microsoftonline.com/{TenantID} (thay {TenantID} bằng TenantID của bạn ví dụ https://login.microsoftonline.com/f5becf92-5262-49f0-884b-45e6cb5abff5/)
- Audience: 41b23e61-6c1e-4545-b367-cd054e0ed4b4 (Application ID default của “Azure VPN” Microsoft Entra Enterprise App)
- Issuer: https://sts.windows.net/{TenantID}/(thay {TenantID} bằng TenantID của bạn ví dụ https://sts.windows.net/f5becf92-5262-49f0-884b-45e6cb5abff5/)
- Ấn Save (Chờ Save xong, hơi lâu)

5. Sau khi Save xong, ấn Download VPN Client
6. Giải nén file Cloud-VPN-Gateway.zip vừa download
7. Copy file này vào máy VPN Client
Task 3 Tạo On-Premises VPN Client
Task 2.1 Tạo On-premises Vnet
- Tại Azure portal, vào menu trái chọn Virtual networks.
- Tại màn hình Virtual Networks, chọn Create.
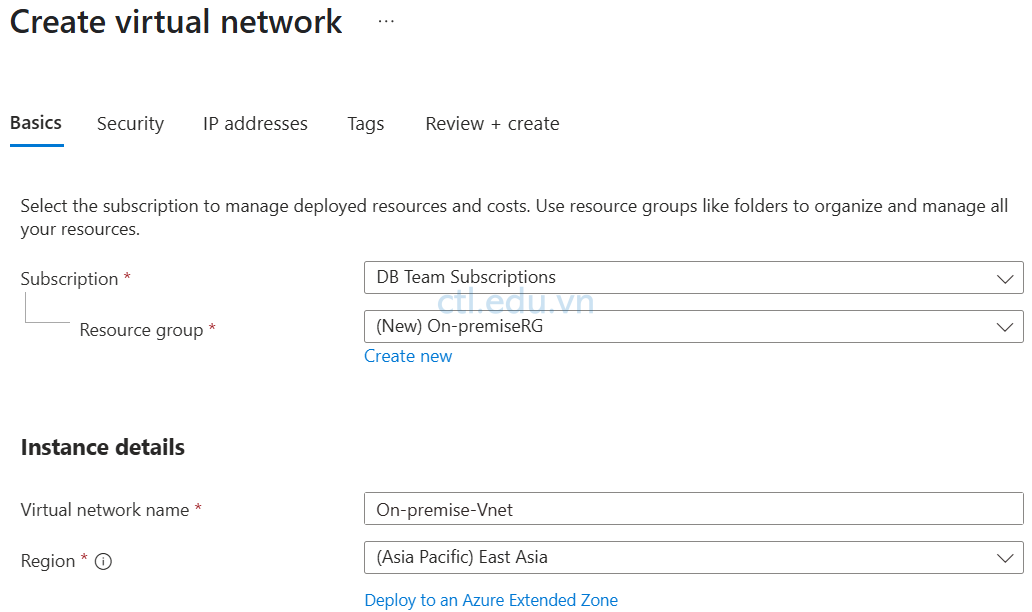
- Màn hình Create virtual network, tại tab Basic nhập các thông tin sau:
- Subscription: chọn Subscription của bạn,
- Resource group: ấn Create new, nhập vào On-premiseRG, ấn Ok
- Virtual network name: nhập vào On-premise-Vnet
- Region: Chọn East Asia
- Ấn Next, và Next
Tại Tab IP Address nhập các thông tin sau:
- Range Ip: 192.168.1.0/24
- Subnet1: 192.168.1.0/25
- Ấn Review + Create
- và ấn Create

Task 2.2 Tạo On-premises Client (Giả lập VPN Client)
- Tại Azure portal, vào menu trái chọn Virtual machines.
- Màn hình Compute infrastructure | Virtual machines, chọn Create và chọn Azure Virtual machines.
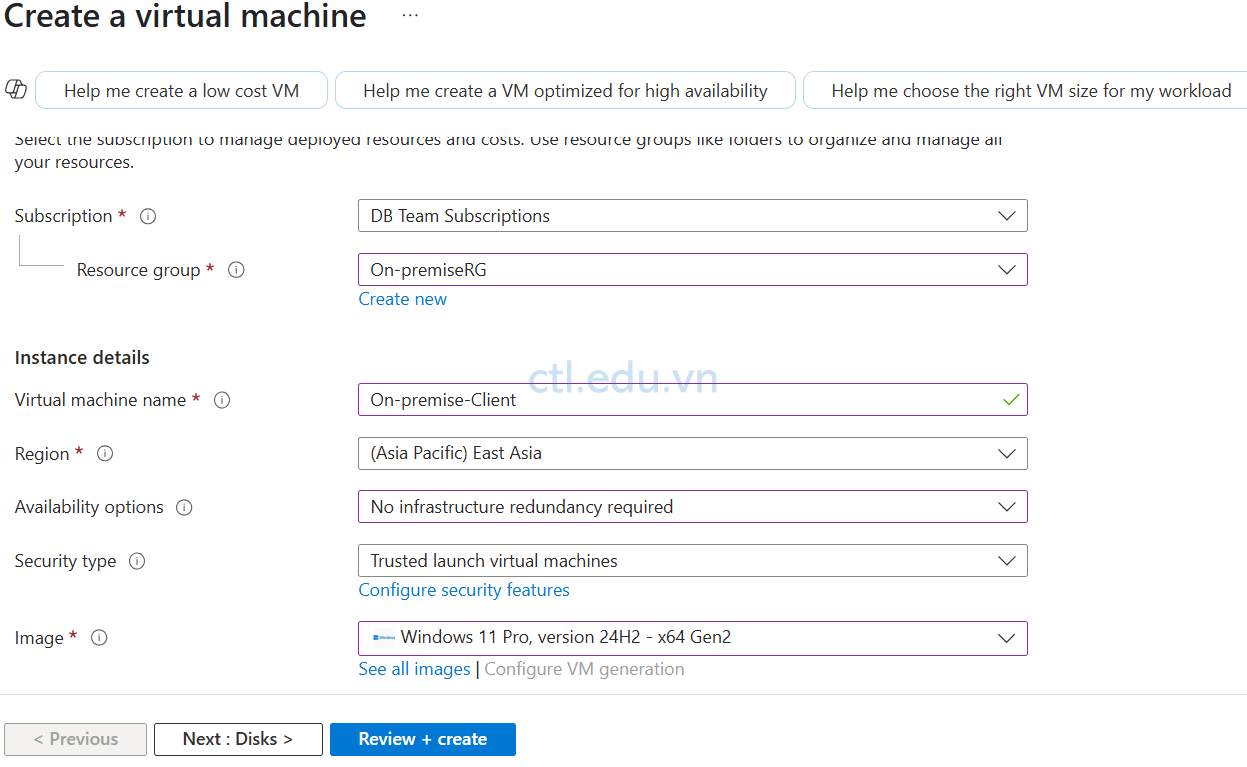
- Màn hình Create a virtual machine nhập các thông tin sau:
- Subscription: Chọn Subscription của bạn
- Resource group: chọn On-premiseRg
- Virtual machine name: nhập On-Premise-Client
- Region: East Asia
- Availability options: chọn No infrastructure redundancy required
- Image: Chọn Windows 11 Pro, version 24H2 – x64 Gen2
- Size: Standard_D4s_v5 – 4 vcpus, 16 GiB memory
- Username: admin-client
- Password: 1234567890?aA
- Confirm password: 1234567890?aA
- Public inbound ports: chọn option Allow selected ports
- Select inbound ports: RDP 3389
- Ấn Next: Disks
- Ấn Next: Networking
4. Tại tab Networking nhập các thông tin sau:
- Virtual network: chọn On-premise-Vnet
- Subnet: chọn subnet1 (192.168.1.0/25)
- Public IP: (new) On-Premise-VM-ip
- Ấn Review + Create
- Ấn Create
Task 2.3 Tạo VPN Client Connection
- Remote vào On-Premise-Client (Windows 11)
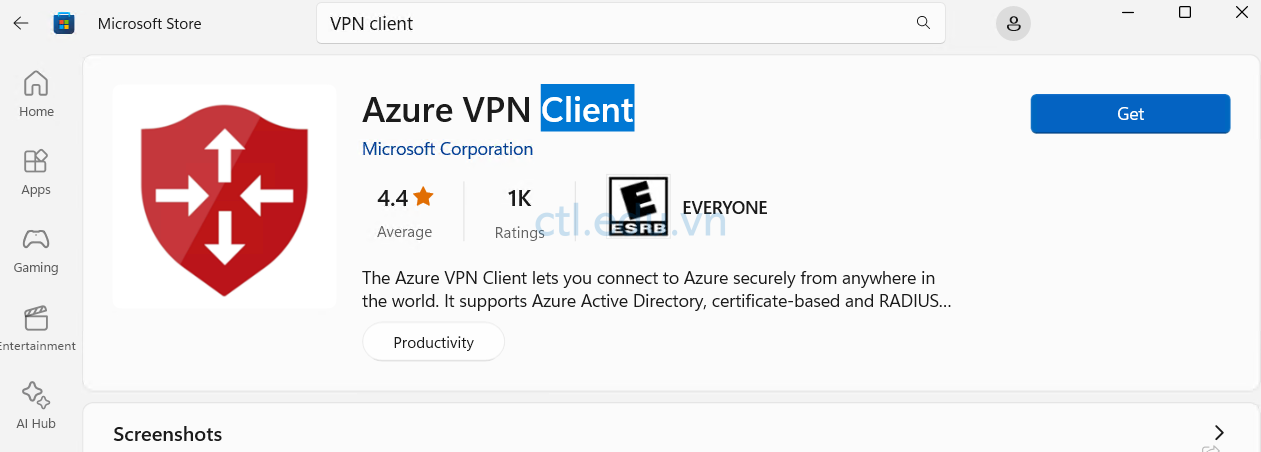
- Tại máy Windows 11, vào Microsoft Store tìm và cài app Azure VPN Client
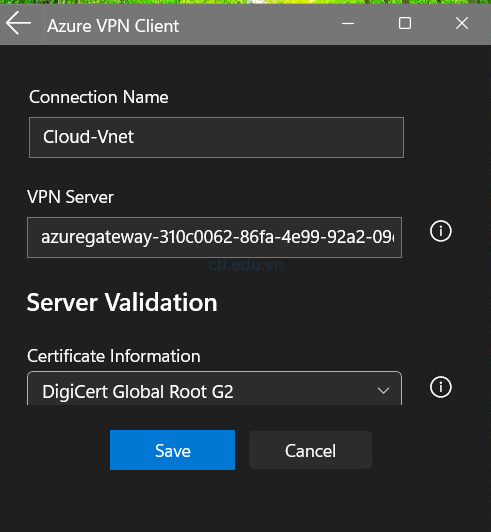
3. Copy và giải nén file Cloud-VPN-Gateway.zip vào On-Premise-Client (file bạn đã download ở bước 6 task 2)
4. Thực thi App Azure VPN Client vừa cài, ở gốc dưới bên phải chọn + Import, chọn file azurevpn\azurevpnconfig.xml
5. ấn Save
6. Tại Azure VPN Client, ấn Connect
7. Nhập vào User name và password trên Microsoft Entra ID
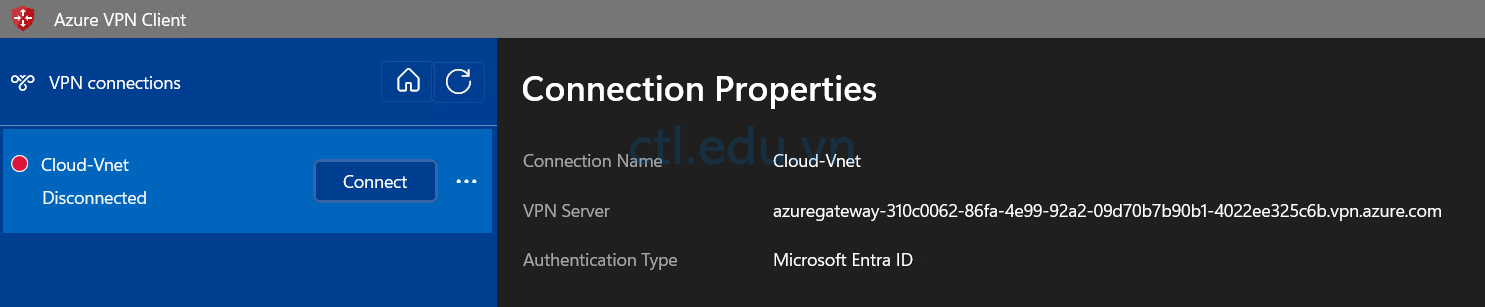
8. Chọn No, This App Only
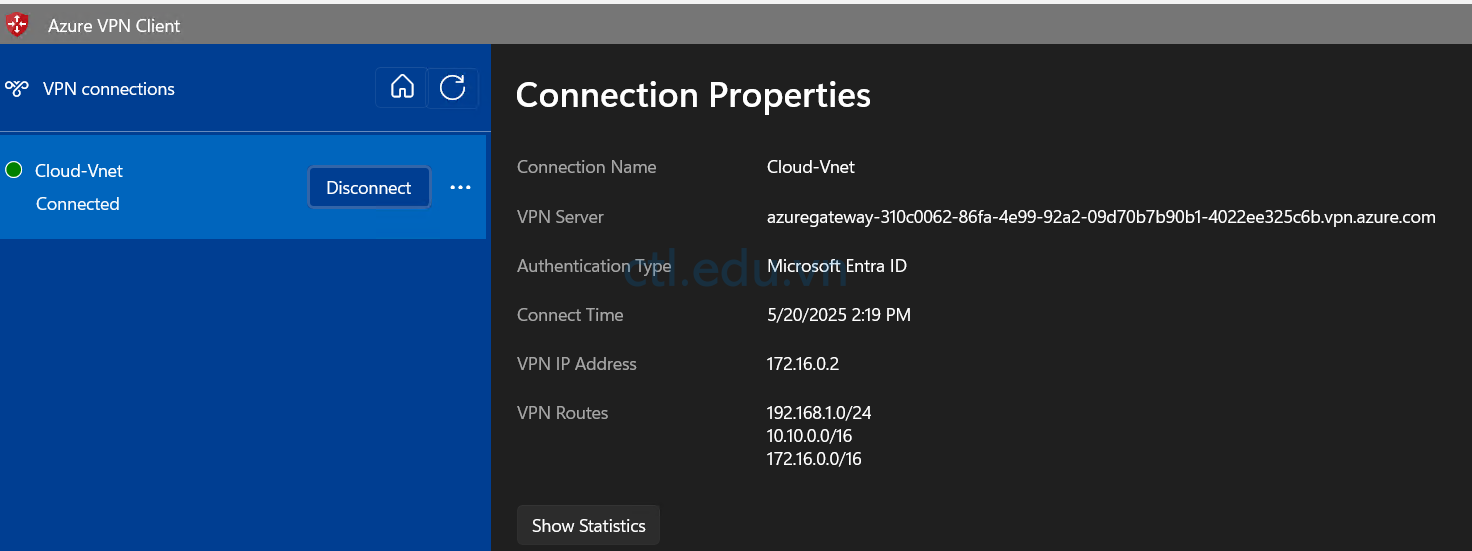
9. Kết nối VPN thành công
10. Để kiểm tra bạn có thể Remote desktop dùng IP private của máy Cloud-VM để kiểm tra kết nối thành công
Hoàn tất bài Lab