SMB over QUIC là feature mới trong Windows Server 2025, SMB over QUIC giới thiệu một giải pháp cho internet computer (External client) kết nối an toàn và tin cậy đến File Server bên trong mạng công ty mà không cần phải thực hiện VPN. Tất cả các gói tin từ internet computer đến File Server, luôn được mã hóa và quá trình bắt tay (handshake) được xác thực bằng TLS 1.3
SMB over QUIC cung cấp giải pháp “SMB VPN” dành cho người làm việc từ xa, người dùng thiết bị di động và các tổ chức có yêu cầu bảo mật cao. Tất cả lưu lượng QUIC tunnel, bao gồm cả xác thực và ủy quyền được mã hóa TLS 1.3 trên UDP port 443 thân thiện với internet thay vì TCP 445 port truyền thống.
SMB over QUIC thay thế giao thức SMB over TCP truyền thống bằng một giải pháp nhanh hơn, an toàn hơn cho việc truy cập từ xa, client computer không cần thực hiện kết nối VPN và cải thiện độ tin cậy trên internet.
SMB over QUIC là một cải tiến hiện đại của SMB protocol (Server Message Block) cho phép chia sẻ file an toàn, thân thiện. SMB over QUIC kết hợp SMB 3.1.1 với QUIC (Quick UDP Internet Connections), một giao thức truyền tải dựa trên UDP, được mã hóa TLS do Google phát triển và hiện đã được IETF (Internet Engineering Task Force) chuẩn hóa.
Để sử dụng SMB qua QUIC, bạn cần những điều sau:
- File Server (SMB): Windows Server 2022 Datacenter: Azure Edition hay tất cả phiên bản Windows Server 2025
- Internet computer (External client): Windows 11 24H2 trở lên
- Hiện tại bạn phải dùng Windows Admin Center (WAC) hay Powershell để Enable SMB Over QUIC
- File Server (SMB over QUIC) phải có certificates do Active Directory Certificate Services hay trusted third party certificate cấp. (Bài lab này Tôi dùng Certificates do Active Directory Certificate Services cấp)
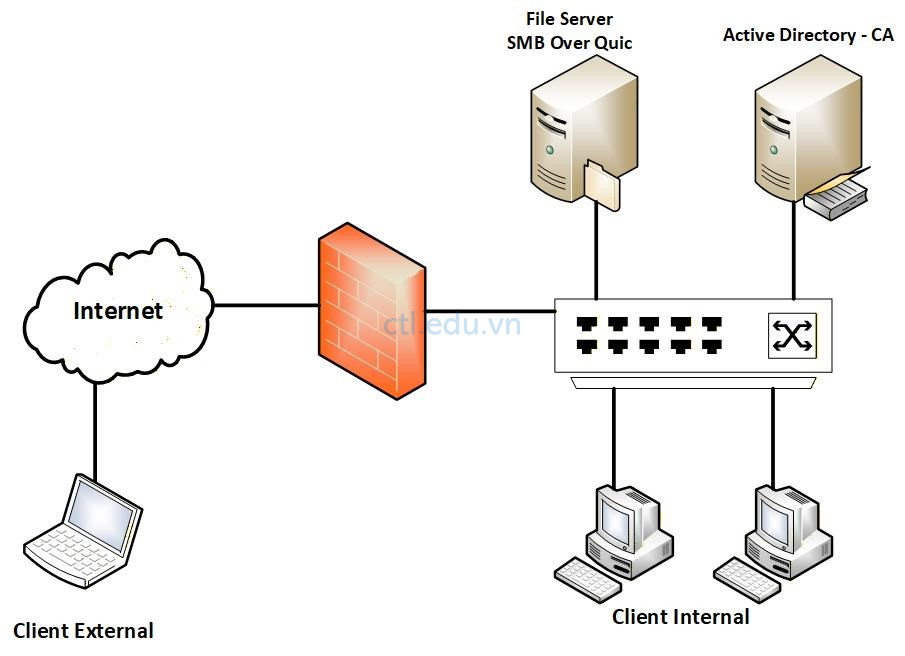
Mô hình lab gồm:
- DC01 : Domain Controller (tanloc.xyz) + Active Directory Certificate Services (Windows Server 2025)
- PC02: File Server (Member server Windows Server 2025), tạo và share Folder Data.
- PC03: External Client (Windows 11 24H2) đã join domain local
- Domain Public : Trong bài lab Tôi dùng domain ctloc.click
Bài Lab Configure SMB Over Quic With Active Directory Certificate Services gồm các bước sau:
Task 1. Tạo SMB Over Quic Certificate Template
- Cài và cấu hình mặc định Active Directory Certificate Services, trên máy DC01
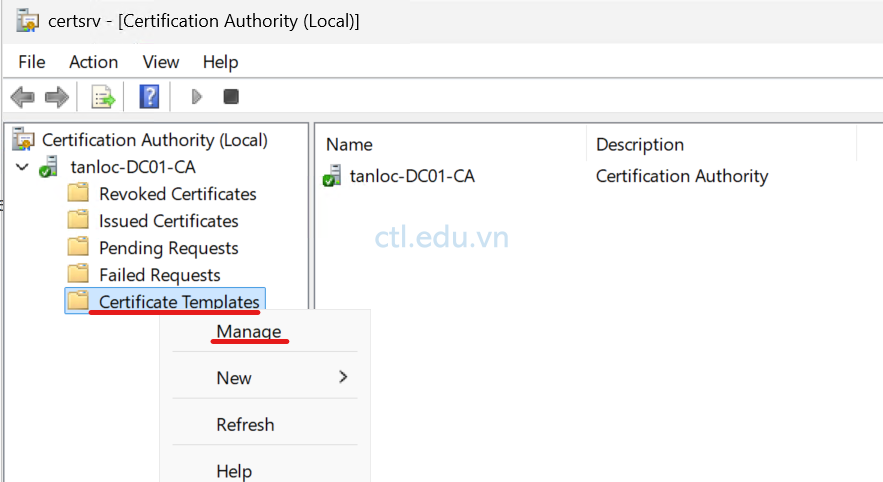
- Tại Dc01, vào Run gõ lệnh Certsrv.msc
- Màn hình Certification Authority, phải chuột vào Certificate Templates, chọn Manage
4. Tại cửa sổ Certificate Templates, phải chuột vào Computer chọn Duplicate Template

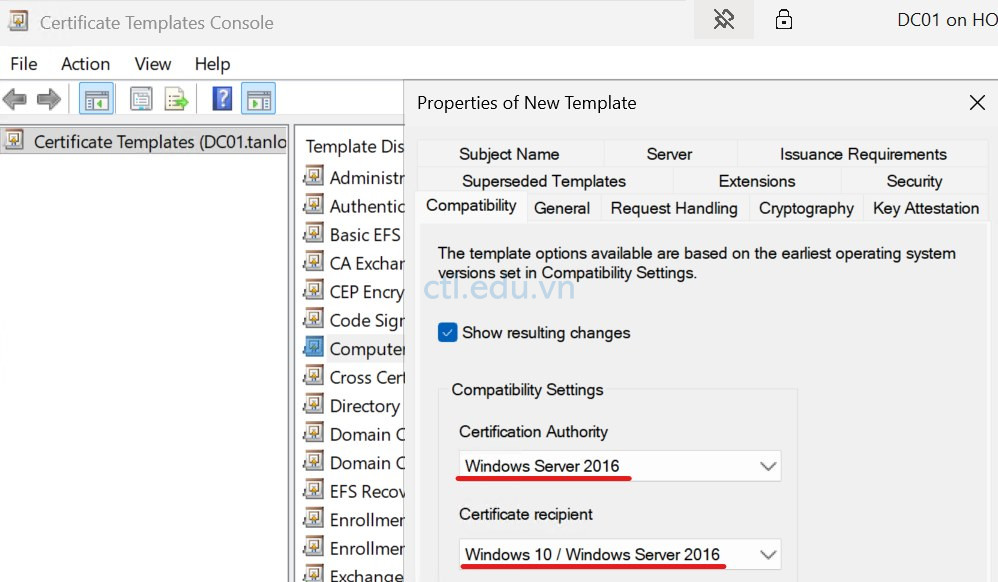
5. Tại tab Compatibility chọn các thông tin sau:
- Certification Authority: chọn Windows Server 2016
- Certificate Recipient: Chọn Windows 10/ Windows Server 2016
- Chọn tab General
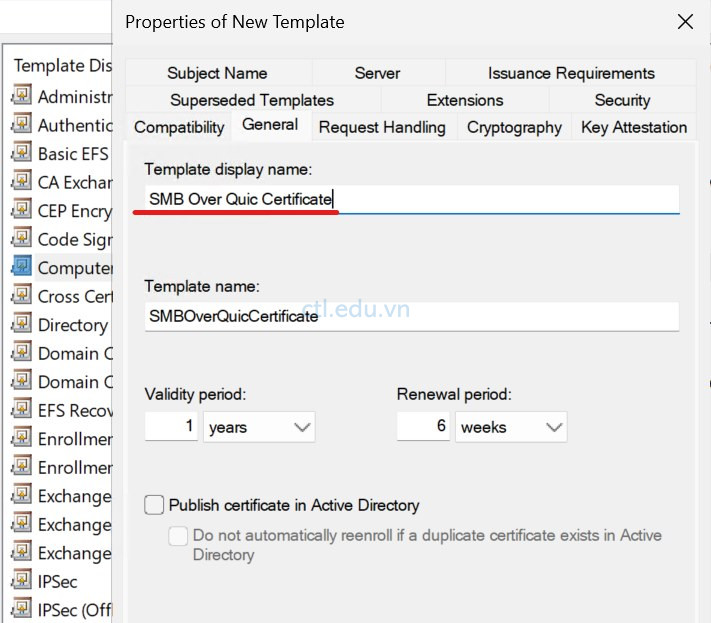
6. Tại tab General, Trong phần Template display name: nhập vào SMB Over Quic Certificate, Chọn tab Request Handling
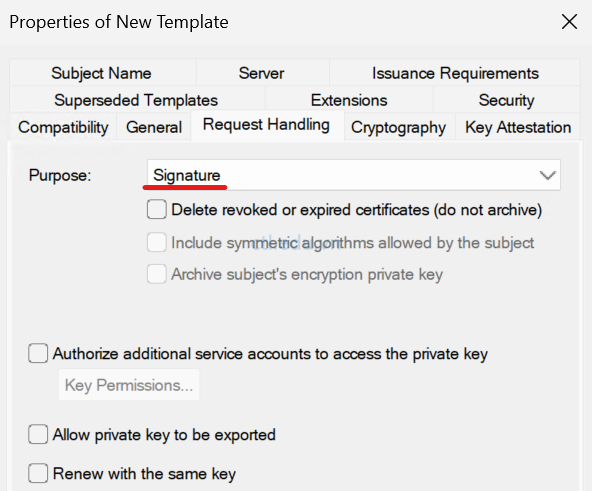
7. Tại tab Request Handling, Trong phần Purpose chọn Signature, chọn tab Cryptography
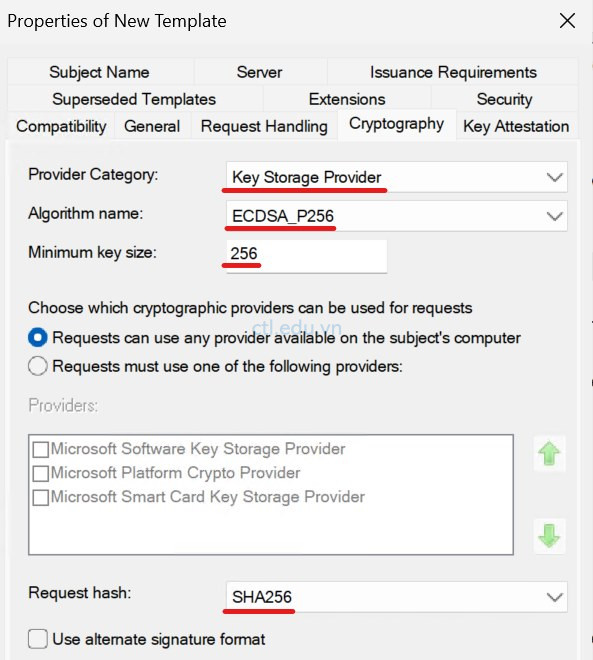
8. Tại tab Cryptography, chọn các thông tin sau:
- Provider Category: Chọn Key Storage Provider
- Algorithm name: Chọn ECDSA_P256
- Minimum key size: 265
- Request hash: Chọn SHA256
- Chọn tab Subject Name
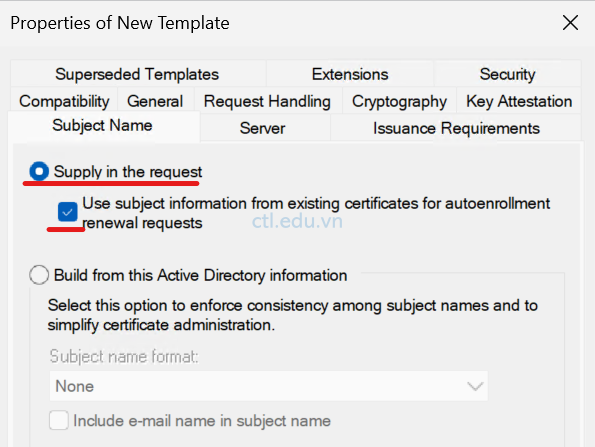
9. Tại tab Subject Name, chọn option Supply in the request, và chọn checkbox Use Subject information from…., chọn tab Extensions
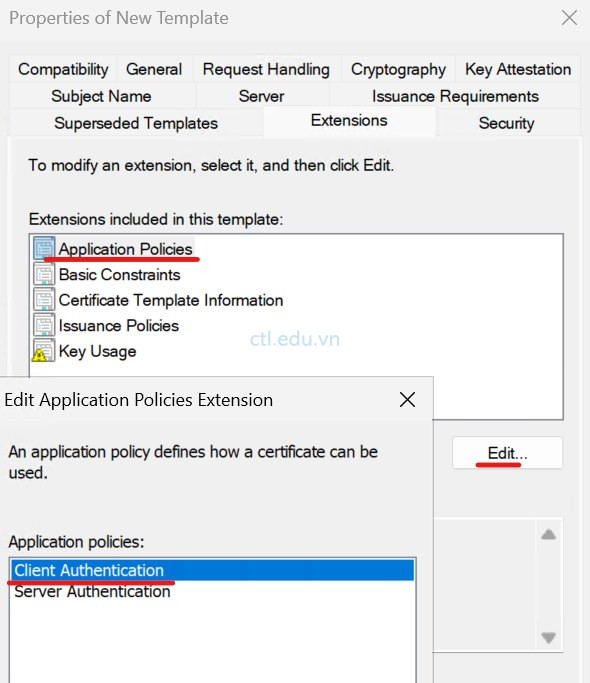
10. Tại tab Extensions, chọn Application policies ấn Edit, Chọn Client Application ấn Remove, ấn Ok, chọn tab Security.
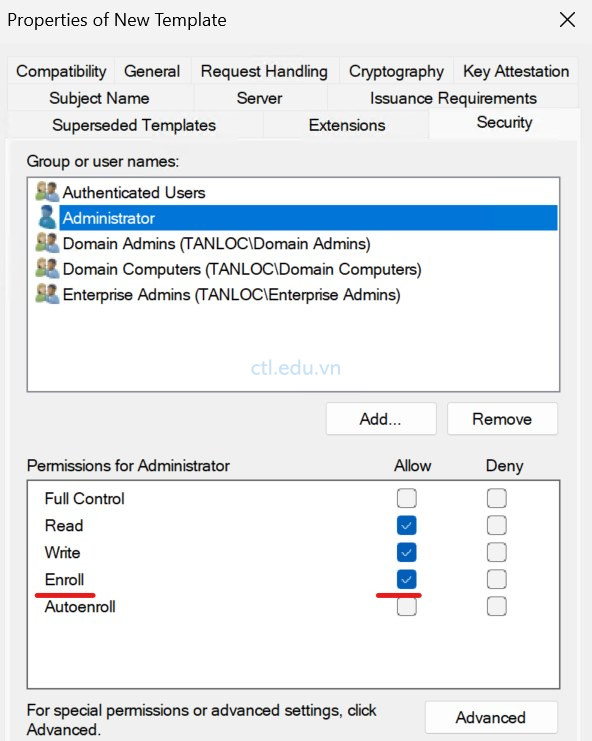
11. Tại tab Security, Chọn Administrator và check chọn quyền Allow Enroll, ấn OK. Kiểm tra đã có SMB Over Quic Certificate template, đóng cửa sổ Certificate templates
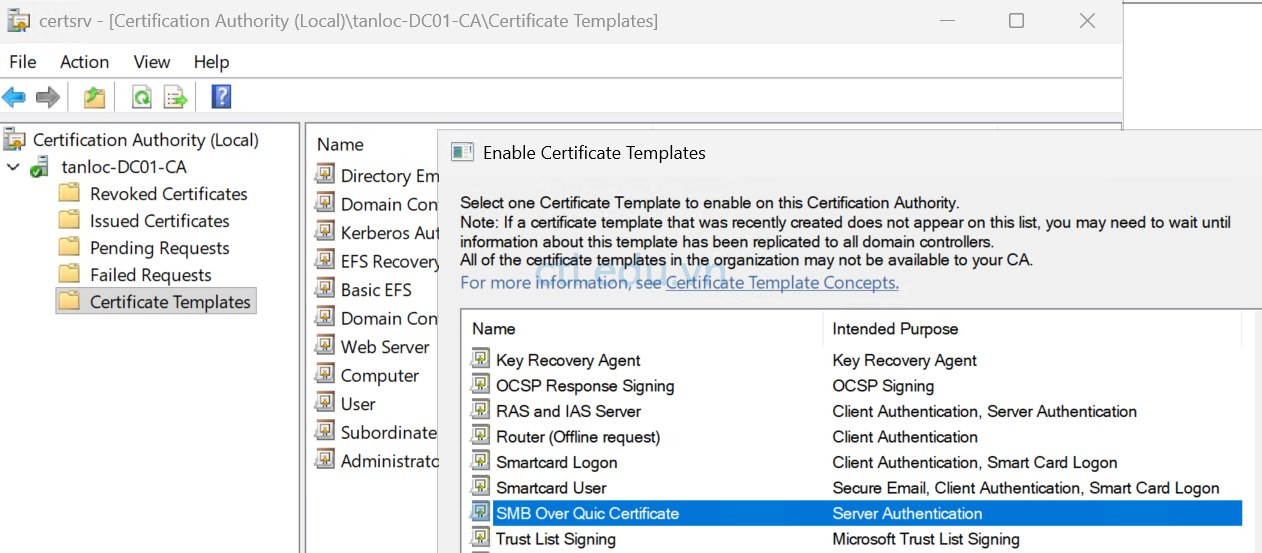
12. Trở lại Màn hình Certification Authority, phải chuột vào Certificate Templates, chọn New, Chọn Certificate Template to Issue, Chọn SMB Over Quic Certificate, ấn OK
Hoàn tất tạo SMB Over Quic Certificate template
Task 2. Yêu Cầu SMB Over Quic Certificate cho File Server
- Khởi động lại File server (PC02) để update trust root certificate từ CA (DC01)
- Logon vào File Server bằng user domain\administrator, vào run gõ lệnh MMC, vào menu File chọn Add/remove snap in, tìm và chọn Certificates ấn Add, chọn option Computer Account, ấn Next và Finish, ấn OK
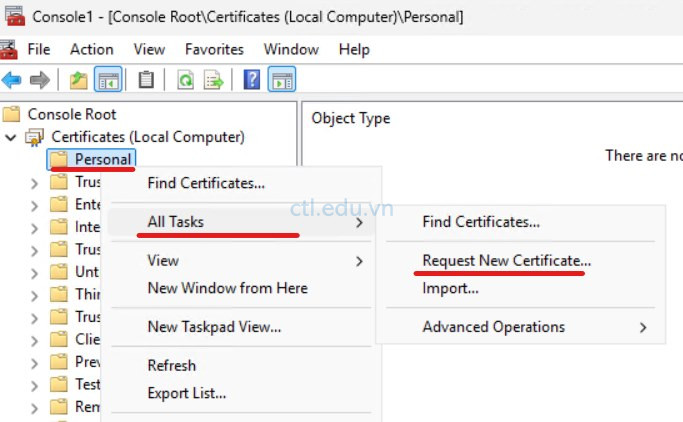
- Chọn Certificates (Local Computer), Phải chột vào Personal chọn All Tasks, chọn Request new Certificate.
4. Cửa sổ Before you begin ấn Next
5. Cửa sổ Select Certificate Enrollment policy, ấn Next
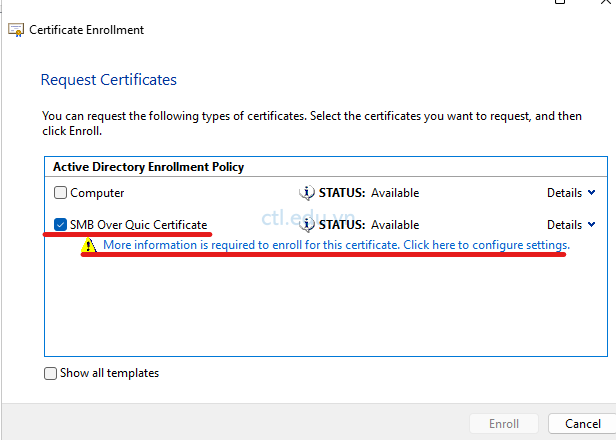
6. Cửa sổ Request Certificates, check chọn SMB Over Quic Certificate, và click vào More information is required to enroll …
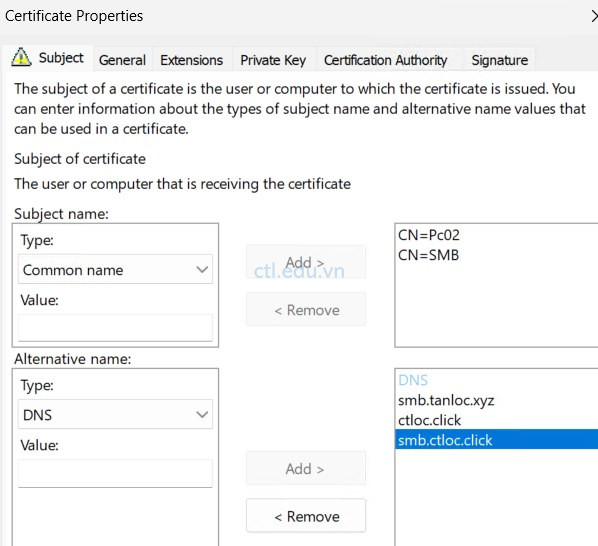
7. Tại tab Subject, trong phần Type của Subject name chọn Common Name, trong phần Value nhập vào PC02 (PCname của File server) ấn Add sang bên phải, tiếp tục trong phần Value nhập vào SMB (tên thay thế PCname của File server)ấn Add sang bên phải,
8. Trong phần Type của Alternative name chọn DNS, trong phần Value nhập vào smb.tanloc.xyz (tên thay thế của pc02) ấn Add sang bên phải. tiếp tục trong phần Value nhập vào ctloc.click (tên domain public nếu có) ấn Add sang bên phải, tiếp tục trong phần Value nhập vào smb.ctloc.click (tên thay thế của pc02 với domain public) ấn Add sang bên phải
9. Ấn OK, ấn Enroll và Finish.
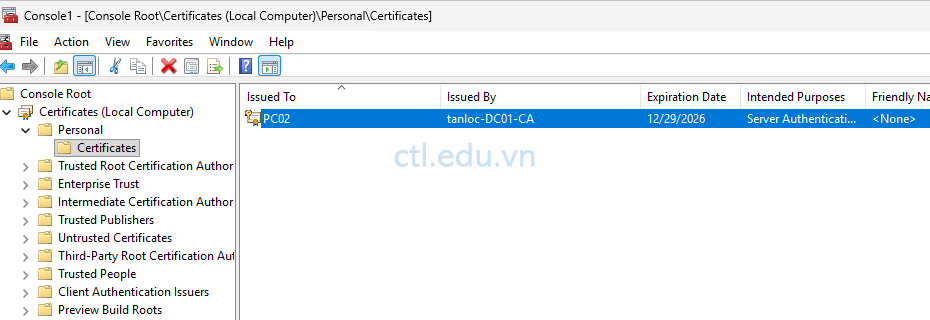
10. Chọn Certificates (Local Computer) > Personal > Certificates, quan sát thấy có certificate pc02 mới vừa request từ Active Directory Certificate Services.
Task 3. Cấu Hình SMB Over Quic dùng Windows PowerShell
- Tại File Server (PC02) vào Powershell (Run as Administrator) thực hiện lệnh sau:
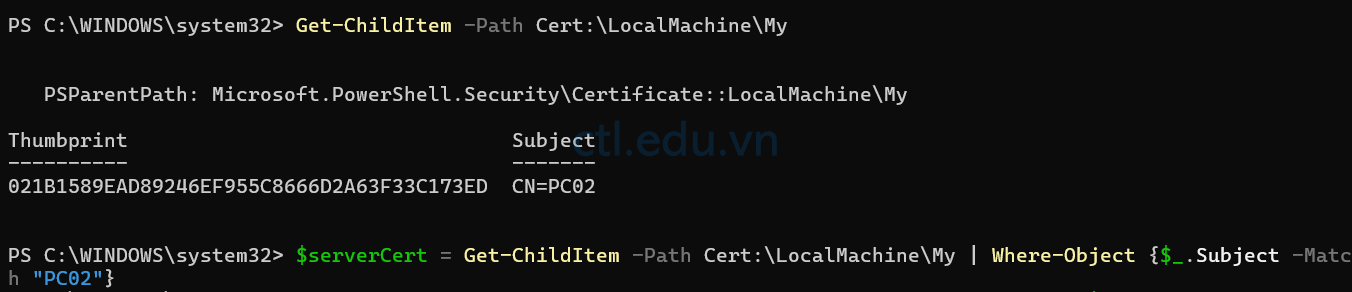
Get-ChildItem -Path Cert:\LocalMachine\My
Quan sát Subject name
2. Thực hiện tiếp lệnh sau: (thay PC02 bằng Subject name bạn quan sát từ bước 1)
$serverCert = Get-ChildItem -Path Cert:\LocalMachine\My | Where-Object {$_.Subject -Match “PC02”}
3. Thực hiện tiếp lệnh sau để cấu hình SMB Over Quic trên file server (pc02)
New-SmbServerCertificateMapping -Name smb.tanloc.xyz -ThumbPrint $serverCert.Thumbprint -Storename My

Task 4. Kiểm tra SMB Over Quic
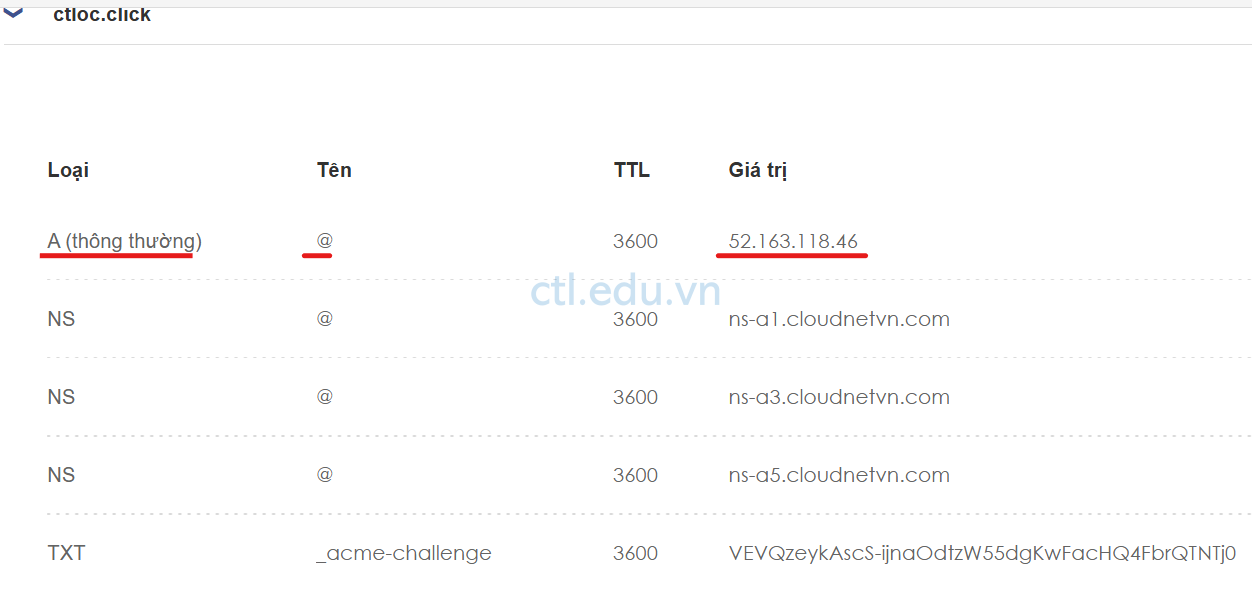
- Tại Firewall, NAT UDP port 443 vào PC02
- Vào DNS của nhà cung cấp (ISP) nơi bạn đăng ký tên miền, tạo A Record trỏ vể IP public của Firewall.
3. Tại máy Windows 11 (External Client – đã join domain) vào Run gõ lệnh CMD và thực hiện lệnh sau:
Net Use H: \\ctloc.click\data /transport:Quic
Nhập user name và password trên domain, Kiểm tra kết nối thành công.
External User không cần kết nối VPN vẫn connect vào file server trên PC02 thành công.

4. Client External cũng có thể dùng Powershell để connect đến file server trên PC02 dùng SMB over Quic
New-SmbMapping -LocalPath L: -RemotePath \\ctloc.click\data -TransportType Quic -UserName tanloc\Administrator -Password 1234567890?aA
hay lệnh:
New-PSDrive -Name “J” -Root “\\ctloc.click\data” -Persist -PSProvider “FileSystem” -scope global -Credential tanloc\administrator
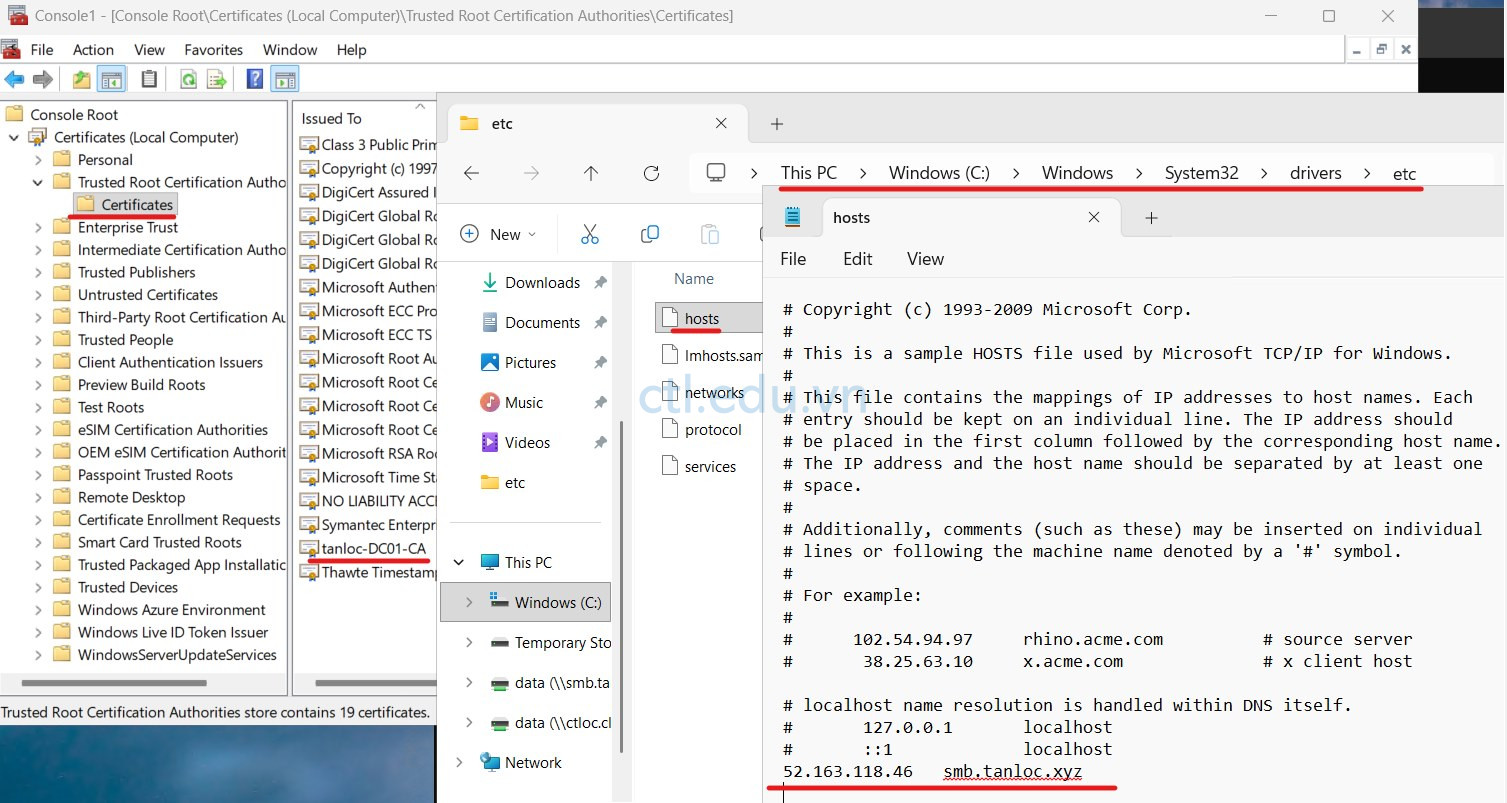
(Ghi chú: Nếu Windows 11 chưa join domain bạn phải import trust Root certificate từ DC01, và Nếu không dùng domain public bạn phải edit host file với giá trị là:
- IP public (của Firewall) smb.tanloc.xyz (tên domain local))